Users Guide
Page
Virus Disclaimer
Page
Restricted Rights Notice
Page
Contents
Chapter Discovering Nodes
Chapter List Views
Chapter Tree Views
Editing Node Class Properties
Creating Network Maps
Chapter Node Management Overview
Contents Xii
Using This Guide
Introduction
Using On-line Help
Getting Help
Getting Technical Support
Accessing On-line Documentation
Online Services on the World Wide Web
Documentation Feedback
Mailing Address
Overview NetSight Element Manager
About NetSight Element Manager
About NetSight Element Manager
Overview of NetSight Element Manager
Subnet Discovery
Network Discovery
Discover Script Capability
Scheduled Discovery
IP or Host Locator
Secondary Discover and Discover Reset
Management and Monitoring Workspace
Automatic Creation of the Node Database
List Views
Multiple List Views
Customizable Node Properties
List View Workspace
Detailed Node Information
Tree Views
Overview of NetSight Element Manager
Map Views
Sample Map View Workspace and Map Window
Excluding Nodes
Log Views
Alarm and Event Handling
NetSight Element Manager Tool Suite
Remote Administration Tools
Scheduler Tool
Adjusting Default Settings
Customizing NetSight Element Manager
MIB Tools
Show Tooltips
Workspace Options
Show Splash window at startup
Autofill IP address fields
Network Options
Autofill Community Name fields
Confirm Shutdown
Community Name
To set the default community name
IP Address Autofill
Address Mask
Polling Options
Node Polling
Interval sec
Packets
Default Poll Settings
Node Options
Timeout sec
Retries
Directories Options
Map files
Data files
Exported files
Log files
Executable files
Device Management Options
Chassis Manager Settings
Event Log Options
Poll Rate
Clear normal and informational events hourly
Clear deleted events hourly
Clear acknowledged and closed events hourly
Set log size
Customizing the Toolbar
Adding a Tool Entry
Overview of NetSight Element Manager
15. Select Image Window
Backing Up Data Files
Editing a Tool Entry
Removing a Tool Entry
Overview of NetSight Element Manager
Overview of NetSight Element Manager
Editing the Backup Configuration File
17. Sample NetSight Element Manager Backup Configuration
Performing a Backup
18. Select Backup Directory Window
Restoring Files from a Backup Set
Restoring Default Files
Overview of NetSight Element Manager Backing Up Data Files
Accessing the Discover Manager Window
Discovering Nodes
Accessing the Discover Properties Window
Creating and Modifying Discover Scripts
To create a new Discover script
To modify an existing Discover script
Discover Properties Window
Setting General Discover Properties
General Page of the Discover Properties Window
Setting Device Discovery Parameters
Device Page of the Discover Properties Window
Defining IP Address Ranges
Address Range Properties window -5 opens
Defining and Selecting Subnets
Subnet Page of the Subnet Properties Window
Discovering Nodes
General Page of the Subnet Properties Window
Defining a Community Name
Community Name Properties window -8 opens
Selecting a Script Filter
Script Filter Options
Setting a Discover Interval
Executing Discover Scripts
10. The Schedule Page of the Discover Properties Window
Discovering Nodes
Discover Process
NEW and Secondary Discovers
Stopping a Discover in Progress
Restarting a Completed Discover
Deleting a Discover Script
Scheduled Discovers
Using the IP or Host Locator Tool
Starting the Discover Wizard
Launching the Scheduler Application
Matching a Host Name to an IP Address
Click the IP or Host Locator button
Matching an IP Address to a Host Name
Locating the MAC Address for a Host Name/IP Pair
Subnet Search
Discovering Nodes
Discovering Nodes
Matching a MAC Address to a Host Name and IP
18. MAC Search Window
19. Find MAC Address Search
Using the Subnets Window
Creating and Modifying a Subnet Entry
Deleting a Subnet Entry
Discovering Nodes Using the Subnets Window
About List Views
List View Workspace
List Views
Adding a Folder to the Workspace
All Nodes List View
Renaming a Folder
Other Default List Views
Class Views
Device Views
Using the List View Toolbar
List View Display Options
Enterprise Views
Sorting Nodes
Searching a List View
To access the Find window
List Views
Creating and Editing List Views
Selecting Node Information to
Selecting Node Information to Display
Node Information Options
Status
Logical Address
Name
Label
Physical Address
Selecting a Display Font
Selecting the Nodes to Display Using Filters
Status Groups
Filter Categories
Subnets
Enterprises
PBX
Excluded Nodes
Excluding Nodes from an Individual View
Creating the Filter
11. The Individual View Excluded Nodes List
To Exclude a Node from a View
12. The Node Delete Window
To Re-include a Node in a View
13. Re-including Nodes Excluded from a View
Excluding Nodes from the Central Node Database
Excluded Nodes List and Discover
To Exclude a Node from the Central Node Database
15. The Node Delete Window
To Re-include a Node into the Central Node Database
To Delete a Node from the Database
Adding Network Elements to the Node Database
17. The Node Delete Window
Adding a Device
18. Displaying the Pop-up Menu
19. The Insert Device Window
Editing Device Properties
General Properties
Device Properties
Interfaces
Is contacted. See Configuring Node Interface Poll Settings
Class Properties
24. Class Properties
Configuring Node Interface Poll Settings
Default polled interface will display a Method value
Editing Poll Settings for Multiple Nodes
Editing Node Class Properties
28. The Node Class Properties Window
Selecting a New Model, Class, Enterprise, or Topology Symbol
29. Default Symbol Sets
Changing Management Application Information
Choosing a Command Executable File
30. The Browse Executables Window
Building an Argument List
31. The Build Window
List Views
Selecting a Working Directory
Changing General Node Class Properties
List Views
List Views and Maps
Selecting and Deleting Orphans
Using the Go To Map Function
List Views List Views and Maps
Tree Views
About Tree Views
Tree View Workspace
Adding a New Folder to the Tree View Workspace
All Nodes Tree View
Other Default Tree Views
Using the Toolbar and the View Menu
Navigating a Tree View
Using the Keyboard
Tree View Toolbar
Creating and Editing Tree Views
New Tree View Window
To edit an existing tree view
Node Properties Options
Description
Address
DLM Status Group
Interface Properties Options
List Views
View Filter Window
Status Groups
Creating the Filter
Tree Views and Maps
Tree Views and Maps
Tree Views Tree Views and Maps
Creating Network Maps
Working with Maps
About the Map View
About Submap Icons
Building a Map Hierarchy
About GoTo Symbols
Map and Device Status Conditions
Icon represented by a question mark one with which no IP
Building Your Network Map
Adding a Folder
Adding a New Map
TIP Submap, page 6-13, or Adding a GoTo Symbol,
Setting Basic Map Options
Selecting a Background Color or Image
Color Window Expanded with Custom Colors
Setting a Background Grid
Setting Print Options for the Map
Setting the Icon Label Font
Editing Map Properties
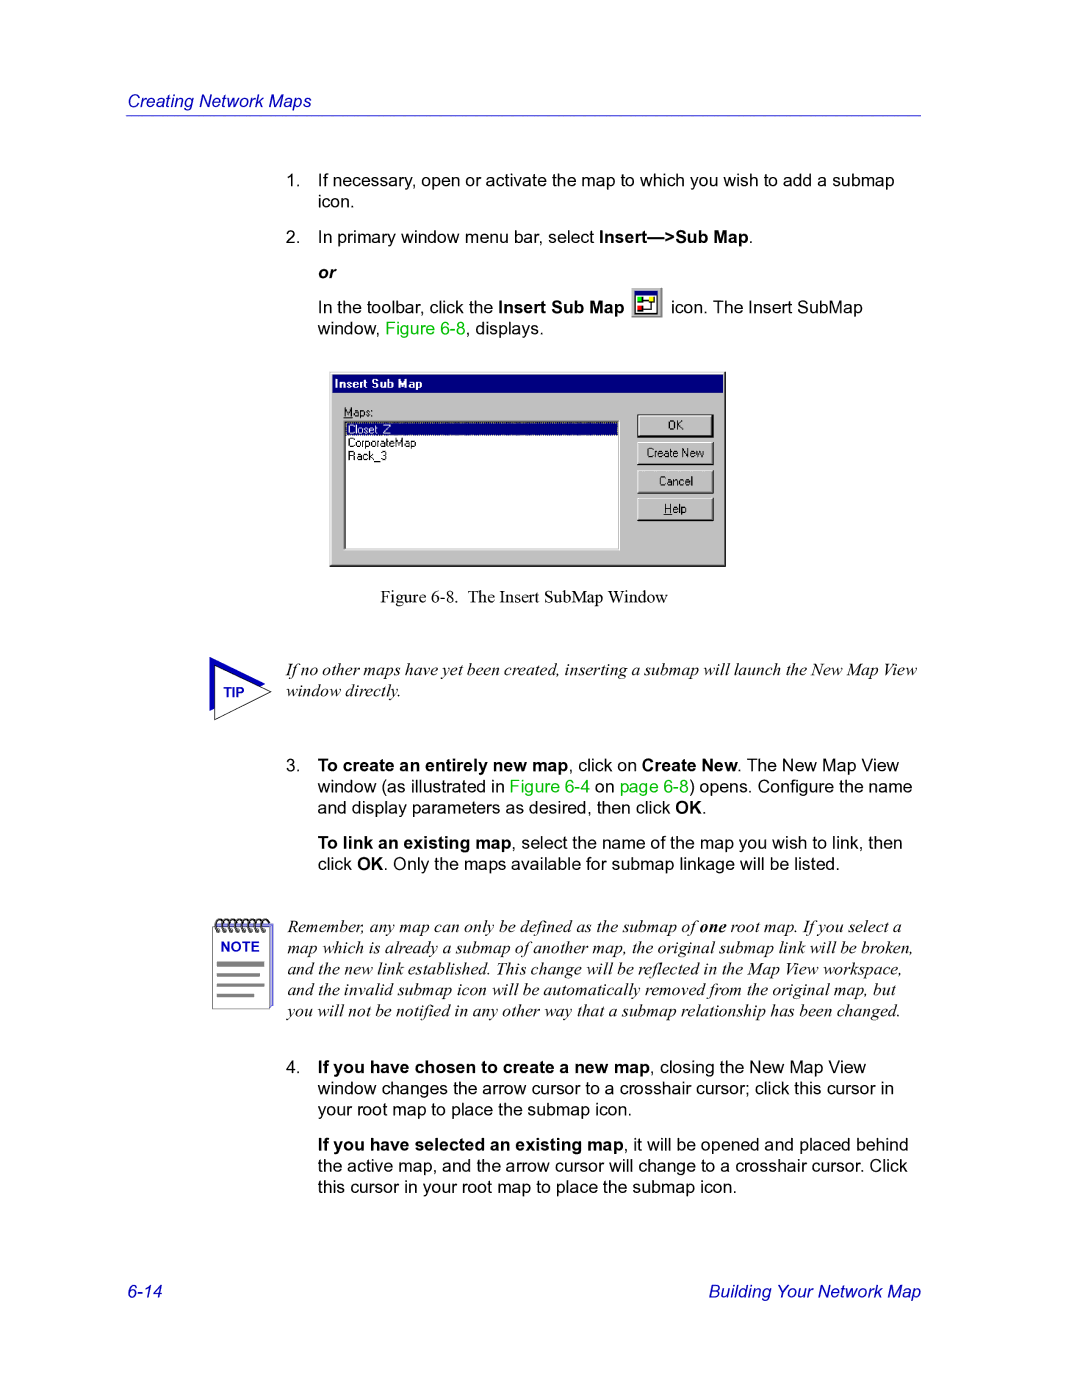
Adding a Submap
Insert SubMap Window
Generating Submaps Automatically
Subnet Mapping Window
10. Renaming a Submap
11. Automatically Created Submaps
Changing a Submap Link
Adding a GoTo Symbol
12. The Insert Map GoTo Window
Creating Network Maps
Setting MRM Import Options
Importing an MRM Map
Importing a Map
13. Importing MRM Maps Options
15. MRM Import Progress Indicator
Adding Network Elements to your Map
Adding a Device Directly to a Map
Insert Device window, -17, opens
18. Device Timeout Windows
Customizing Your Map
Using Non-manageable Symbols
Placing a Symbol Icon
21. Select Symbol Window
Editing Symbol Properties
Editing Individual Symbol Properties
Editing the Symbol Database
23. Select Symbol Window
24. Global Symbol Properties Window
Creating a New Symbol
25. New Symbol Window
Using Connections
Using Lines and Shapes
Creating Network Maps
26. Line and Shape Properties To specify Line Properties
Using Text
27. Font Properties
Adding Object Notes
TIP Adding Notes to Multiple Nodes,
28. Object Notes Window
29. Entering an Object Note via the Properties Window
Changing the Layout of Map Objects
Adding Notes to Multiple Nodes
Layering Items in a Map
Align Left, Right, Top, or Bottom
Space Evenly Horizontally or Vertically
Make Same Width, Height, or Size
Align Objects in Grid
Align Objects in Ring
Using Object Linking and Embedding OLE
30. The Ring Spacing Window
Creating Network Maps
Embedding an Object in a Map File
31. Sample Insert Object Window Create New Selected
32. Sample Change Icon Window
Creating Network Maps
Creating an Object Link
Adding an Object Package
34. Sample Object Packager Window
Editing Object Data
Updating a Link
Links
Type
Converting an Object
36. Sample Convert Window
Working with Linked and Embedded Objects
Editing Your Map
Creating Network Maps
Protecting Your Maps from Editing The Lock Feature
Managing Maps and Folders
Opening and Closing Maps and Folders
Saving Maps
Deleting Maps and Folders
Creating Network Maps
Creating Network Maps Managing Maps and Folders
Device Management
Launching Device Management
Brief Overview of Device Management
Node Management Overview
Node Management Overview
Source Address Naming
00001d027f18 Bill’s PC 486-66 Acme Super PC
2displays a sample ENETADDR.DEF file
Accessing the Ping Window
Ping
Successful ping, and one which has timed out
Ping
Using the AddTool Utility
Menu Text
Hint Text
Arguments
Command
Bubble Text
Working Directory
Comma-Separated Variable CSV Format
Creating an Add Tool Input File
Large Image File
CSV Sample File
Executing the AddTool Command
Tag/Data Sample File
Using the AddImage Utility
Image Type
Image Name
Creating an AddImage Input File
Image Identifier
Tag/Data Format
Executing the AddImage Command
Using the AddDevType Utility
SysObjectID
Management Module
Management Arguments
Creating an AddDevType Input File
Executing the AddDevType Command
Viewing the Log File
Page
Symbols
Index
Index-16
Index-17
Index-18