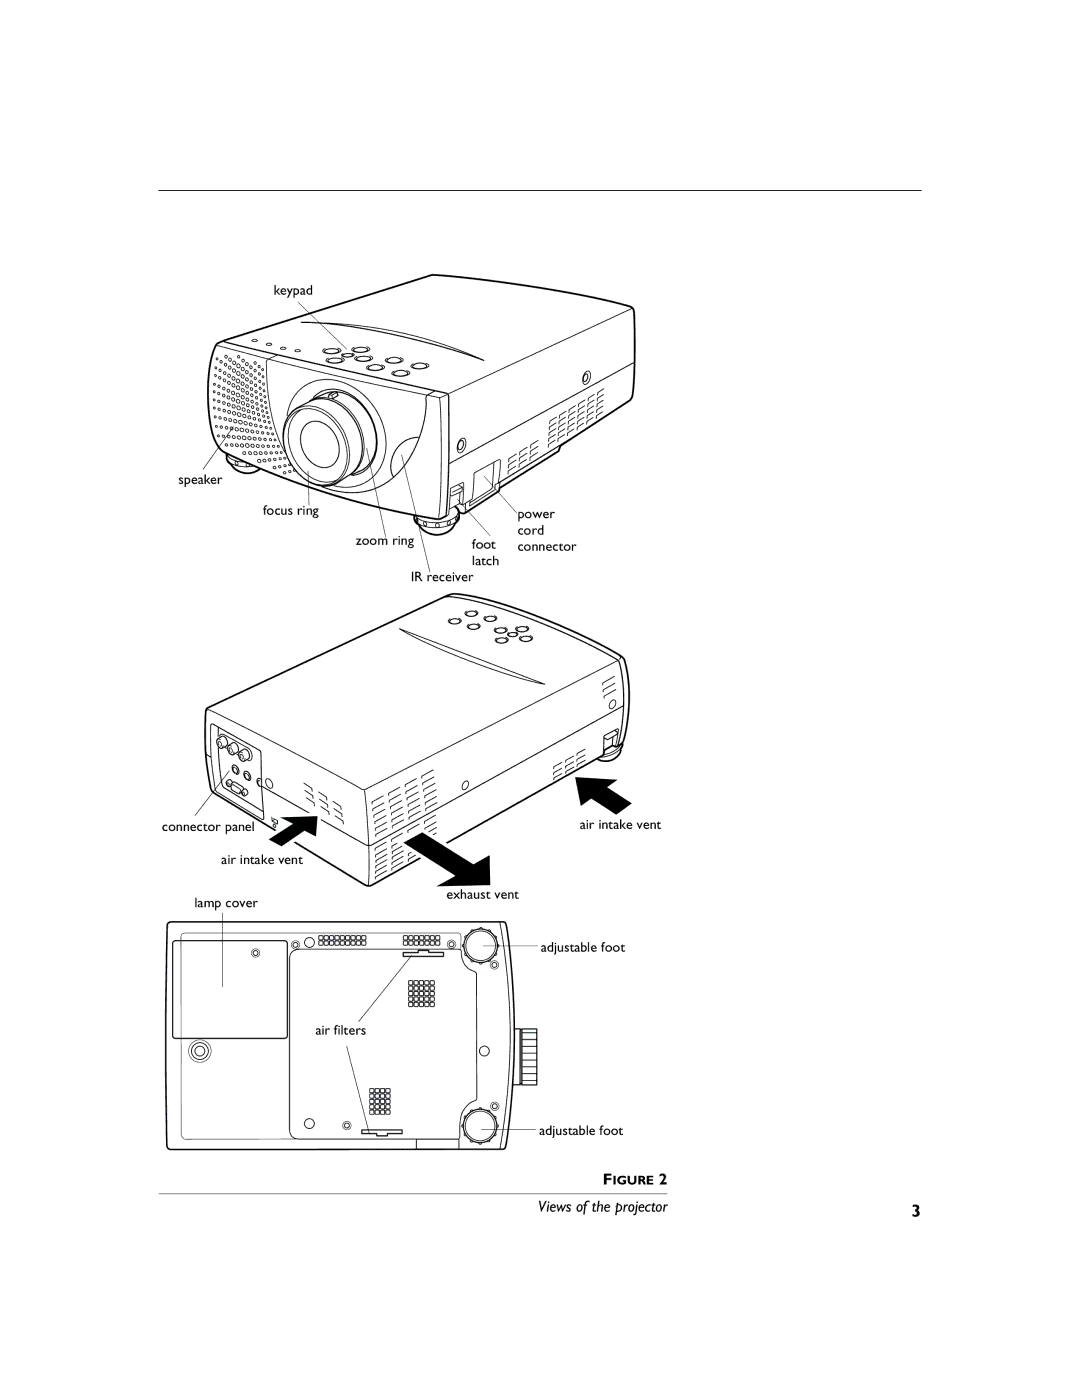
Contents
G U I D E
U S E R ’ S
Wilsonville, Oregon. All rights reserved
Copyright 2000 by InFocus Corporation
EN 55022 Warning
Safety Certifications
FCC Warning
Canada
Australian Certification C-tick mark Trademarks
Declaration of Conformity
Using the Projector
TABLE OF CONTENTS
Safety Instructions
Setting up the Projector
C o n t e n t s
T a b l e
Warning Hot surface. Do not touch
SAFETY INSTRUCTIONS
Or, send us an e-mail at techsupport@infocus.com
Unpacking the Projector
Image Resolution
INTRODUCTION
Compatibility
I n t r o d u c t i o n
Shipping box contents
air intake vent exhaust vent adjustable foot
keypad speaker focus ring connector panel air intake vent lamp cover
power
foot connector
If You Need Assistance
Warranty
Usage Guidelines
SETTING UP THE PROJECTOR
S-video
reset audio OUT AV
Connector panel
video
Connecting a Computer
Connecting a Video Player
Powering up the Projector and Adjusting the Image
Turning Off the Projector
Adjusting the Image
USING THE PROJECTOR
The message “Keystone” appears
Remote range
Using the Remote Control
select button
Remote control
point button
Select button
Using the Keypad and Remote Buttons
Power
Point button 1 button on remote, 4 buttons on keypad
This allows you to zoom a computer image. See page 25 for details
Computer menus
Using the On-Screen Menus
System Menu
Computer Adjustments
PC Adjustment
The number of vertical lines
Select On to resize the image with a 4x3 aspect ratio
Image Menu
1 Select Auto Image in the menu The “Auto Adjust Image” menu appears
1 Select the Position menu The “Position” menu appears
Position menu
You can move the image up, down, left and right using this menu
2 Use the point buttons to adjust the position
Screen menu
Video Source menu
Video Adjustments
PAL/SECAM/NTSC/NTSC4.43/PAL-M/PAL-N
Video System menu
When the video signal is from the Video or S-Video jack Auto
t h e
When the video signal is from the Y, Pb/Cb, Pr/Cr jacks
Component Video Signal Format
U s i n g
The “Video Screen” menu appears
Screen menu
Image Menu
The “Image Adjustments” menu appears
The contrast controls the degree of difference between the lightest and darkest parts of the picture. Adjusting the contrast changes the amount of black and white in the image. Press the point left button to decrease the contrast, press the point right button to increase the contrast, making the blacks appear blacker and the whites appear whiter
Setting menu
Ceiling
Power Management
NOTE The Power Management feature is On by default
Display
Language menu
Cleaning the Fan Intake Filters
MAINTENANCE & TROUBLESHOOTING
Cleaning the Lens
T r o u b l e s h o o t i n g
Replacing the Projection Lamp
M a i n t e n a n c e
lamp cover
Removing the lamp cover
Removing the lamp module
Replacing the Batteries in the Remote Control
Problem Only the start-up screen displays
Troubleshooting Problem The projector is not running
Problem Image is too wide or narrow for screen
Problem Color or text not being projected
Problem The screen resolution is not right
Problem Image isn’t centered on the screen
Problem Lamp seems to be getting dimmer
Problem the projector displays vertical lines, “bleeding” or spots
Problem no sound
Problem Image is “noisy” or streaked
the projector’s serial number located on the projector’s label
Weight
APPENDIX Specifications
Temperature
Dimensions
A p p e n d i
Accessories
Standard Accessories
NOTE Use only InFocus approved accessories. Other
InFocus Catalog Sales at
Optional Accessories
NOTE You can purchase these items by contacting your dealer or
Portable and Laptop Activation Chart
Computer
Key command to
Key command to
mode/? for setup option
Computer
Key command to
Key command to
A p p e n d i
activate port
Key command to
Key command to
Computer
Computer
Key command to
Key command to
A p p e n d i
Using Video Mirroring with a PowerBook Computer
A p p e n d i
INDEX
I n d e
DISCLAIMER OF UNSTATED WARRANTIES
LIMITED WARRANTY
WARRANTY LIMITATION AND EXCLUSION
Part Number
LIMITATION OF LIABILITY