ENGLISH
中文
‰∑¬
ELECTRICAL CONNECTIONS | 電路連接 | °“√‡™◊ËÕ¡µËÕ‰øøÈ“ |
To prevent short circuits, we recommend that you disconnect the battery’s negative terminal and make all electrical connections before installing the unit. If you are not sure how to install this unit correctly, have it installed by a qualified technician.
Note:
This unit is designed to operate on 12 V DC, NEGATIVE ground electrical systems. If your vehicle does not have this system, a voltage inverter is required, which can be purchased at JVC car audio dealers.
為防止短路,建議在安裝本機之前,斷開電池的負極,並把所有 電路都連接好。如果您不能確定如何正確地安裝本機,應請合格 的技術人員來安裝。
注意︰
本機僅可使用直流 12 V 、負極接地的電源系統。如果您的車輛 沒有這一電源系統,則需要一個電壓變換器,可以在 JVC 汽車音 響分銷商處買到。
•把保險絲更換為額定負荷值的保險絲。如果保險絲經常燒壞, 請向 JVC 汽車音響分銷商詢問。
À¡“¬‡Àµÿ:
«·∑π®”ÀπË“¬‡§√◊ËÕ߇ ¬ß√∂¬πµÏ¬’ËÀÈÕ’JVC
•‡ª≈’ˬπø‘«
«·∑π®”ÀπË“¬‡§√◊ËÕ߇ ¬ß√∂¬πµÏ¬’ËÀÈÕ’JVC
•Replace the fuse with one of the specified ratings. If the fuse blows frequently, consult your JVC car audio dealer.
Typical Connections / 典型連接 /
Before connecting: Check the wiring in the vehicle carefully. Incorrect connection may cause serious damage to this unit. The leads of the power cord and those of the connector from the car body may be different in color.
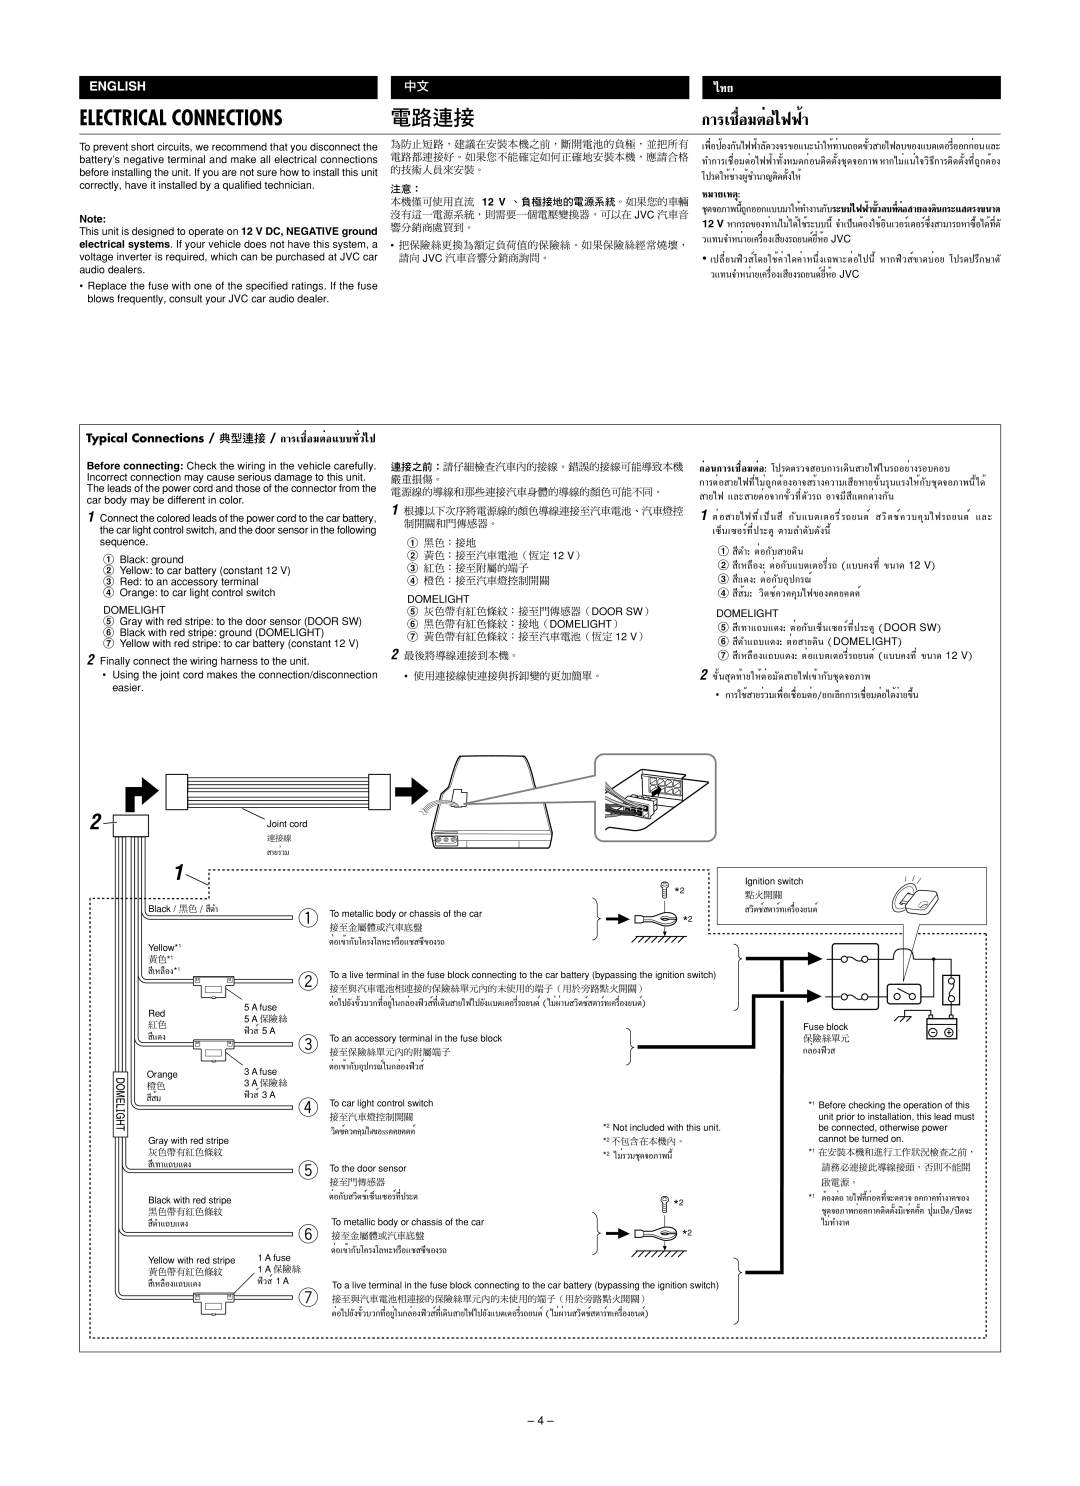
1Connect the colored leads of the power cord to the car battery, the car light control switch, and the door sensor in the following sequence.
1Black: ground
2Yellow: to car battery (constant 12 V)
3Red: to an accessory terminal
4Orange: to car light control switch
DOMELIGHT
5Gray with red stripe: to the door sensor (DOOR SW)
6Black with red stripe: ground (DOMELIGHT)
7Yellow with red stripe: to car battery (constant 12 V)
2Finally connect the wiring harness to the unit.
•Using the joint cord makes the connection/disconnection easier.
連接之前:請仔細檢查汽車內的接線。錯誤的接線可能導致本機 | °ËÕπ°“√‡™◊ËÕ¡µËÕ: ‚ª√¥µ√«® Õ∫°“√‡¥‘𠓬‰ø„π√∂լ˓ß√Õ∫§Õ∫ | |||
嚴重損傷。 | °“√µËÕ | “¬‰ø∑’ˉ¡Ë∂Ÿ°µÈÕßÕ“® √ȓߧ«“¡‡ | ||
電源線的導線和那些連接汽車身體的導線的顏色可能不同。 | “¬‰ø ·≈– | |||
1 根據以下次序將電源線的顏色導線連接至汽車電池、汽車燈控 | ||||
1 µËÕ | “¬‰ø∑’ˇªÁπ ’ | |||
制開關和門傳感器。 | ||||
1 | 黑色:接地 | |||
1 | ’¥”: | |||
2 | 黃色:接至汽車電池(恆定 12 V) | |||
3 | 紅色:接至附屬的端子 | 2 | ’‡À≈◊Õß: | |
4 | 橙色:接至汽車燈控制開關 | 3 | ’·¥ß: | |
DOMELIGHT | 4 | ’ È¡: †«‘µ´Ï§«•§ÿ¡‰ø¢Õß••¬•µ•Ï | ||
|
| |||
5 | 灰色帶有紅色條紋:接至門傳感器(DOOR SW) | DOMELIGHT | ||
6 | 黑色帶有紅色條紋:接地(DOMELIGHT) | 5 | ’‡∑“·∂∫·¥ß: | |
7 | 黃色帶有紅色條紋:接至汽車電池(恆定 12 V) | |||
6 | ’¥”·∂∫·¥ß: µËÕ “¬¥‘π (DOMELIGHT) | |||
2 最後將導線連接到本機。 | 7 | ’‡À≈◊Õß·∂∫·¥ß: µËÕ·∫µ‡µÕ√’Ë√∂¬πµÏ(·∫∫§ß∑’Ë¢π“¥ 12 V) | ||
• 使用連接線使連接與拆卸變的更加簡單。 | 2 |
| ||
|
| • °“√„™È “¬√Ë«¡‡æ◊ËÕ‡™◊ËÕ¡µËÕ/¬°‡≈‘°°“√‡™◊ËÕ¡µËÕ‰¥ÈßË“¬¢÷Èπ | ||
2 |
| Joint cord |
| 連接線 | |
|
| |
|
| “¬√Ë«¡ |
| 1 |
|
| Black / 黑色 / ¥’ ” | 1 |
|
| |
| Yellow*1 |
|
| 黃色*1 |
|
| ‡À≈◊Õß’*1 | 2 |
|
| |
| Red | 5 A fuse |
| 5 A 保險絲 | |
| 紅色 | |
| ø‘« Ï5 A | |
|
|
![]() *2
*2
To metallic body or chassis of the car | *2 | |
接至金屬體或汽車底盤 | ||
|
µËÕ‡¢È“°∫‚§√ß‚≈À—–À√◊Õ·™ ´’¢Õß√∂
To a live terminal in the fuse block connecting to the car battery (bypassing the ignition switch)
接至與汽車電池相連接的保險絲單元內的未使用的端子(用於旁路點火開關)
Ignition switch
點火開關
«‘µ™Ï µ“√Ï∑‡§√◊ËÕ߬πµÏ
Fuse block
’·¥ß | 3 | ||||
|
|
|
| ||
|
|
|
| ||
|
|
|
| 3 A fuse | |
Orange | |||||
3 A 保險絲 | |||||
橙色 | |||||
’ ¡È | ø‘« Ï3 A | ||||
|
|
|
| 4 | |
Gray with red stripe |
| ||||
灰色帶有紅色條紋 |
| ||||
’‡∑“·∂∫·¥ß | 5 | ||||
|
|
|
| ||
To an accessory terminal in the fuse block
接至保險絲單元內的附屬端子
µËÕ‡¢È“°∫Õÿª°√≥Ï„π°≈ËÕßø‘«— Ï
To car light control switch
接至汽車燈控制開關
†«‘µ´Ï§«•§¡‰ÿ ø¢ÕSS••¬•µ•Ï
To the door sensor
接至門傳感器
*2 Not included with this unit. *2 不包含在本機內。
*2 ‰¡Ë√«¡™ÿ¥®Õ¿“æπ’È
保險絲單元
°≈ËÕßø‘«
*1 Before checking the operation of this unit prior to installation, this lead must be connected, otherwise power cannot be turned on.
*1 在安裝本機和進行工作狀況檢查之前, 請務必連接此導線接頭,否則不能開 啟電源。
Black with red stripe |
| |||||
黑色帶有紅色條紋 |
| |||||
’¥”·∂∫·¥ß | 6 | |||||
|
|
|
|
| ||
Yellow with red stripe | 1 A fuse | |||||
黃色帶有紅色條紋 | 1 A 保險絲 | |||||
ø‘« Ï1 A | ||||||
’‡À≈◊Õß·∂∫·¥ß | ||||||
|
|
|
|
| 7 | |
|
|
|
|
| ||
|
|
|
|
| ||
µËÕ°∫—
| *2 |
To metallic body or chassis of the car | *2 |
接至金屬體或汽車底盤 |
To a live terminal in the fuse block connecting to the car battery (bypassing the ignition switch)
接至與汽車電池相連接的保險絲單元內的未使用的端子(用於旁路點火開關)
*1
– 4 –
