9753312A
Use and Care Guide
Models KGRT500 KGST300
Please record your model’s information
Thank you for buying a Kitchenaid appliance
Anti-tip bracket
Range Safety
For self-cleaning ranges
Important Safety Instructions
Feature locations
Parts and Features
Surface burner controls
Slide-in models
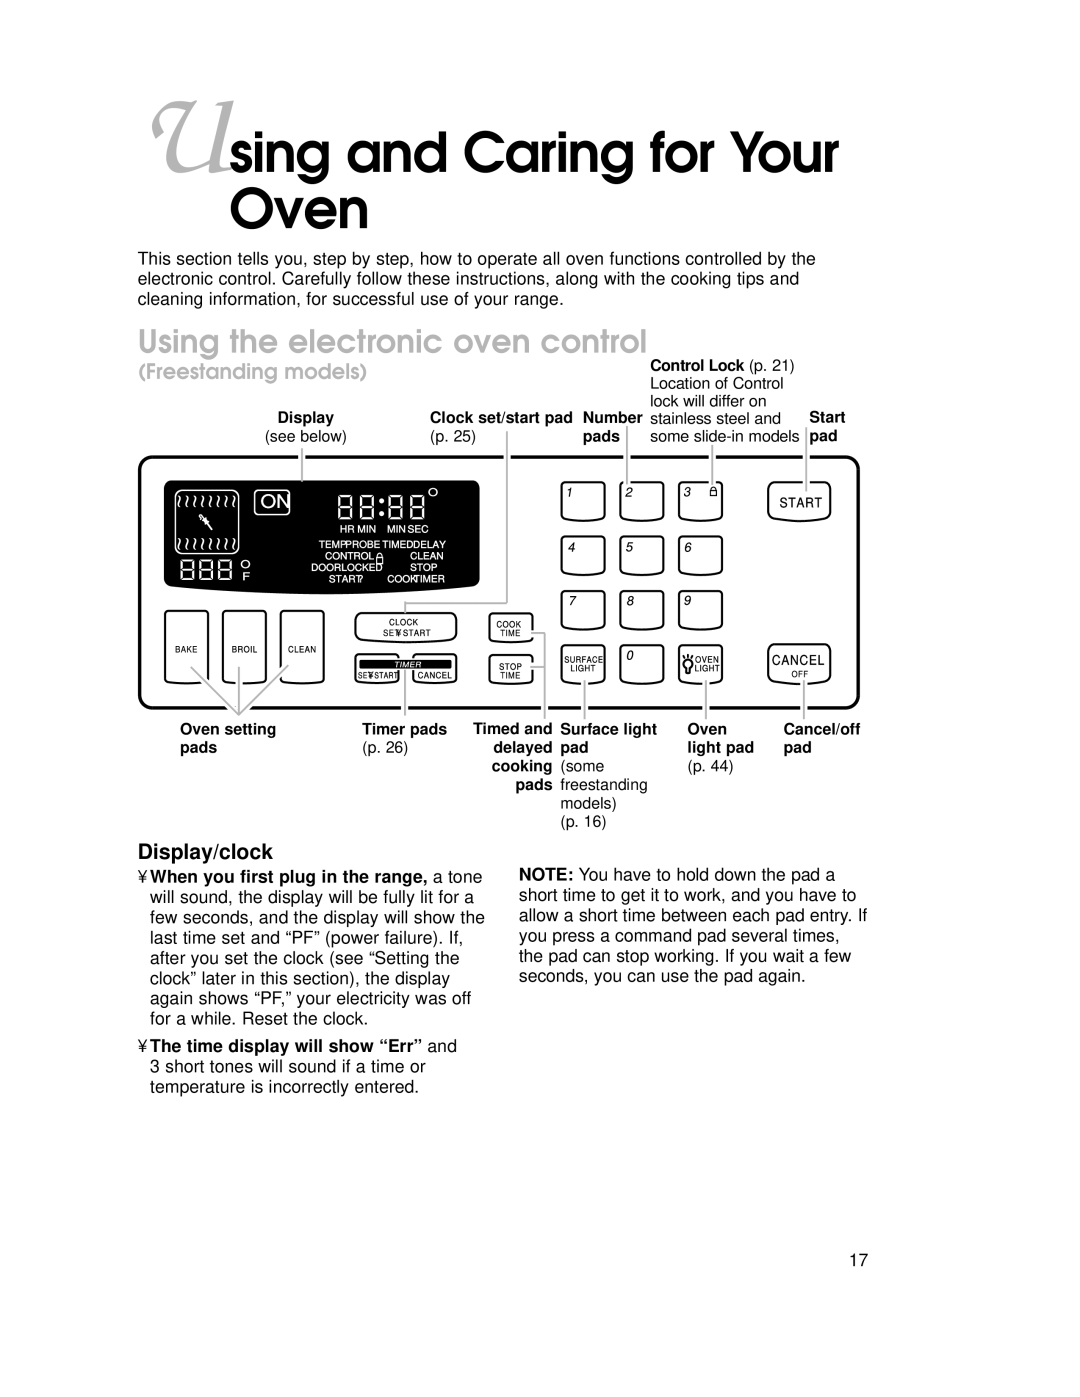
Freestanding models
Oven door
Oven vent
Positioning the pan over the bake burner
Removing the oven door
Storage drawer
When handling the drawer
Removing the storage drawer
Replacing the storage drawer
Using the surface burners
Using and Caring for Your Cooktop
When to use the right rear and left front burners
When to use the left rear and right front burners
MED
Using the surface burners
Burner heat settings
Case of a prolonged power failure
Using the right cookware makes a big difference
Characteristics of cookware materials
Cookware tips
Home canning information
Surface burners
To clean burners and burner caps
Caring for your cooktop
To adjust the flame height follow the instructions below
Adjusting the height of top burner flames
Part What to USE HOW to Clean
Cleaning your cooktop
Unplug range or disconnect power
Using and replacing the surface light
Plug in range or reconnect power
To turn the surface light on or off
Display/clock
Using and Caring for Your Oven
Using the electronic oven control
Press Broil
Press CANCEL/OFF
On next
Disable/enable audible signals
Repeat Steps 1-5 to turn the sig Nals back on
Press Timer SET/START
Snd and Off will appear on Display
Snd and On will appear on the display
Open the door Press and hold Control Lock for 5 seconds
Using the control lock
Press Start
Open the door Press and hold Control
Press Number Pad
Using the Sabbath mode
Press the Number Pads 7, 8, and 9, in that order
Setting your range for the Sabbath
Press Number Pads to set the temperature you want
Open the door Press Bake
Start oven
For 5 seconds Starting an operation
Case of a power failure
Open the door Press and hold Number Pad
Press Clock SET/START
Setting the clock
Set time
Start clock
Start Timer
Using the timer
To change the timer during its operation
When time is up, turn off Timer
To cancel the timer during
Its operation
Bakeware tips
Cooking tips
Baking tips
For baking
Using aluminum foil in the oven
Roasting tips
Bake or Roast
Preset broiling temperature is 500F 260C
Preheat broiler for 5 minutes before using Press Broil
Broil
After cooking, turn off oven
Variable temperature broiling
Completely close door When broiling is done, turn
After preheating, put food in oven
Off oven
Set the new offset temperature. Press
Adjusting oven temperature
To Cook Adjust by this Food … Number of Degrees
Press Start to enter the adjustment
How to determine the amount of adjustment needed
Press Cook Time
Choose Bake setting
Timed cooking
Set cook time
When baking/roasting is done
To delay start and stop automatically Prepare oven
Set stop time
Press Stop Time
To cancel timed cooking settings
Refer to Cooking tips section
Baking chart
Press Bake
Roasting chart
Broiling chart
Cleaning your oven and controls
Oven cavity
Routine cleaning
Fingerprints
Stubborn stains
Replacing halogen oven lights located on each side of oven
Oven lights
Replacing standard oven lights located on back wall
Before you start
Using the Self-Cleaning Cycle
Setting the controls
Before setting the controls
To start cleaning immediately 1. Press Clean
Set cleaning time optional
To delay cleaning start time Press Clean
After the Self-Cleaning cycle ends
Complete entry
To stop the self-cleaning cycle at
For best cleaning results
How the cycle works
Any time
Problem Possible Cause What to do
Troubleshooting
BAKE, Broil
Expected
Areas around area. cookware
Roastingenough
Baked items too
Troubleshooting
Our consultants provide assistance with
Requesting Assistance or Service
If you need assistance or service in Canada
Warranty
9753312FA
Modèles KGRT500 KGST300
Veuillez noter ici l’information concernant votre appareil
Merci d’avoir acheté un appareil électroménager Kitchenaid
Votre sécurité et celle des autres est très importante
La bride antibasculement
Cuisinière autonettoyante
Importantes Instructions DE Sécurité
Boutons de commande des brûleurs
Emplacements des caractéristiques
Pièces et caractéristiques
Modèles encastrés
Modèles autoportants
’évent du four
Réinstallation de la porte du four
La porte du four
Enlèvement de la porte du four
Retrait du tiroir de remisage
Réinstallation du tiroir de remisage
Le tiroir de remisage
Utilisation des brûleurs
Utilisation et entretien de la table de cuisson
Remarques
Utilisation des brûleurs
Réglage de la chaleur des brûleurs
En cas de panne de courant prolongée
Choix des ustensiles de cuisine
Préparation de conserves
Une fois le brûleur allumé, régler à la position désirée
Caractéristiques des matériaux des ustensiles de cuisson
Pour nettoyer les brûleurs et leurs couvercles
Entretien de la table de cuisson
Brûleurs de surface
Ajustement de la hauteur des flammes des brûleurs de surface
Nettoyage de la table de cuisson
Pièce Articles Utilisés Mode DE Nettoyage
Remplacement de la lumière de surface
Utilisation et remplacement de la lumière de surface
Pour allumer ou éteindre la lumière de surface
Débrancher la cuisinière ou interrompre le courant
Afficheur du four et de l’horloge
Utilisation du tableau de commande du four électronique
Utilisation et entretien du four
Annuler/Éteindre
Ouvrir la porte Appuyer sur CANCEL/OFF
Appuyer sur Broil Cuisson AU Gril
Activer le four
Valeurs de conversion
Désactiver/Activer les signaux sonores
Allumer le four
Ouvrir la porte
Utilisation du verrouillage
Appuyer sur Control Lock
Appuyer sur Start Mise en
Ouvrir la porte Appuyer sur Cancel
Utilisation du mode Sabbat
OFF Annuler/Éteindre
Appuyer sur la touche
Préparation de la cuisinière pour le Sabbat
Ouvrir la porte Appuyer sur Bake Cuisson normale
Allumer le four
Dant cinq secondes
Réglage de l’horloge
Ouvrir la porte Appuyer sur la touche numérique
Annulation d’une fonction
Activer l’horloge
Utilisation de la minuterie
Activer la minuterie
Régler la durée
Lorsque le temps est écoulé
Arrêter la minuterie
Conseils pour la cuisson au four
Conseils pour la cuisson
Position des grilles
Conseils pour le choix des ustensiles de cuisson
Pour la cuisson
Utilisation de papier d’aluminium dans le four
Conseils pour le rôtissage
Positionner les grilles
Cuisson au four ou Rôtissage
Choisir le programme de cuisson au four/Rôtissage
Régler la température de cuisson facultatif
Placer la nourriture dans le four
Cuisson au gril
La fin de la cuisson, éteindre le Appuyer SUR
Four
Mettre le four en marche
Régler la température facultatif
Fermer entièrement la porte
La fin de la cuisson au gril
Cuisson au gril à températures différentes
Réglage de la température du four
Conseils pour la cuisson au gril
Positions de la grille pour la cuisson au gril
Appuyer sur Start Mise en marche pour faire l’ajustement
Appuyer sur la touche Bake Cuisson normale
Programmer la température modifiée de cuisson
SOIT… Chiffre DE Degrés
Comment déterminer le degré d’ajustement
Choisir le programme Bake Cuisson au four
Cuisson commandée par la minuterie
La fin de la cuisson ou du rôtissage
Appuyer sur Cook Time Temps DE Cuisson
Régler le temps de cuisson. Appuyer SUR
Choisir le programme Bake Cuisson
Régler l’heure d’arrêt deAPPUYER SUR
Appuyer SUR Stop Time Heure d’arrêt
Se référer à la section Conseils pour la cuisson
Tableau de cuisson au four
Tableau de rôtissage
Viandes LA Grille Température
Tableau de cuisson au gril
Durée
Nettoyage du four et des boutons de commande
Cavité du four
Grilles du four
Nettoyage de routine
Et marques de doigt
Lampes du four
Avant la mise en marche
Utilisation du programme d’autonettoyage
Réglage des commandes
Avant le réglage des commandes
Facultatif
Régler le temps de nettoyage
Appuyer sur Stop Time Heure Appuyer SUR
Régler le temps de nettoyage facultatif
’arrêt
Compléter le réglage
Fonctionnement du programme
Pour obtenir les meilleurs résultats de nettoyage
Pour arrêter le programme
Autonettoyant à tout moment
Problème Cause Possible Quoi Faire
Guide de diagnostic
Broil ou Clean
Mode Bake
Commande ne
Émission
Cuisson non uniforme des aliments
Rôtissage lent
Articles cuits trop bruns à la base
Problème Cause Possible
Si vous avez besoin de pièces de rechange
Demande d’assistance ou de service
Pour plus d’assistance
Nos consultants vous renseigneront sur les sujets suivants
Si vous avez besoin d’assistance ou de service au Canada
Otes
Garantie