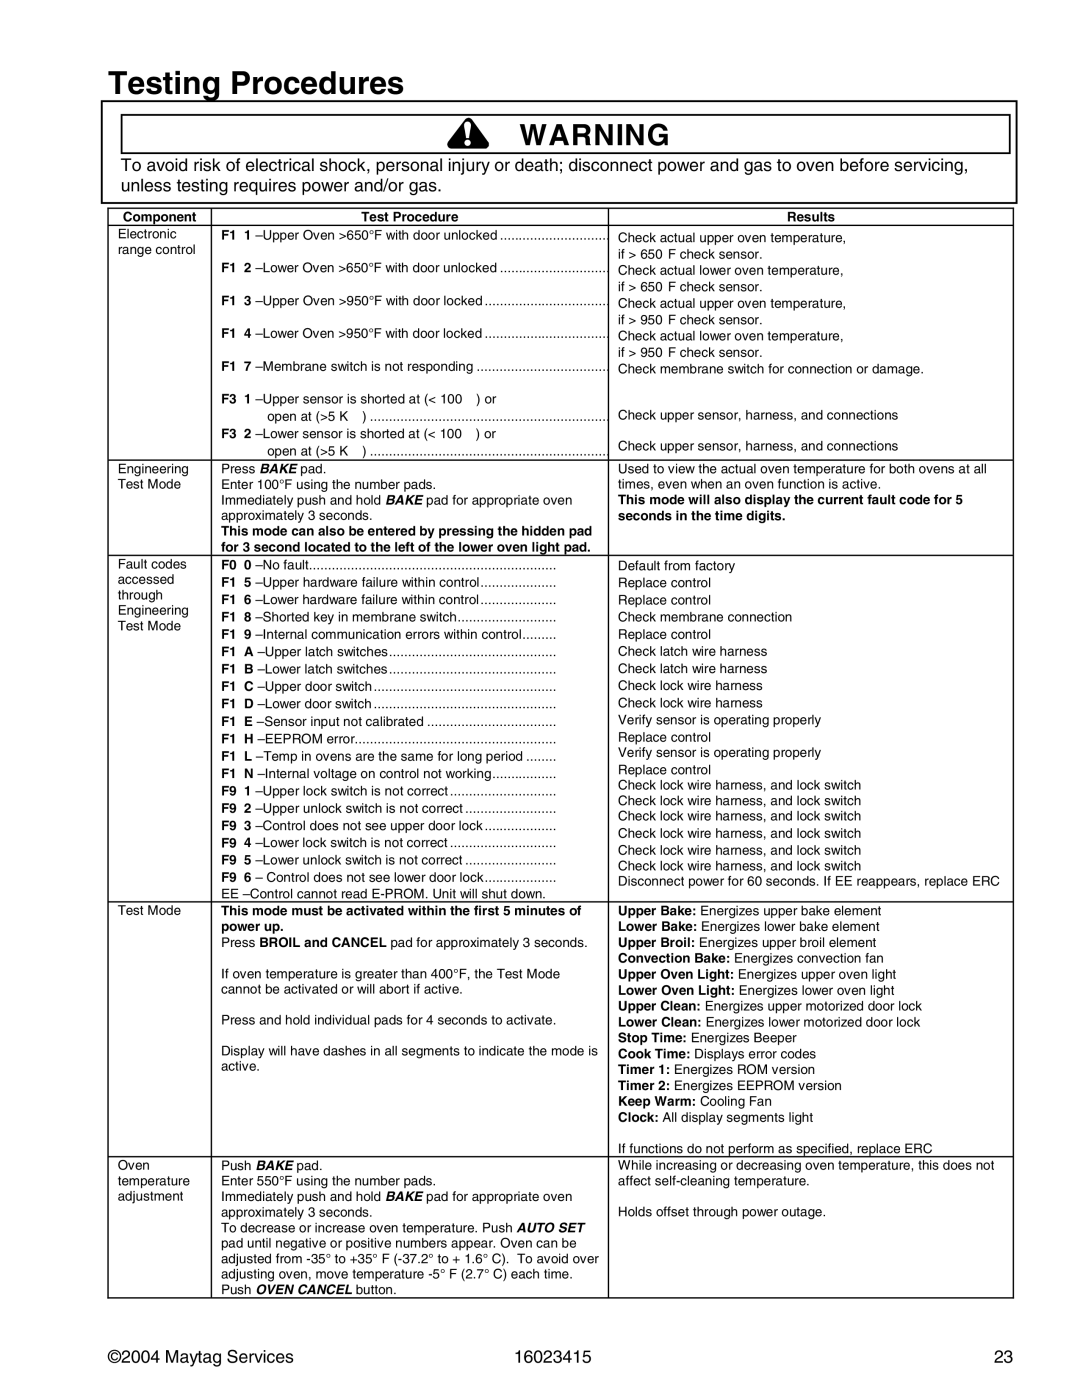
Testing Procedures
!WARNING
To avoid risk of electrical shock, personal injury or death; disconnect power and gas to oven before servicing, unless testing requires power and/or gas.
Component | Test Procedure | Results | |
Electronic | F1−1 | Check actual upper oven temperature, | |
range control | F1−2 | if > 650°F check sensor. | |
| Check actual lower oven temperature, | ||
| F1−3 | if > 650°F check sensor. | |
| Check actual upper oven temperature, | ||
| F1−4 | if > 950°F check sensor. | |
| Check actual lower oven temperature, | ||
| F1−7 | if > 950°F check sensor. | |
| Check membrane switch for connection or damage. | ||
| F3−1 |
| |
| open at (>5 K Ω) | Check upper sensor, harness, and connections | |
| F3−2 | Check upper sensor, harness, and connections | |
| open at (>5 K Ω) | ||
|
|
| |
Engineering | Press BAKE pad. | Used to view the actual oven temperature for both ovens at all | |
Test Mode | Enter 100°F using the number pads. | times, even when an oven function is active. | |
| Immediately push and hold BAKE pad for appropriate oven | This mode will also display the current fault code for 5 | |
| approximately 3 seconds. | seconds in the time digits. | |
| This mode can also be entered by pressing the hidden pad |
| |
| for 3 second located to the left of the lower oven light pad. |
| |
Fault codes | F0−0 | Default from factory | |
accessed | F1−5 | Replace control | |
through | F1−6 | Replace control | |
Engineering | F1−8 | Check membrane connection | |
Test Mode | |||
F1−9 | Replace control | ||
| |||
| F1−A | Check latch wire harness | |
| F1−B | Check latch wire harness | |
| F1−C | Check lock wire harness | |
| F1−D | Check lock wire harness | |
| F1−E | Verify sensor is operating properly | |
| F1−H | Replace control | |
| F1−L | Verify sensor is operating properly | |
| F1−N | Replace control | |
| F9−1 | Check lock wire harness, and lock switch | |
| Check lock wire harness, and lock switch | ||
| F9−2 | ||
| Check lock wire harness, and lock switch | ||
| F9−3 | ||
| Check lock wire harness, and lock switch | ||
| F9−4 | ||
| Check lock wire harness, and lock switch | ||
| F9−5 | ||
| Check lock wire harness, and lock switch | ||
| F9−6 – Control does not see lower door lock | ||
| Disconnect power for 60 seconds. If EE reappears, replace ERC | ||
| EE |
| |
Test Mode | This mode must be activated within the first 5 minutes of | Upper Bake: Energizes upper bake element | |
| power up. | Lower Bake: Energizes lower bake element | |
| Press BROIL and CANCEL pad for approximately 3 seconds. | Upper Broil: Energizes upper broil element | |
| If oven temperature is greater than 400°F, the Test Mode | Convection Bake: Energizes convection fan | |
| Upper Oven Light: Energizes upper oven light | ||
| cannot be activated or will abort if active. | Lower Oven Light: Energizes lower oven light | |
| Press and hold individual pads for 4 seconds to activate. | Upper Clean: Energizes upper motorized door lock | |
| Lower Clean: Energizes lower motorized door lock | ||
| Display will have dashes in all segments to indicate the mode is | Stop Time: Energizes Beeper | |
| Cook Time: Displays error codes | ||
| active. | Timer 1: Energizes ROM version | |
|
| Timer 2: Energizes EEPROM version | |
|
| Keep Warm: Cooling Fan | |
|
| Clock: All display segments light | |
|
| If functions do not perform as specified, replace ERC | |
Oven | Push BAKE pad. | While increasing or decreasing oven temperature, this does not | |
temperature | Enter 550°F using the number pads. | affect | |
adjustment | Immediately push and hold BAKE pad for appropriate oven | Holds offset through power outage. | |
| approximately 3 seconds. | ||
| To decrease or increase oven temperature. Push AUTO SET |
| |
| pad until negative or positive numbers appear. Oven can be |
| |
| adjusted from |
| |
| adjusting oven, move temperature |
| |
| Push OVEN CANCEL button. |
|
©2004 Maytag Services | 16023415 | 23 |
