Manuals
/
Middleby Marshall
/
Kitchen Appliance
/
Oven
Middleby Marshall
PS314SBI + or + or, Ii. Normal Operation - Step-By-Step, Dailystartupprocedure
Models:
PS314SBI
1
14
60
60
Download
60 pages
3.05 Kb
11
12
13
14
15
16
17
18
Specifications
Install
Maintenance
Symptomproblem
Iii. Assembly
Dailystartupprocedure
HourService Hotline
Solution
Page 14
Image 14
Page 13
Page 15
Page 14
Image 14
Page 13
Page 15
Contents
OWNERS OPERATING
INSTALLATION
Model PS314SBI Gas and Electric Ovens
MANUAL
Retain This Manual For Future Reference
24-HourService Hotline
ENGLISH
page
TABLE OF CONTENTS
ENGLISH
page
ENGLISH
SECTION 1 - DESCRIPTION
OVEN SPECIFICATIONS
I.OVEN USES
SECTION 2 - INSTALLATION
A.Installation kit components
I. INSTALLATION KIT
Fig. 2-1- Installation Kit
ENGLISH
B.Restraint Cable Installation
III. ASSEMBLY
A.Legs/Casters Installation
Fig. 2-4- Adjustable Legs and Casters
Figure 2-6- Thermocouple Installation Location
IV. THERMOCOUPLE INSTALLATION
V. CONVEYOR INSTALLATION
Figure 2-9- Conveyor Installation
Figure 2-11- Conveyor belt tension
ENGLISH
Figure 2-10- Drive Motor and Drive Chain
Figure 2-12- Master link orientation
Figure 2-14- Final Assembly - Rear
VI. FINAL ASSEMBLY
Figure 2-13- Final Assembly - Front
ENGLISH
ENGLISH
VII. ELECTRICAL SUPPLY all ovens
ENGLISH
VIII. GAS SUPPLY gas ovens only
I.LOCATION AND DESCRIPTION OF CONTROLS
SECTION 3 - OPERATION
ENGLISH
NOT SHOWN
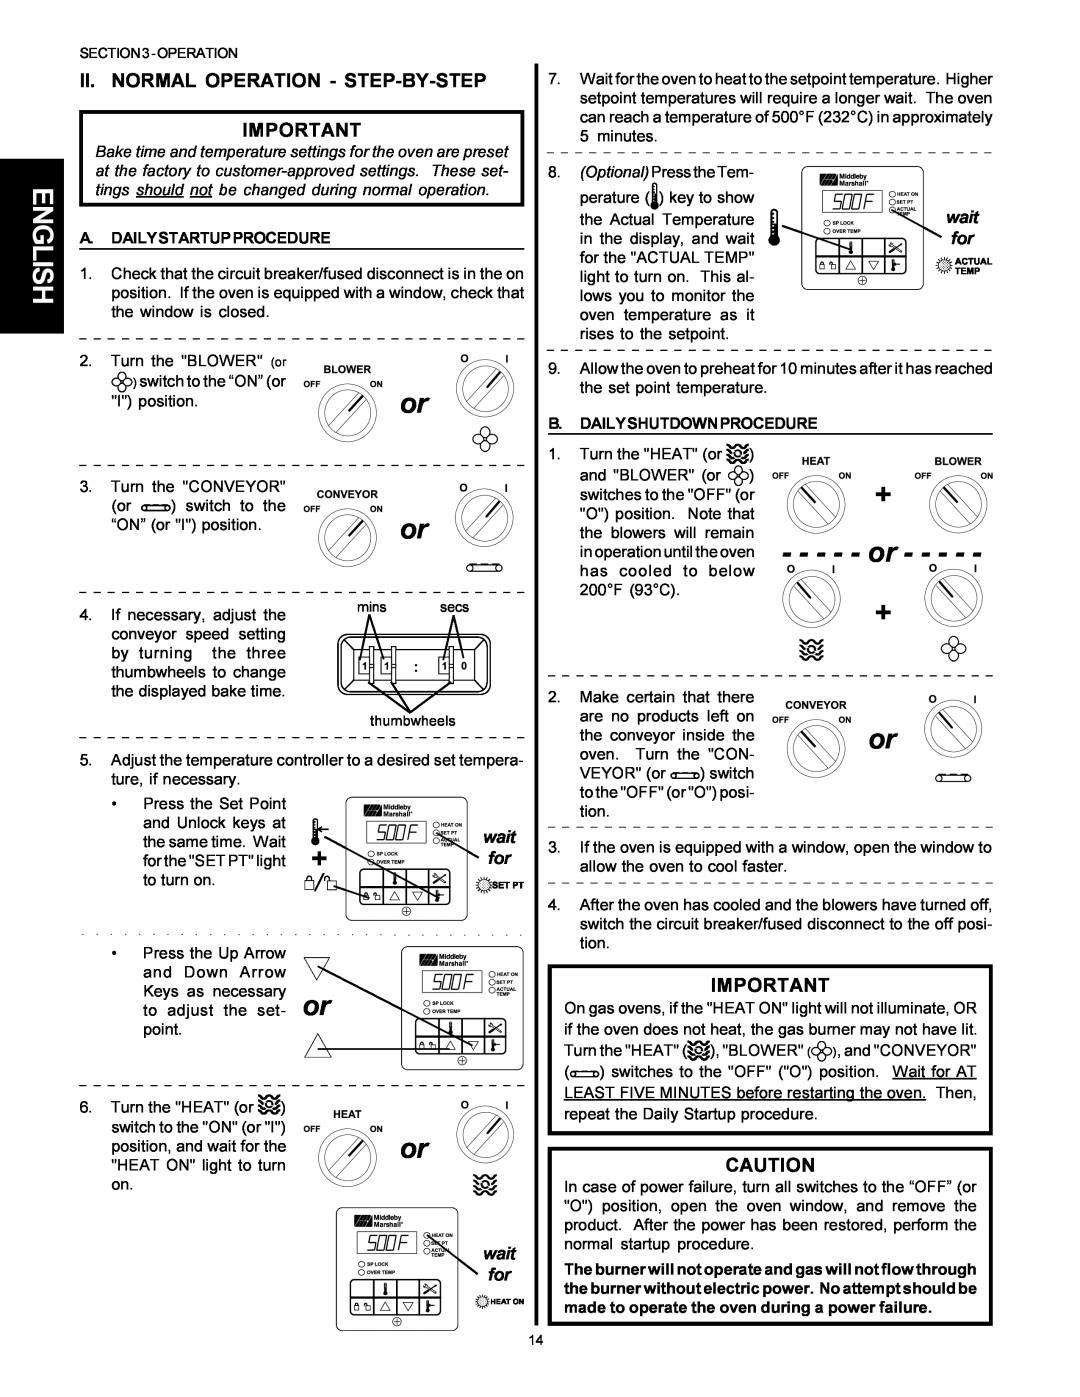
II. NORMAL OPERATION - STEP-BY-STEP
+ or + or
DAILYSTARTUPPROCEDURE
ENGLISH
Display
SOLUTION
V. QUICK REFERENCE TROUBLESHOOTING
SYMPTOMPROBLEM
ENGLISH
SECTION 4 - MAINTENANCE
ENGLISH
ENGLISH
I. MAINTENANCE - DAILY
II. MAINTENANCE - MONTHLY
FRONT
V. MAINTENANCE - EVERY 12 MONTHS
III. MAINTENANCE - EVERY 3 MONTHS
IV. MAINTENANCE - EVERY 6 MONTHS
ENGLISH
FRANÇAIS page ESPAÑOL página
machinery compartment or control compartment
ENGLISH page
24-HourService Hotline
ET D’UTILISATION
MANUEL D’INSTALLATION
Fours électriques et à gaz, modèle PS314SBI
Modèles
FRANÇAIS
Service d’assistance téléphonique 24 heures
AVERTISSEMENT
Conservez ce manuel pour référence ultérieure
FRANÇAIS
TABLE DES MATIÈRES
SECTION 2 -INSTALLATION
page
II. COMPOSANTS DU FOUR - Figure
SECTION 1 - DESCRIPTION
FRANÇAIS
SPÉCIFICATIONS DU FOUR
AVERTISSEMENT
SECTION 2 - INSTALLATION
FRANÇAIS
AVERTISSEMENT
FRANÇAIS
I. TROUSSE DINSTALLATION
II. SYSTÈME DE VENTILATION
MISE EN GARDE
FRANÇAIS
III. ASSEMBLAGE
Figure 2-6- Point dinstallation du thermocouple
IV. INSTALLATION DU THERMOCOUPLE
V. INSTALLATION DU TRANSPORTEUR
Figure 2-9- Installation du transporteur
dentraînement
REMARQUE
Figure 2-10- Moteur dentraînement et chaîne
FRANÇAIS
Figure 2-13- Assemblage final - Avant
FRANÇAIS
VI. ASSEMBLAGE FINAL
Figure 2-14- Assemblage final - Arrière
VII. ALIMENTATION EN ÉLECTRICITÉ tous les fours
MISE EN GARDE
FRANÇAIS
AVERTISSEMENT
MISE EN GARDE
FRANÇAIS
VIII. ALIMENTATION EN GAZ fours à gaz seulement
AVERTISSEMENT
FRANÇAIS
SECTION 3 - OPÉRATION
I.EMPLACEMENT ET DESCRIPTION DES COMMANDES
NON ILLUSTRÉ
MISE EN GARDE
+ ou +
II. OPÉRATION NORMALE - PAS-À-PAS
FRANÇAIS
FRANÇAIS
Témoin OVERTEMP
V. CONSULTATION RAPIDE DÉPANNAGE
SOLUTION
FRANÇAIS
SYMPTÔME
SECTION 4 - ENTRETIEN
FRANÇAIS
MISE EN GARDE
FRANÇAIS
I. ENTRETIEN - QUOTIDIEN
II. ENTRETIEN - MENSUEL
IV. ENTRETIEN - SEMESTRIEL
FRANÇAIS
III. ENTRETIEN - TRIMESTRIEL
V. ENTRETIEN - ANNUEL
21 ESPAÑOL página
du compartiment des composants ou de commande
Service dassistance téléphonique 24 heures
ENGLISH page
DEL PROPIETARIO
Hornos de Gas y Eléctricos Modelo PS314SBI
MANUAL DE OPERACIÓN
E INSTALACIÓN
Retenga este Manual para referencia futura
AVISO
ESPAÑOL
página
ÍNDICE DE MATERIAS
ESPAÑOL
página
I.USO DEL HORNO
SECCIÓN 1 - DESCRIPCIÓN
ESPAÑOL
II.COMPONENTES DEL HORNO - VER FIGURA
AVISO
SECCIÓN 2 - INSTALACIÓN
ESPAÑOL
AVISO
Fig. 2-1- Juego de Instalación
I. JUEGO DE INSTALACIÓN
II. SISTEMA DE VENTILACIÓN
A.Componentes del juego de instalación
A.Instalación de las patas o ruedas
C.Otros problemas de ventilación
III. ENSAMBLADO
B.Instalación del cable de sujeción
V. INSTALACIÓN DEL TRANSPORTADOR
ESPAÑOL
IV. INSTALACIÓN DEL TERMOPAR
NOTA
Figura 2-11- Tensión de la banda de transporte
ESPAÑOL
NOTA
Figura 2-12- Orientación del Eslabón Maestro
Figura 2-13- Ensamblado final - Parte delantera
ESPAÑOL
VI. ENSAMBLADO FINAL
Figura 2-14- Ensamblado final - Parte posterior
VII. SUMINISTRO ELÉCTRICO todos los hornos
PRECAUCIÓN
ESPAÑOL
AVISO
PRECAUCIÓN
ESPAÑOL
VIII. SUMINISTRO DE GAS solamente hornos de gas
AVISO
I.UBICACIÓN Y DESCRIPCIÓN DE LOS CONTROLES
SECCIÓN 3 - OPERACIÓN
ESPAÑOL
NO MOSTRADO
II. OPERACIÓN NORMAL - PASO A PASO IMPORTANTE
+ o + o
ESPAÑOL
IMPORTANTE
ESPAÑOL
Luz “SP LOCK”
V. REFERENCIA RÁPIDA DIAGNÓSTICO DE AVERÍAS
PROBLEMA
ESPAÑOL
SÍNTOMA
SECCIÓN4-MANTENIMIENTO
ESPAÑOL
PRECAUCIÓN
ESPAÑOL
I. MANTENIMIENTO - DIARIO
PARTE DELANTERA
IV. MANTENIMIENTO - SEMESTRAL
ESPAÑOL
III. MANTENIMIENTO - TRIMESTRAL
V. MANTENIMIENTO - ANUAL
IMPORTANTE
Top
Page
Image
Contents