LS-7
Introduction
Trademarks and registered trademarks
Table of contents
Safety precautions
Safety precautions
Handling the recorder
Be careful with the strap
Keep young children and infants away from the recorder
Battery handling precautions
Keep battery out of the reach of children
Safety precautions
Main features
Getting started
Main features
Main features
Checking the contents of the box
Identification of parts
= POWER/HOLD switch QBattery cover wUSB connector
Peak indicator light LED LED indicator light LED
Recorder mode display
1Recording media indicator
Display LCD panel
Identification of parts
Music mode display
1Recording media indicator
# Playback position bar indicator $Icon display P.14
Identification of parts
Identification of parts Icon displayFor all modes
Power supply
Close the battery cover
Inserting batteries
Direction B
Battery settings
Setting
Complete the setting
Recorder P.15
Power supply
Charging by connecting to a computer via USB
Adapter optional to charge
Plug the recorder’s USB cable
Into the AC adapter
Plug the AC adapter into AC outlet
Operating temperature
Batteries
Discharging
Storage for a long period -20C 30C/ -4F 86F
Turning on/off the power
Turning on the power
Turning off the power
Power save mode
Slide the POWER/HOLD switch to
Set the recorder to Hold mode Exit Hold mode
Slide the POWER/HOLD switch to
Hold position Aposition
Setting time and date Time & Date
Press the 9or 0button to Select the item to set
Setting time and date Time & Date
Changing the time and date
Inserting and ejecting a microSD card
Inserting a microSD card
Inserting and ejecting a microSD card
Close the card cover securely
Inserting and ejecting a microSD card
Ejecting a microSD card
Press the List button repeatedly to set the Home display
Press the + or − button to select the mode
Home display operations
About the folders for voice recordings
About the folder for music playback
Folders
First layer Second layer
FolderFile
Selecting the folders and files
Recording
Press the REC s button to start recording
Select the recording folder
Press the REC s button to prepare recording
Recording
Press the Stop 4 button to Stop recording
Recording
It is possible to record exceeding 2GB
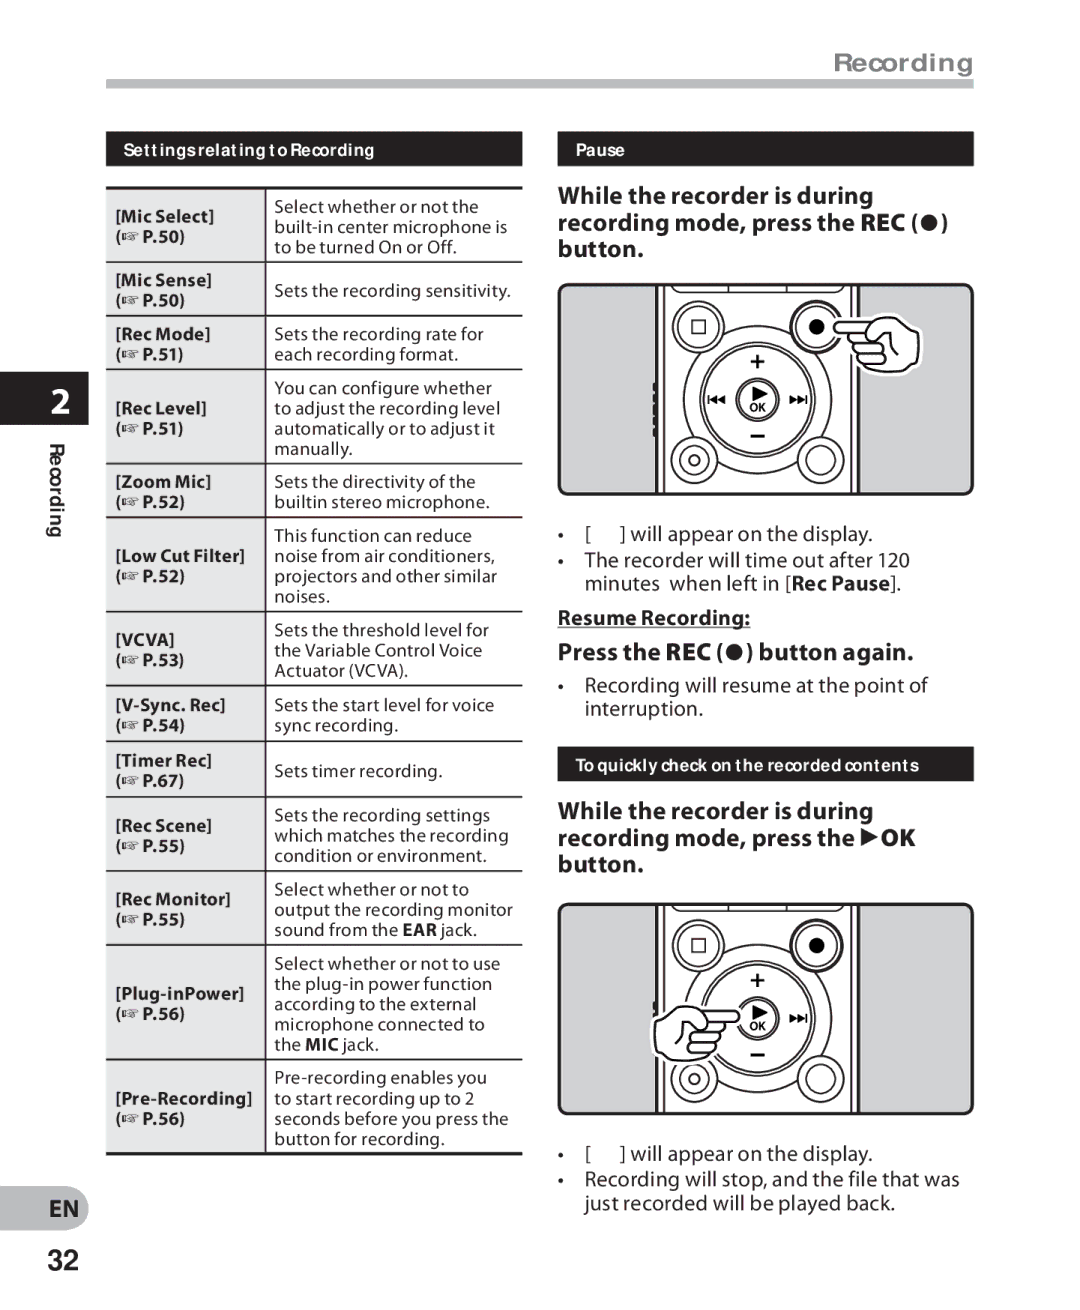
Settings relating to Recording
To quickly check on the recorded contents
Press the REC s button again
Pause
Changing the recording scene Rec Scene
Connect the earphone to the EAR jack on the recorder
Press the + or − button to select Rec Scene Recording
Listening while audio is recorded
Recommended settings by recording condition
Recording Recommended settings
LS7 0001 .MP3
Condition
Recording from external microphone or other devices
Applicable external microphones optional P.96
Recording the sound of other devices with this recorder
Recording the sound of this recorder with other devices
Volume can be adjusted within a
Playback
Range from 00 to
Stop 4 button + − button `OK button
Playback through earphone
Settings relating to playback
Playback
While
Hold the 9button Hold the 0button
9button
While the recorder is during
Playback mode, press
While the recorder is during stop
About the limits of fast playback
Noise Cancel P.57
Changing the playback speed
F2 Index button 90button Erase button
Setting an index mark or a temp mark
Clearing an index mark or a temp mark
F1 A-B button
How to begin segment repeat playback
Repeat playback
Canceling the segment repeat playback Function
Changing the playback scene Play Scene
BPress the Stop 4 button
CPress the 9button
Erasing a folder
Erasing
Erasing files
Play the file you want to partially erase
Erasing
Partially erasing a file
When Partial erase completed. is
Press the Erase button
Press the + or − button to change the setting
Menu setting method
Menu setting method
Setting menu during playback Close the menu screen
Menu setting method
Setting menu during recording
+ File Menu
Rec Menu
Adjust the recording level
Select the recording format
Select the recording rate
Select Manual or Auto
About the Zoom Mic function
Zoom Mic
Low Cut Filter
300Hz
Adjust the start/stop actuation level
Select On/Off or Standby Sets the Vcva function
Adjust the voice sync level
Press the 9or 0button to adjust the voice sync level
Select On or Off
Sets the detection time
When Scene Save is selected
When Scene Select is selected Select a recording scene
Set the recording settings according to your preferences
Select Scene Select or Scene Save
How to enable pre-recording
Plug-inPower
Press the REC s button
Pre-Recording
Voice Filter
Noise Cancel
Play Menu
Select Forward Skip or Reverse Skip Set the skip space
Select the desired playback mode Select Repeat or Random
Forward/Reverse Skip Playback
When Scene Select is selected Select a playback scene
Set the playback settings according to your preferences
Play Scene
Reverb
Select Lighting Time or Brightness Select the setting
LCD/Sound Menu
Menu settings after resetting initial settings
Device Menu
Memory Info
System Info
Format
Rearranging files Replace
Press the F2 Exit button to close the menu screen
Press the + or − button to select the file you want to move
F2 button + − button `OK button
Press the `OK button to move to the respective setting
Moving/Copying files File Move/Copy
When you select 1file
When you select Selected files
When you select All files
Press the F2 GO button
Press the F2 Exit button to complete the setting
Dividing files File Divide
Stop playback at the divide position
Press the + button to select Start Press the `OK button
Timer recording Timer Rec
Select Timer Rec from the menu on the Rec Menu
On/Off setting
Day setting
Time setting
Rec Mode setting
Folder setting
Mic Sense setting
Volume, Alarm Sound and Playback File
Alarm playback function Alarm
Select Alarm from the menu on the Play Menu
Press the `OK button to move to the respective setting
Start Time setting
Volume setting
Alarm Sound setting
Select the folder using the + or
Select Voice Guide from the menu in LCD/Sound Menu
Speed setting
Guidance Voice Guide
Changing the USB class USB Settings
Select USB Settings from the menu on the Device Menu
When USB Connect is selected
When USB Class is selected
Formatting the recorder Format
Method Select Format from the menu on the Device Menu
Setting method
Menu
Setting
Method
Operating environment
Windows
Precautions on using the recorder connected to a PC
Operating environment
Macintosh
Operating System Display
Sonority
Using Olympus Sonority
Functions available in the Olympus Sonority
Using Olympus Sonority
Installing software
Changing the Installation Destination
Using Olympus Sonority
Uninstalling software
Using Olympus Sonority
Exit Olympus Sonority Select Control Panel from Start menu
Exit Olympus Sonority
Copying voice guide data
Connect the recorder to a PC
Start Olympus Sonority
Copy voice guide data
Upgrade function
Start the Olympus Sonority
Or click the button in the Tool Bar
Select Purchase Olympus Sonority Plus in the Help Menu
Functions available in the Olympus Sonority Plus
Functions available with the music editing plug-in
Search by keyword
Using online help
Search by contents
Connecting to your PC
Connecting to your PC
Windows
Macintosh
Data will be destroyed
Connecting to your PC
Disconnecting from your PC
Transfer the voice files to your PC
Using as external memory of the PC
Using as external memory of the PC
Message Meaning Explanation Action
Alarm message list
Alarm message list
Can’t make
System file. Connect
To PC and delete
Unnecessary file
Troubleshooting
Troubleshooting
Symptom Probable cause Action
Troubleshooting
Troubleshooting Symptom Probable cause Action
Unable to set index
Marks, temp marks
Cannot recharge
Recorder
Accessories optional
Specifications
Specifications
During recording mode Built-in microphone
During playback mode
During recording mode Microphone jack
Guide to battery life
Recording mode Built-in stereo microphone Earphone playback
During playback mode
Alkaline batteries
100
Linear PCM format
MP3 format
WMA format
101
Linear PCM format
Canadian RFI
Technical assistance and support
Declaration of Conformity
Olympus Imaging Corp