Chapter 2 Parts and their functions
2-8 Viewfinder section
= > ; 7 | 9 |
|
:
<
1
| 8 | ON |
|
| |
4 5 2 3 6 | OFF |
|
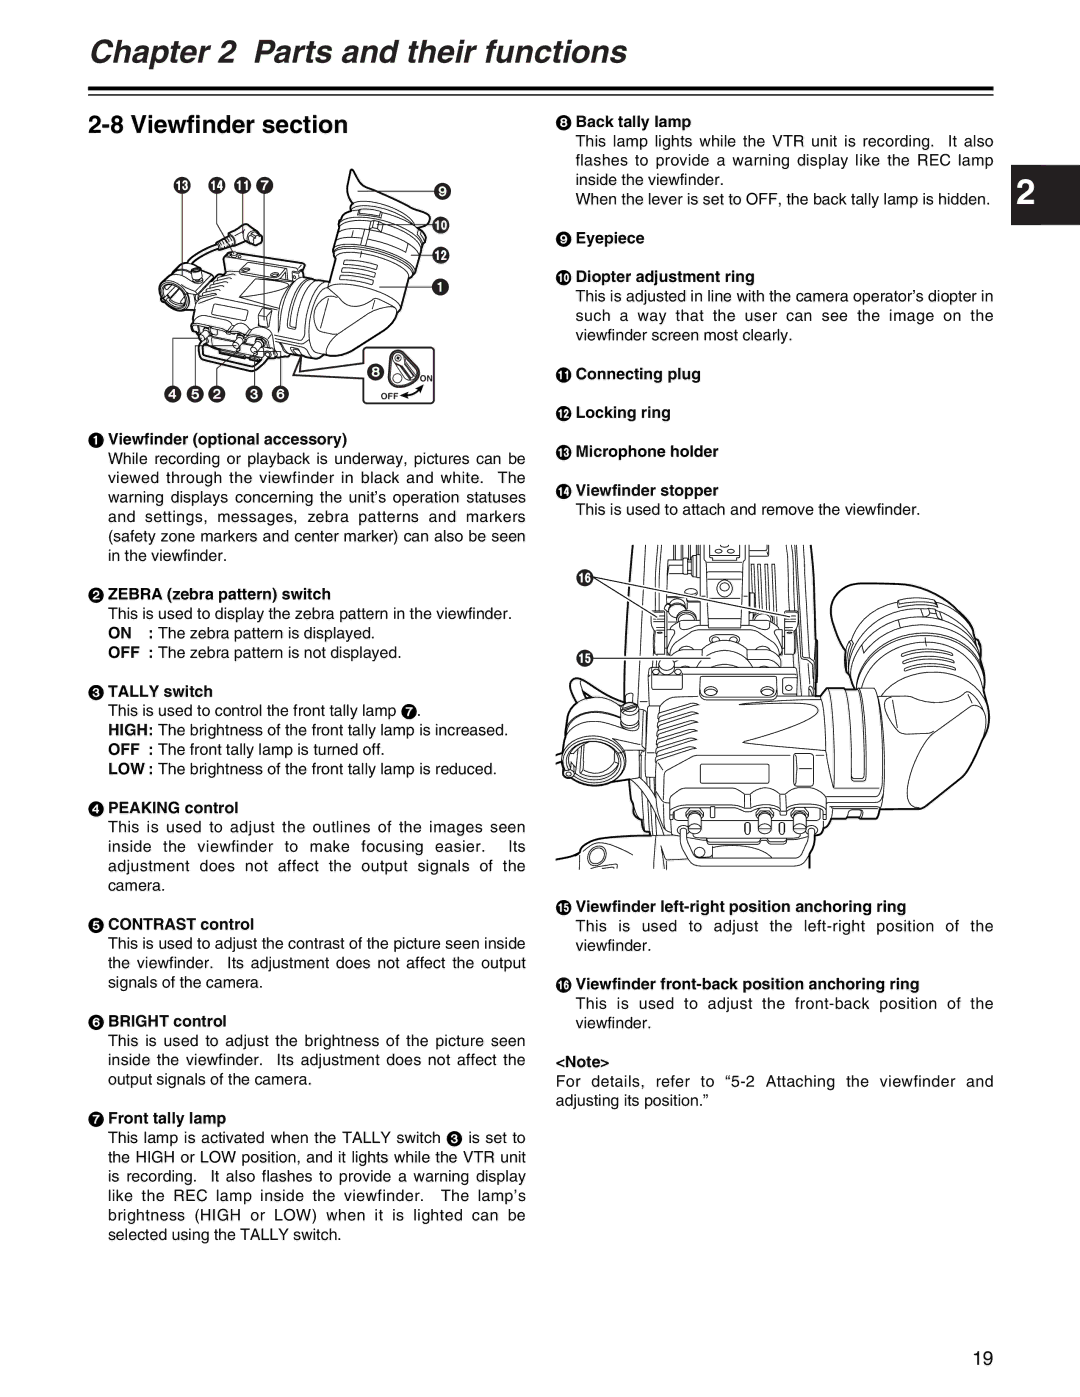
1Viewfinder (optional accessory)
While recording or playback is underway, pictures can be viewed through the viewfinder in black and white. The warning displays concerning the unit’s operation statuses and settings, messages, zebra patterns and markers (safety zone markers and center marker) can also be seen in the viewfinder.
2ZEBRA (zebra pattern) switch
This is used to display the zebra pattern in the viewfinder. ON : The zebra pattern is displayed.
OFF : The zebra pattern is not displayed.
3TALLY switch
This is used to control the front tally lamp 7.
HIGH: The brightness of the front tally lamp is increased.
OFF : The front tally lamp is turned off.
LOW : The brightness of the front tally lamp is reduced.
4PEAKING control
This is used to adjust the outlines of the images seen inside the viewfinder to make focusing easier. Its adjustment does not affect the output signals of the camera.
5CONTRAST control
This is used to adjust the contrast of the picture seen inside the viewfinder. Its adjustment does not affect the output signals of the camera.
6BRIGHT control
This is used to adjust the brightness of the picture seen inside the viewfinder. Its adjustment does not affect the output signals of the camera.
7Front tally lamp
This lamp is activated when the TALLY switch 3 is set to the HIGH or LOW position, and it lights while the VTR unit is recording. It also flashes to provide a warning display like the REC lamp inside the viewfinder. The lamp’s brightness (HIGH or LOW) when it is lighted can be selected using the TALLY switch.
8 Back tally lamp |
|
This lamp lights while the VTR unit is recording. It also |
|
flashes to provide a warning display like the REC lamp |
|
inside the viewfinder. | 2 |
When the lever is set to OFF, the back tally lamp is hidden. |
9 Eyepiece
:Diopter adjustment ring
This is adjusted in line with the camera operator’s diopter in such a way that the user can see the image on the viewfinder screen most clearly.
;Connecting plug
<Locking ring
=Microphone holder
>Viewfinder stopper
This is used to attach and remove the viewfinder.
@
?![]()
?Viewfinder
This is used to adjust the
@Viewfinder front-back position anchoring ring
This is used to adjust the
<Note>
For details, refer to
19