4 |
|
|
| 5 |
3 |
|
|
| 6 |
!7 |
|
|
| 7 |
|
|
|
| |
PAGE | ITEM | UP | DOWN | IRIS |
| (AWC) | (ABC) | (BAR) |
|
G/L IN |
| VIDEO OUT | 8 | |
!6 |
|
|
| ZOOM/FOCUS |
VBS/HD | VD |
|
| 9 |
75 ¶ | VIDEO/RGB |
| ||
ON |
|
| ||
|
|
|
| |
!5 |
|
|
| REMOTE |
|
|
|
| |
OFF |
|
|
| !0 |
CONTROL |
|
| ||
|
| CAUTION |
| !1 |
| CONNECT TO SPECIFIED |
| ||
| CLASS 2 POWER SUPPLY EXT DC IN | |||
SEE MANUAL ONLY SEE MANUAL |
|
| ||
|
|
|
| !2 |
|
|
|
| !3 |
!4 |
|
| ||
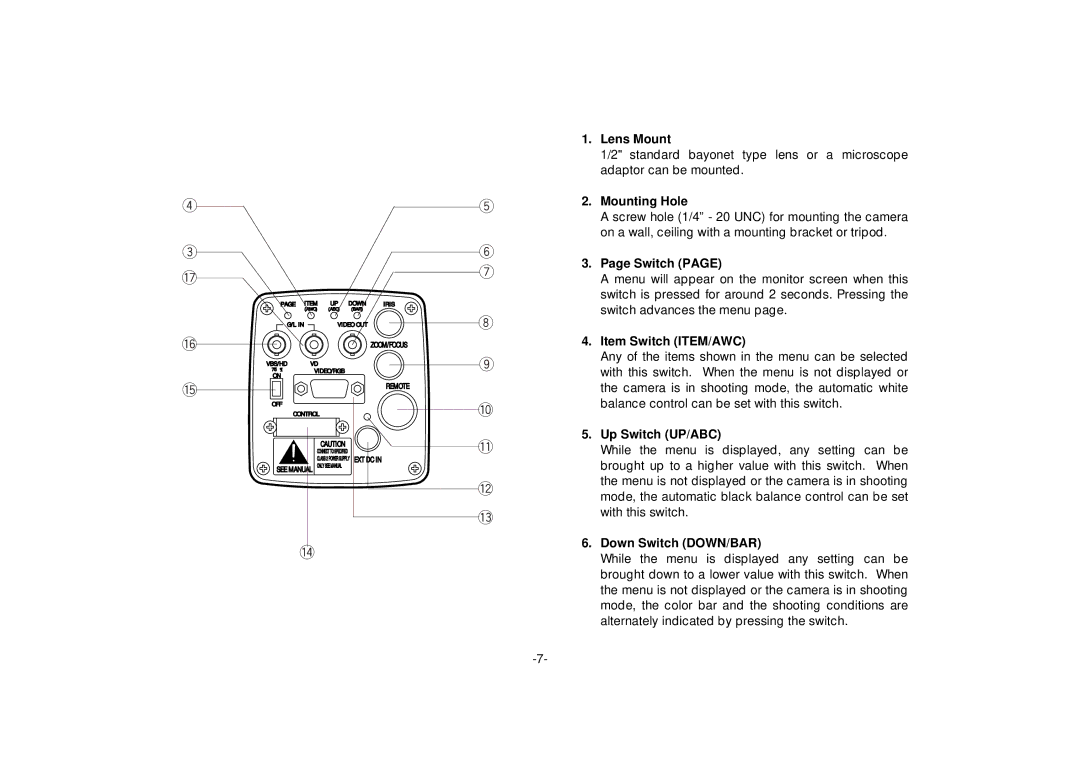
1.Lens Mount
1/2" standard bayonet type lens or a microscope adaptor can be mounted.
2.Mounting Hole
A screw hole (1/4” - 20 UNC) for mounting the camera on a wall, ceiling with a mounting bracket or tripod.
3.Page Switch (PAGE)
A menu will appear on the monitor screen when this switch is pressed for around 2 seconds. Pressing the switch advances the menu page.
4.Item Switch (ITEM/AWC)
Any of the items shown in the menu can be selected with this switch. When the menu is not displayed or the camera is in shooting mode, the automatic white balance control can be set with this switch.
5.Up Switch (UP/ABC)
While the menu is displayed, any setting can be brought up to a higher value with this switch. When the menu is not displayed or the camera is in shooting mode, the automatic black balance control can be set with this switch.
6.Down Switch (DOWN/BAR)
While the menu is displayed any setting can be brought down to a lower value with this switch. When the menu is not displayed or the camera is in shooting mode, the color bar and the shooting conditions are alternately indicated by pressing the switch.