Settings (continued)
English | USER SCREEN AUDIO DVD INPUT/OUTPUT RADIO |
|
DISPLAY UNIT
39Display adjustment
| TILT |
|
| (Tilt angle adjustment) |
| |
1 | 2 | 3 | 4 | 5 | 1 | 5 |
|
|
|
|
| ||
|
|
|
|
|
| default: 5 |
OPEN/CLOSE |
| (Monitor setting when power on) | ||||
Note:
¡To start the clock, touch/press ![]() /[MODE]. ¡Set the Daylight Saving Time manually.
/[MODE]. ¡Set the Daylight Saving Time manually.
default: HOUR ADJUST: AM12 MINUTE ADJUST: 00
TOUCH PANEL
Panel touch position adjustment
Position difference between the touching position and the displaying symbol position may appear in the following sit- uations:
ID-CODE
ID Code Setting
Prior to operating this unit, it is advisable to assign a 4- digit ID code for security. Once the ID code has been set, the unit cannot be operated if the main power supply is dis- connected then
The ID code operation must be performed only by the per- son to whom the unit belongs.
Generally, it is not necessary to enter the ID code each time when using the unit if it has not been disconnected
|
|
|
|
|
| English | |
|
|
|
|
|
|
| |
MEMORY CLEAR |
|
|
|
| |||
|
|
|
| ||||
Memory clearance |
| 40 |
| ||||
|
|
|
| ||||
The state of all of the current memories are returned to |
|
|
|
| |||
default settings. |
|
|
|
|
|
| |
Note: |
|
|
|
|
|
| |
¡The ID code is not deleted by executing memory clear. |
|
|
|
| |||
| : no memory clear. |
|
|
|
| ||
NO |
|
|
|
|
| ||
|
| The display returns to the previous one. |
|
|
|
| |
|
| : clears the memory to default settings |
|
|
|
| |
YES |
|
|
|
|
| ||
|
| default: |
|
|
|
|
|
|
| NO |
|
|
|
| |
AUTO
MANUAL
Note:
:the monitor is opened automatically when turning ON ACC.
:the monitor is not opened automatically. default: MANUAL
1.The display position adjustment is executed.
2.The system is initialized.
3.The power is turned off soon after the touch panel is adjusted.
For the cases above, readjust the touch panel position.
Note:
¡This function can be performed on the touch panel.
from the main power supply (car battery).
0 to 9 4 digits numeric code
default: none
How to set your ID code (for the first time)
qEnter an 4 digit ID code.
REALLY? (Really?) appears |
when YES is selected. |
CANCEL : no memo- |
ry clear. |
¡The monitor position setting menu can also be displayed by pressing the [TILT] button on the display unit for more than 2 seconds. (a page 19)
¡You can also enter this setting menu by pressing and holding [TILT] button.
CLOCK
Clock setting
| DISPLAY |
| (Clock display) | |
|
|
|
|
|
| OFF | : clock display OFF | ||
|
|
|
|
|
| ON | : clock display ON ([12:00] is displayed | ||
|
| before adjusting the clock.) | ||
|
|
|
| default: OFF |
|
|
| ||
HOUR ADJUST |
| (Hour adjustment) | ||
| : puts back hour |
| ||
] |
| |||
| : puts forward hour |
| ||
[ |
| |||
|
|
|
|
|
MINUTE ADJUST |
| (Minute adjustment) | ||
] : puts back minute
[ : puts forward minute
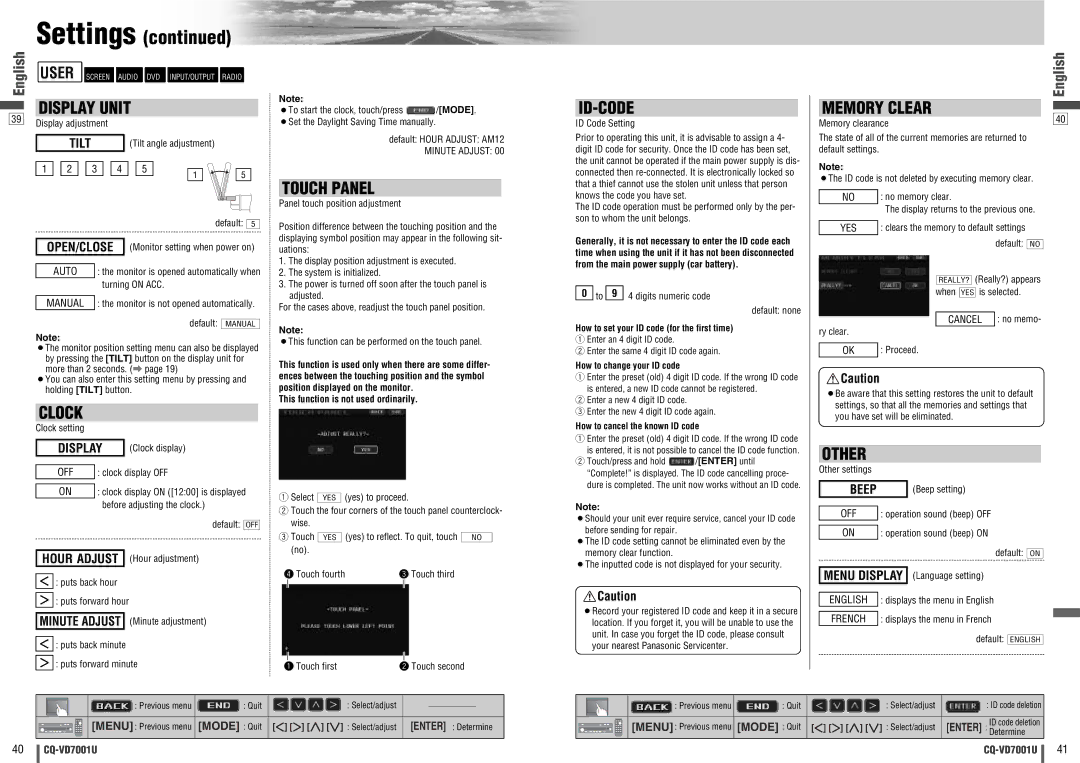
This function is used only when there are some differ- ences between the touching position and the symbol position displayed on the monitor.
This function is not used ordinarily.
qSelect YES (yes) to proceed.
wTouch the four corners of the touch panel counterclock- wise.
e Touch | YES |
| (yes) to reflect. To quit, touch | NO |
(no). |
|
| ||
r Touch fourth | e Touch third | |||
q Touch first | w Touch second |
wEnter the same 4 digit ID code again.
How to change your ID code
qEnter the preset (old) 4 digit ID code. If the wrong ID code is entered, a new ID code cannot be registered.
wEnter a new 4 digit ID code.
eEnter the new 4 digit ID code again.
How to cancel the known ID code
qEnter the preset (old) 4 digit ID code. If the wrong ID code
is entered, it is not possible to cancel the ID code function.
wTouch/press and hold ![]() /[ENTER] until “Complete!” is displayed. The ID code cancelling proce- dure is completed. The unit now works without an ID code.
/[ENTER] until “Complete!” is displayed. The ID code cancelling proce- dure is completed. The unit now works without an ID code.
Note:
¡Should your unit ever require service, cancel your ID code before sending for repair.
¡The ID code setting cannot be eliminated even by the memory clear function.
¡The inputted code is not displayed for your security.
![]() Caution
Caution
¡Record your registered ID code and keep it in a secure location. If you forget it, you will be unable to use the unit. In case you forget the ID code, please consult your nearest Panasonic Servicenter.
OK | : Proceed. |
![]() Caution
Caution
¡Be aware that this setting restores the unit to default settings, so that all the memories and settings that you have set will be eliminated.
OTHER
Other settings
BEEP |
| (Beep setting) | |
|
|
|
|
OFF | : operation sound (beep) OFF | ||
|
|
|
|
ON | : operation sound (beep) ON | ||
|
| default: |
|
|
| ON | |
|
| (Language setting) | |
MENU DISPLAY | |||
|
|
|
|
ENGLISH | : displays the menu in English | ||
|
|
|
|
FRENCH | : displays the menu in French | ||
default: ENGLISH
|
| : Previous menu | : Quit | : Select/adjust |
|
|
|
|
|
|
|
| |||
|
|
|
|
|
|
|
|
|
| [MENU] : Previous menu | [MODE] : Quit | []] [[] [}] [{] : Select/adjust | [ENTER] : Determine | ||
| |||||||
| |||||||
|
|
|
|
|
|
|
|
|
| : Previous menu | : Quit | : Select/adjust | : ID code deletion | |
|
|
|
|
|
|
|
|
| [MENU] : Previous menu | [MODE] : Quit | []] [[] [}] [{] : Select/adjust | [ENTER] : | ID code deletion |
| ||||||
| ||||||
|
|
|
|
|
| Determine |
40
41