Options
English
Important Information
Table of Contents
Advanced Features
Table of Contents
Network Feature
Problem Solving
Printout Journals and Lists
Appendix
This page is intentionally left blank
Safety Information
Hint
Safety Information
Important Safety Instructions
Safety Information
Function Key
Any function can be started by first pressing
Then select the desired function on the display
External View
Power switch
Telephone Line Jack
External Telephone Optional
Used to select the FAX Original size manually Mode
On Line Indicator
Blinks When sending Or receiving faxes
Control Panel
Used to switch the machine into energy saving mode
Ten Keypad
Used for manual number
Dialling, recording phone
This page is intentionally left blank
Adjusting the Volume
Setting The Ringer Volume
Select the desired setting for the Ringer Volume
Press or to scroll the display to the desired Fax Parameter
Setting the Monitor Volume
Press or repeatedly to raise or lower the Volume
Monitor
You will hear the dial tone through the speaker
Setting the Date and Time
User Parameters
User Parameters Select a Function
User Parameters Date & Time
15-08-2001
Setting Your Logo
User Parameters
Logo
Logo Panasonic
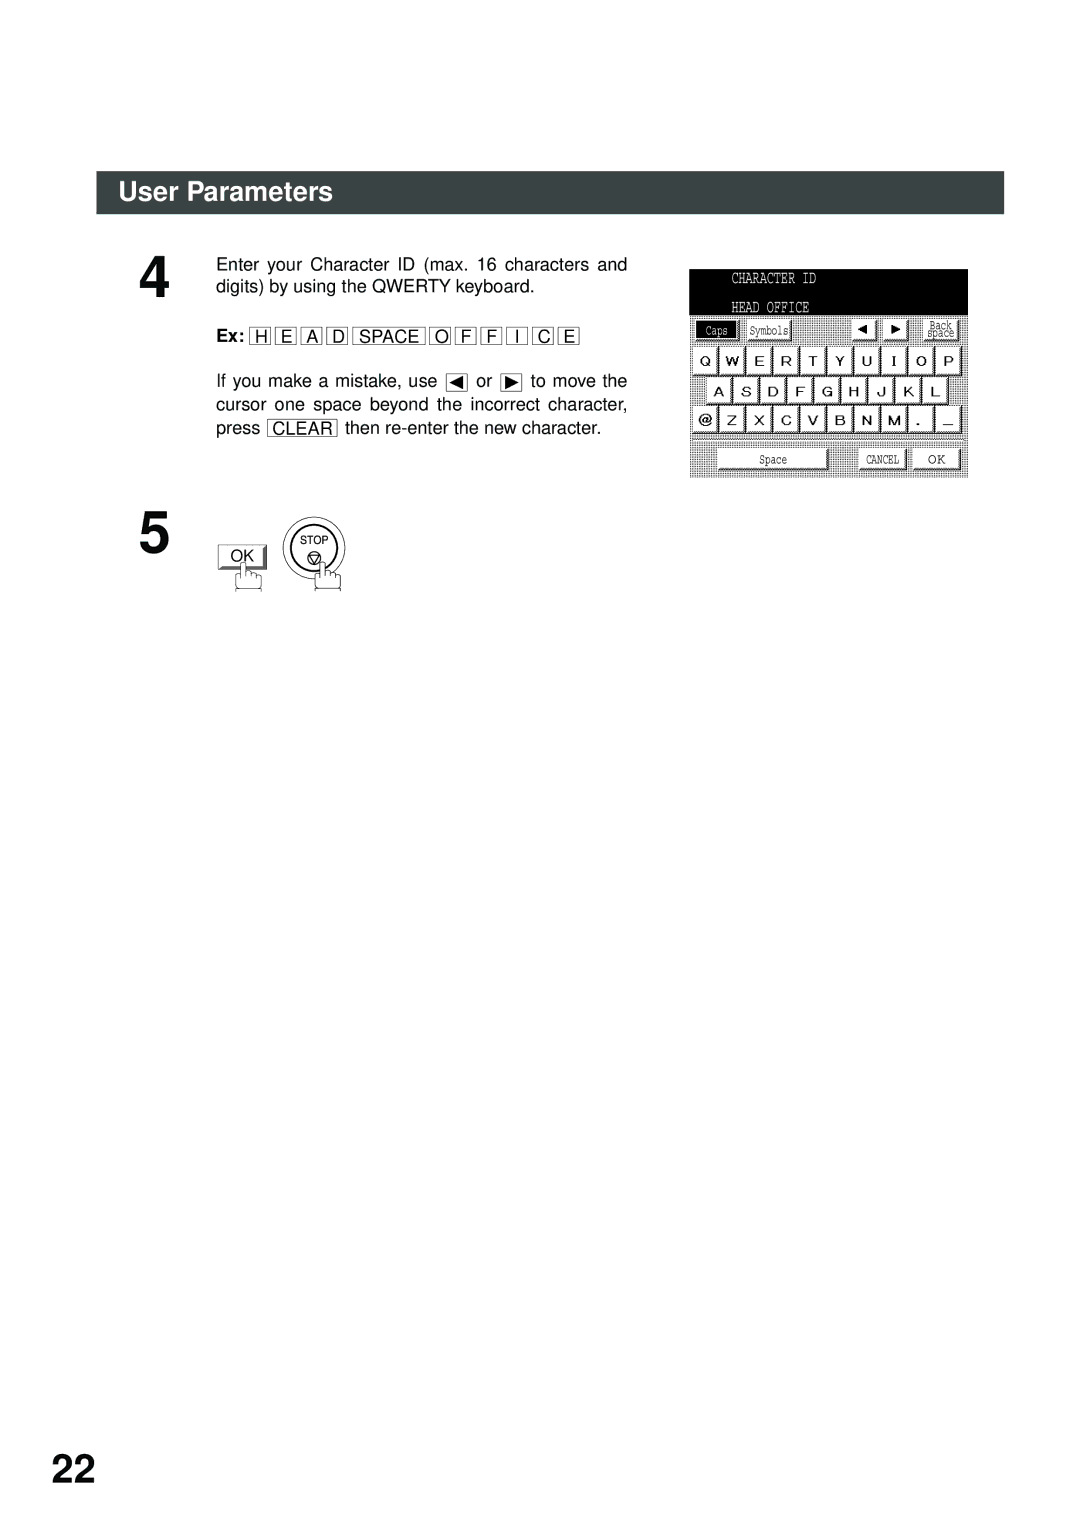
Setting Your Character ID
Character ID
Character ID Head Office
Setting Your ID Number Fax Telephone Number
User Parameters ID no
Enter Upto 20-DIGITS
201 555
Phone Book
Adding Telephone Numbers
To add a Telephone Number, follow the steps below
Phone Book Enter Name Sales Dept
Phone Book Enter KEY Name Sales Dept
To change the settings of a Speed dialling number
Editing the Phone Book
Select the station you wish to change
Then enter a new telephone number. See Note
Phone Book Enter Name Panafax
Book
KEY Name Panafax
To erase an entry from the Phone Book
Enter the station you wish to erase
Delete Station
DELETE?
To return to standby, press
Stop
Setting the Fax Parameters
Customizing Your Machine
To set another parameter, press
Return to or press standby
To return to
Parameter Setting Comments
Fax Parameter Table
Function Select Mode RCV to Memory
SUB-ADDRESS
Special Tray
How To Load Originals
Loading Originals
Sending Non-Standard Size Originals
Flatbed Scanning
Basic Transmission Settings
Resolution
Contrast
For detailed originals
Original Text/Photo
Verification Stamp
For text and photo originals
For photo or illustration originals
Communication Journal Comm. Journal
Select the desired setting
Press To scroll the display to the desired
Fax Parameter
Sending Documents
Memory Transmission
Memory XMT
Memory XMT Memory Full
Manual Number Dialling
Place originals face up on the ADF
SET
Phone Book Dialling
Place a book or an original face down on the Platen Glass
Ready to FAX Original SET
Press the key name for the desired station
If the key name for the station that you want to send to
Direct Transmission
Manual Number Dialling Direct Transmission
Make sure that Direct XMT is displayed, if
Ex 5 5 5 1 2 3
Dialing
Your machine starts to dial the telephone number
Direct COMM. NO.027
Duplex Scan Select Mode set to
Rotated Transmission
Double-Sided Transmission Receiving
Rotation XMT Fax Parameter set to
Setting the Rotation XMT
Invalid Valid
Rotation XMT
Sending Documents Using Duplex Scan
Duplex Scan
Duplex Scan
OFF
Dial by any combination of the following methods
Manual Number Dialling, press After
Setting Duplex Print
Duplex Print
Voice Mode Transmission
Off-Hook Dialling
XMT On Line
On-Hook Dialling
You will hear dial tone through the monitor speaker
Dial the telephone number from the keypad Ex 5 5 5 1 2 3
When you hear a beep
Transmission Reservation
Memory Transmission Reservation Multi-Tasking
Your machine will store the documents into memory
To reserve your machine for sending the urgent documents
Memory XMT appears, press
Change to Direct Transmission
To cancell the direct transmission reservation
Ex 555
Redialling
Automatic Redialling
Manual Redialling
Key Set originals face down
Receiving Documents
Automatic Reception
Manual Reception
When the telephone rings, lift the handset
To receive documents manually
See Note
Remove any documents from the ADF
Selecting the Print Reduction Mode
Print Reduction
Automatic Reduction
Fixed Reduction
Receiving Oversize Documents
Transmitted Document Received Document
Substitute Memory Reception
Memory RCV`D DOC Printing
This page is intentionally left blank
Delayed Batch Transmission
Batch Transmission
Real-Time Batch Transmission
Timer Controlled Communications
Deferred Transmission
Enter the start time from the keypad and press OK
Use a 4-digit, 24-hour clock
Each station is entered up to 70 stations
Phone Book Dialling up to 200 stations
Deferred Polling
Ex 0 3 3 0 330 a.m. and press OK
Deferred Polling
Polling
Polling STNS0000 Panasonic
Deferred Advanced Communication
Deferred ADV. Comm
Polling
Preparing to be Polled
Enter a 4-digit polling password and then press
Ex 4 3 2 1 and press OK Documents are stored into memory
Polling Documents from Another Station
1 and press
Polling STNS0001 Panasonic
Setting for Group Dialling
Program Keys
To set a Program Key for Group Dialling
Group Dial Enter Stations
Group Dial
America
Program Keys Select a Function
Setting for Program Dial
Program Dial Enter Program Name
Enter the Program Name up to 15 characters
Ex PRO.POLL and press
Enter the Program Key Name up to 10 characters
Program Keys
To change the setting of Group Dialling
Editing for Group Dialling
Modify Group Dial
Enter the Group Dial you wish to change and press
Group Dial KEY Name NEW Group
Group Dial Enter Stations America
China
Erasing the Program Key Settings
To erase the settings in a Program Key
Press the Program key you want to erase Ex PRO.POLL
Delete PROGRAM/GRP Select Delete Prog
Group Dial Program Dial Modify Group Dial Delete PROGRAM/GRP
Edit File Mode
Check Setting
Printing or Viewing a File List
Explanation of Contents
Sample File List
Changing the Start Time or the Station of a File
Change TIME/STN
Select the file that you want to change and press
Confirm Destinations Check and Press OK
Delete File Check Setting Press OK
Deleting a File
Select the file that you want to delete and press
Delete File MEM. DEF. XMT
Delete File
Print File Check Setting Press OK
Printing Out a File
Select the file that you want to print and press
Your machine will print the file. The documents
Will remain in memory even after printing the file
ADD Document Check Setting Press OK
Adding Documents Into a File
Edit File Mode
Retry an Incomplete File
Setting
100
Store Completed
Setting the RCV To Memory Password
Enter a 4-digit RCV to Memory Password and then
101
Receive To Memory
Setting RCV To Memory
102
103
Ready to FAX
104
Printing Documents
Message in Memory
Enter the password to print the documents
105
Then press See Note
Ex 1
106
Fax Cover Sheet
General Description
To Use the Fax Cover Sheet
107
Cover Sheet Select a Function
Ex Panasonic Start
108
Fax Cover Sheet Sample
Setting the Department Code
109
Department Code
General Description
110
Department Code Invalid Valid
Department Code
Setting the Department Code Name
111
Enter Department Code Number and press
ADD Code
112
Enter a 4-digit Department Code and press
Ex 1 1 1 1 and press
ADD Code Enter Name
113
Changing the Department Code
Enter Department Code Number that you wish to
Change and press
114
Enter New Department Code and press
DEPT.1
115
Deleting the Department Code
Enter Department Code you wish to delete
116
Enter the Department Code and press
Ex 10 10 10 10 and press OK
To delete another Department Code, repeat Steps 3 to
117
Sending a Document with Department Code
Panasonic Sales Dept
Input DEPT. Code
118
119
Dial the telephone number from the keypad
Printing a Department Code List
120
FAX Parameter List Printing
121
122
Printing a Department Code Journal
Journal Printing
123
Sample Department Code Journal / Originated Calls
124
Sample Department Code Journal / Received Calls
Setting the Selective Reception
125
Selective Reception
FAX Parameters Select a Function
126
Select RCV
Password Communications
Model Special Settings
127
Compatibility with Other Machines
Setting Password Transmission
To set transmission password and parameter
Enter a 4-digit Transmission Password and press
128
Password is not checked Password is checked
129
Setting Password Reception
To set receiving password and parameter
130
Enter a 4-digit Receiving Password and press
131
Ex 1 2 3 4
Using Password Transmission
PASSWORD-XMT Select a Function OFF on
132
Using Password Reception
133
134
Confidential Mailbox
Confidential Mailbox
Confidential Mailbox Requirement
135
Confidential XMT Input a 4-DIGIT PWD
136
Enter a 4-digit Confidential Code and press
Ex 2 2 3 3 and press
137
138
139
Sample CONF. RCV Report
140
Storing a Confidential Document in Your Machines Mailbox
Confidential Polled Input a 4-DIGIT PWD
141
142
Printing a Confidential Document from Your Machines Mailbox
To delete a file using the Confidential Code
143
Enter a 4-digit Confidential Code and then press
144
To delete all confidential files from memory
Delete CONF. File Delete ALL FILES?
Setting of Routing, Forwarding or Relaying
145
Sub-Addressing
Compatibility with Other Machines
Setting the Sub-Address into a Phone Book Numbers
146
147
Then continue to enter the station name and key name
Phone Book Enter Name
Using the Phone Book Dialling Numbers
148
Sending a Fax with Sub-Address
Using Manual Number Dialling
149
Then enter the Sub-Address up to 20 digits
Ex Telephone number = 5551234, Sub
150
Use Sub-Address temporarily
SUB-ADDRESS XMT Enter SUB-ADDR
151
Up to 70 stations Phone Book Dialling. Up to 200 stations
SUB-ADDRESS XMT
152
153
Journal
To print a Journal
154
Journals and Lists
For viewing transmission transactions only
155
Individual Transmission Journal Ind. XMT Journal
IND. XMT Journal Printing
156
Sample Transaction Journal
Sample Individual Transmission Journal Ind. XMT Journal
157
158
Sample Comm. Journal
159
160
Phone Book List
Phone Book List Printing
161
Sample Phone Book List
162
Group and Program List
Program List Printing
163
Sample Group and Program List
164
FAX Parameter List
165
Sample FAX Parameter List
166
Troubleshooting
If You Have Any of These Problems
Mode Symptom Cause / Action
167
168
Communication
169
Information Codes
170
171
172
Specifications
173
Power Consumption
174
Phone Book Memory
Capacity
175
Options and Supplies
176
Glossary
G3 Mode Group
Duplex Scan
End Receiving Station
FAX Parameter List
178
179
180
181
182
Using Manual Number Dialing
183
Facsimile Telephone Number Directory
Name Telephone Number
For Service Call