Pulse-or-tone dialing capability
Charge the battery for 6 hours before initial use
Dual Handsets Digital Cordless Answering System
Accessories included
For your future reference
Base Unit Location/Noise
Battery Charge
For Best Performance
Contents
Contents
Location of Controls
Base unit
Answer on Button
Message Button p Greeting REC Record
Location of Controls
Handset
Charger unit
OFF Button
Handset soft keys
Handset navigator key
Base unit display
Talk 00-00-32 KVE MuteL
Installation
Connections
Installation Installing the Battery in the Handset
Battery strength
To replace the battery
Display prompt Battery strength
Installation
Battery information
Battery replacement
Recharge
Programmable Settings
How to select a function item from the menu
Initial setting
Then press Save to save your setting
Programmable Settings Function Menu Table Handset
Main menu
Programmable Settings Date and Time Handset
To confirm the date and time, repeat steps 1 and 2 above
Programmable Settings Dialing Mode Handset
Programmable Settings Line Mode Handset
Auto Talk Handset
Ringer setting
Programmable Settings Ringer Volume
Handset ringer volume Handset
Programmable Settings
Base unit ringer volume Base Unit
To turn the ringer on, press Volume or
Ringer Tone
Setting the base unit ringer tone by using the Handset
Select the desired ringer tone by pressing d or B
Ringer tone 1Tone KBack dB SaveL
To 3 Bell ringer patterns To 7 Melody patterns
Programmable Settings LCD Contrast Handset
Preparing the Answering System
Greeting Message Base Unit
Scroll to LCD contrast by pressing d or
Preparing the Answering System
To record a greeting message
To review the greeting
To erase the greeting
Flash Memory Message Backup Message storage
Caller’s Recording Time Handset
Pre-recorded greeting
Recording time
Number of Rings Handset
Select the number of rings by pressing d or
Toll saver
Number of rings
Preparing the Answering System Recording Mode Handset
Recording mode
Scroll to Recording mode by pressing d
Select the recording mode by pressing d or
Using the Handset Handset
Making Calls
To have a hands-free phone conversation
Hands-free Digital Duplex Speakerphone
To redial using the redial list Memory Redial
Making Calls
To dial after confirming the entered number
To redial the last number dialed
Backlit LCD display/Lighted handset keypad
To put a call on hold
Voice Enhancer Technology
Making Calls Using the Base Unit Base Unit
To adjust the speaker volume during a conversation
Press SP-PHONE
Dial a phone number
Answering Calls
Talk into the MIC To hang up, press SP-PHONE
OFF s Auto Talk
To transfer the call to another person, see pages
Caller ID Service
How Caller ID information is displayed
Private name display
Display Meaning
Caller ID Service Using Talking Caller ID
Announcing caller information Talker Caller ID
Caller ID Service
Handset Talking Caller ID feature Handset
Base unit Talking Caller ID feature Handset
To turn Talking Caller ID on or off
Press Rcvd calls, d, or B to enter the Caller List
Using the Caller List
Viewing the Caller List Handset
Using the Caller List
Calling Back from the Caller List Handset
What , means
If a caller calls more than once
Scroll to the desired caller by pressing d or
Press Select Press Edit
15553215555
15553215555 Kf MENU=Save PL 015553215555
Press Rcvd calls, d, or B to enter
Caller List
Scroll to the desired caller by pressing d or
Press Select
Using the Caller List Erasing Caller Information Handset
To erase a specific caller
To erase all entries
Then press Erase
To store an emergency number
Phone Book
Storing Names and Numbers Handset
If you make a mistake when entering a name or number
Phone Book
Selecting characters to enter names
For example, to enter Tom
Phone Book Dialing from the Phone Book Handset
Press Search
To search for a name by initial
Press d repeatedly until the desired name is displayed
Chain Dial Handset
Index table
While you are on a call Press Menu
Search for the desired item by pressing d or
Jane Walker
Phone Book Editing an Item in the Phone Book Handset
Erasing an Item in the Phone Book Handset
Phone Book Copying Items in the Phone Book Handset
To copy one phone book item to another handset
Press Menu Scroll to Copy phone book by pressing d
Press Select at Copy 1 item
Phone Book
Copy phone book
Copy all items
Scroll to Copy all items by pressing d
Intercom
Making Intercom Calls
Press HOLD/INTERCOM
Press LOCATOR/INTERCOM
Intercom
Answering Intercom Calls
During an intercom call
Press C, s or HOLD/INTERCOM
To make a voice announcement to all handsets, press 3
When stop paging, press SP-PHONE or LOCATOR/INTERCOM
Intercom Voice Paging Base Unit
Transferring a Call
Press SP-PHONE or LOCATOR/INTERCOM to answer
Quick call transfer
Transferring a Call
From a Handset to another Handset
Conference Calls
To join a conversation Call Share
During a call, press HOLD/ Intercom
To page the base unit, press
Special Features
For Call Waiting Service Users
Temporary Tone Dialing
Muting Your Conversation
Special Features Using the Pause Key
Selecting the flash time Handset
Set flash time
Scroll to Set flash time by pressing d
Special Features Incoming Call Tone Handset Base Unit
Handset incoming call tone Handset
Base unit incoming call tone Handset
Incoming call
To turn the Dial Lock on
Special Features Key Tone Handset
Dial Lock Handset
Dial lock
Special Features
To cancel the Dial Lock
Handset Registering
Handset 1 Registered
Setting the Unit to Answer Calls Base Unit
Automatic Answering Operation
Press Answer on to turn on the Answering System
Press Answer ON, Greeting REC, or
To turn the incoming call monitoring feature off
Press Message
Listening to Messages
To play back messages
Voice menu
Press Menu Press Select at Message play
To end remote operation, press OFF
For Caller ID service users p
Listening to Messages
To call back the displayed number
5557778888 KRepeat SkipL KEdit CallL
Erasing Messages
Erasing a specific message
Erasing all messages
Within 10 seconds, press Erase again
When finished, press Memo or Stop
Recording a Memo Message
Remote Operation from a Touch Tone Phone
Remote Code Handset
Summary of remote operation
Enter a 2-digit remote code
Remote Operation from a Touch Tone Phone Voice Menu
Talk after the long beep
Skipping the greeting
Direct commands
To turn on the Answering System
Connecting the optional headset
Belt Clip
Optional Headset
To attach the belt clip To remove the belt clip
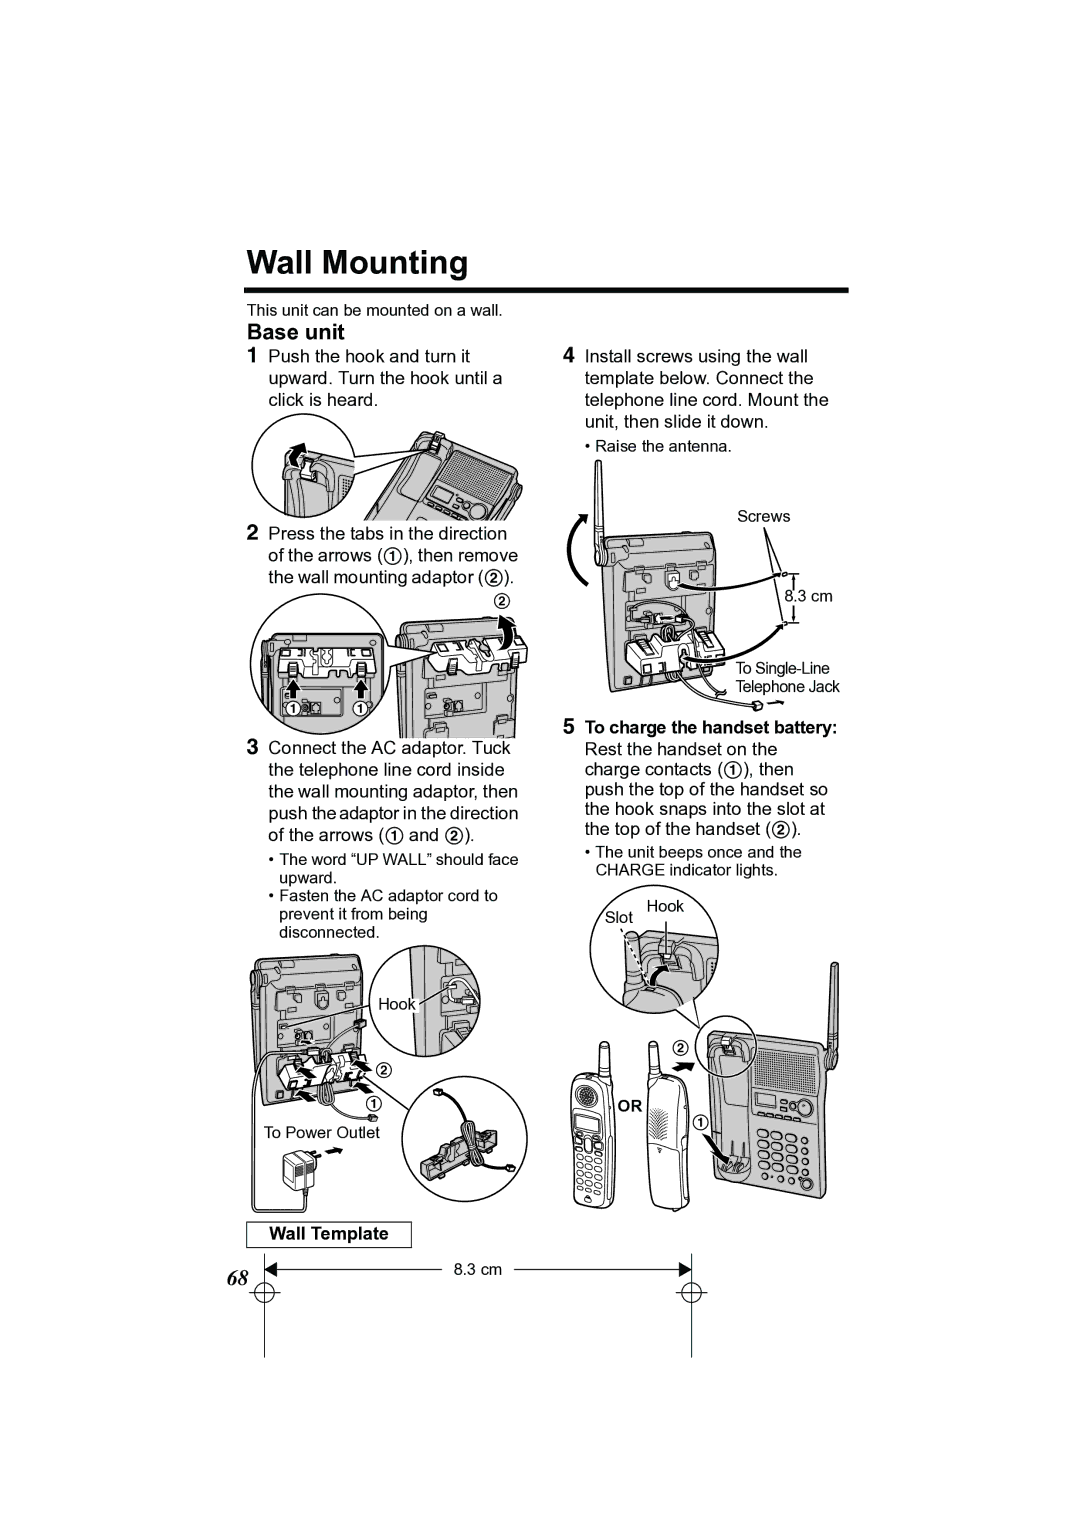
Wall Mounting
Wall Template
Wall Mounting
Wall Template for the Charger unit
Direct Commands
Menu item Command Selection items
Direct Commands
During programming
If the Following Appears on Your Display
Display message Cause & Remedy
If the Following Appears on Your Display
Telephone System
Troubleshooting
Problem Cause & Remedy
Troubleshooting
Troubleshooting
Answering System
Problem Cause & Remedy
Recharge battery is
But Recharge battery is
General
Safety Instructions
Specifications
Safety Instructions
62, 4-chome, Minoshima, Hakata-ku, Fukuoka 812-8531, Japan
PQQX14264ZA F0504-0D