Polycom RMX 1500/2000/4000 Getting Started Guide
Version 7.0 August 2010 DOC2560A
All other trademarks are the property of their respective owners
United States Federal Communication Commission FCC
United States Safety Construction Details
Regulatory Notices
CE Mark R&TTE Directive
Chinese Communication Certificate Singapore Certificate
RMX 2000 complies with IDA standards G0916-07
System Overview
Table of Contents
First Time Installation and Configuration
Basic Operation
Table of Contents
Viewing and System Functionality Permissions
Gathering Phase
Page
Table of Contents
RMX 1500/2000/4000
the RMX 1500/2000/4000 Administrator’s Guide included with the system
System Overview
E1/T1 PRI Lines RMX 1500/2000/4000 RMX Web Client LAN Endpoints
Chapter 1-System Overview
ISDN Endpoints
IP Phone
The RMX 1500 supports one ISDN card with 4 E1/T1 PRI lines
Dynamic Continuous Presence
RMX Main Features
Conferencing Modes
CP mode conferencing is defined by
Telepresence Mode
Table 1-1 Continuous Presence - Video Layouts Continued
VSW mode conferencing is defined by
Video Switching
Multiple Switching Modes
Operator Conference
Video Resolutions
Resolution Configuration for CP
People+Content is Polycom’s proprietary equivalent of H.239
H.239 / People+Content
IVR-Enabled Conferencing
Video Clarity
Entry Queue
Permanent Conference
Conferencing Capabilities and Options
On Demand Conferencing
Scheduled Conferencing / Reservations
Security
Cascading Conferences
Gateway
1-11
Far End Camera Control FECC/LSD in video conferences
Conference Management and Monitoring Features
Lecture Mode or Presentation Mode in Continuous Presence conferences
Media Encryption
Operator Assistance & Participant Move for conferences in CP mode
Card Configuration Modes
Three Card Configuration Modes are supported
1-13
Workstation Requirements
1-14
1-15
Windows 7 Security Settings
To disable Protected Mode
Internet Local intranet Trusted sites
1-16
To configure Internet Explorer
Internet Explorer 8 Configuration
When using Internet Explorer 8 to run the RMX Web Client or RMX
Internet Local intranet
5 In the Browsing history section, click the Delete button
1-18
The Internet Options dialog box is displayed with General tab open
The Delete Browsing History dialog box is displayed
1-19
9 In the Internet Options dialog box, click the Settings button
6 Select the Temporary Internet files and Cookies check boxes
1-20
10 Click the View objects button
1-21
Prerequisites
11 Select the CEMAClassLoaderCntl Object file
1-22
3 First Entry Power-up and Configuration
First Time Installation and Configuration
2 Hardware Installation and Setup
Configure the Default IP Network Service
Default IP Service Conferencing Service
IP Services
Default IP Service Conferencing Service
Preparations
Local Network Settings
IP Network Services Required Information
Factory Default
Parameter
ISDN/PSTN Services
To unpack and lift the RMX
Unpacking the RMX
Unpacking the RMX
Two boxes are placed on the top Stratocell, labelled
4 Remove the boxes and top Stratocell and open the anti-static plastic bag wrapping the RMX
Subnet Mask Default Router IP Address
To modify the USB key settings
The LAN Configuration Utility dialog box opens
Hardware Installation and Setup
Installing the RMX
Mounting the RMX 1500 in a Rack
2-10
For the RTM ISDN 1500 module
Connecting Cables on the RMX
To connect the cables For the RTM-IP 1500 module
2-11
Mounting the RMX 2000 in a Rack
2-12
E1/T1 PRI Connection
2-13
Do not remove the protective caps from LAN1, LAN3 and ShMG ports
LAN 2 Connection
Mounting the RMX 4000 in a Rack
To install the RMX 4000 in a 19”rack Using rack brackets on the RMX
Using a shelf
2-14
DC Power Supply connections
Connecting the RMX 4000 to the Power Sources
AC Power Supply connections
2-15
2-16
3 Remove the transparent plastic caps on the terminal block
2-17
6 Replace the transparent plastic caps on the terminal block
To connect the cables AC and DC systems RTM-IP
2-18
To power-up for the first time using the USB key
First Entry Power-up and Configuration
Procedure 1 First-time Power-up
2-19
3 Select Product Registration
Procedure 2 Product Registration
Obtaining the Activation Key
2-20
Procedure 3 Connection to MCU
2-21
2-22
only if the factory default Management IP addresses were not modified
1 Enter the required IP information in the dialog box
Fast Configuration Wizard
2-23
2 Click Next
2-24
Note This field is displayed in all IP Signaling dialog
Field
4 Click Next
2-25
3 Enter the required Routers information in the dialog box
5 Enter the required DNS information in the dialog box
2-26
Signaling Host and Shelf Management with the DNS
6 Click Next
7 Select the IP Network Type H.323, SIP or H.323 & SIP
2-27
8 Click Next 9 If you selected SIP only, go to Step
Aliases
2-28
Primary Gatekeeper
13 Enter the required SIP Server information in the dialog box
2-29
Select the protocol that is used for signaling between
2-30
The IP Network Service is created and confirmed 16 Click OK
an ISDN/PSTN Network Service, go to Step
2-31
18 Click Next
2-32
17 Define the following parameters
all other spans that you may later define must also
2-33
The PRI Settings dialog box opens 19 Define the following parameters
2-34
20 Click Next The Span Definition dialog box opens
22 Click Next
2-35
21 Define the following parameters
2-36
The Phones dialog box opens
28 Click Save & Continue
2-37
2-38
Slot - the MPM/MPM+/MPMx card that the RTM ISDN
RMX 4000 MPM1/MPM2/MPM3/MPM4
RTM ISDN 1500 card is connected to RMX 2000 MPM 1/MPM2
The System Flags dialog box is displayed
2-39
Description / Default
32 Enter the required System Flags information in the dialog box
2-40
36 In the Please wait for system reset message box, click OK
33 Click Save & Close
User Definition
In the RMX Web Client’s Main Screen an MCU State indicator displays
1 On the RMX menu, click Setup Multilingual Setting
Selecting the RMX Web Client Languages
RMX’s Default Conferencing Settings
2-42
2-43
endpoint upon connection to the Entry Queue and lists the
2-44
numbers range defined in the Network Service. It must be
Includes all the voice messages and video slides used to
Customizing the RMX’s Default Conferencing Settings
2-45
2-46
You can schedule conferences to start in the future
Basic Operation
Starting the RMX Web Client
Link to RMX Manager Installer
To start the RMX 2000 Web Client
The Login screen contains a link to the RMX Manager installer
Conference Templates
RMX 2000 Web Client Screen Components
Conference List List Pane RMX Management Status Bar Address Book
Viewing and System Functionality Permissions
Conferences List
If you are logged in as a user with Chairperson permissions
Status Bar
List Pane
RMX Management
Port Usage Gauges
System Alerts
Participant Alerts
MCU State
The High Port Usage threshold
Dialing Direction - Dial-in or Dial-out
New Participant Delete Participant Import Address Book
New Group Delete Group Export Address Book
IP Address/Phone - of the participant
Displaying and Hiding Conference Templates
Conference Templates
Displaying and Hiding the Address Book
A Conference Template
To re-size a pane
To adjust column width
Customizing the Main Screen
3-11
To switch between Toolbar and List Views
To restore the RMX 2000 display window to its default configuration
On the RMX 2000 menu, click View Restore RMX Display Defaults
Customizing the RMX Management Pane
To expand or Collapse the Frequently Used and Rarely Used sections
3-13
3-14
Start any Conference Template saved in the Conference Templates list
Starting a Conference
Start a Reservation
3-15
3-16
Starting a Conference from the Conferences Pane
To start a conference from the Conference pane
2 Define the following parameters
General Tab
3-17
be used in the Routing Name
3-18
Comma, colon and semicolon characters cannot
3-19
system must reserve resources
3-20
enough to accommodate the participants specified in
Participants Tab
3-21
Participants List
3-22
Column / Button
A Unicode field that displays the participant’s name
3-23
Participants can be added to the conference in the following methods
To add participants from the Address Book
3-24
10 Click the Information tab. The Information tab opens
Information Tab
To add information to the conference
3-25
3-26
11 Enter the following information
3-27
Starting a Reservation
To start a conference from the Reservation Calendar
3-28
The New Reservation - General tab dialog box opens
To start an ongoing conference from a Template
Administrator’s Guide, Reservations” on page
Starting an Ongoing Conference From a Template
2 Click the Start Conference from Template button. or
3-30
Participants that are connected to other ongoing conferences when the template becomes an ongoing conference are not connected
3-31
Click Link to Connect Dial Manually to Connect
3-32
Connecting to a Conference
Direct Dial-in
ISDN/PSTN Participants
H.323 Participants
SIP Participants
Example
Connecting to a Polycom Conference from an Outlook Meeting Invitation
3-34
Figure 3-2 Dial-in Connection via Entry Queue
Entry Queue Access
3-35
ISDN and PSTN Participants
3-36
Automatic Dial Out
Gathering Phase
Dial-out Participants
Manual Dial Out
If enabled
3-38
Indicator
Textual Information
3-39
Gathering Phase Guidelines
The Gathering Phase is not supported in Video Switching Conferences
3-40
Content Gathering Slide
3-41
Text Indication in the Video Layout
Endpoint Names
To change the Display Name
3-42
2 Enter the new Display Name in the Name field 3 Click OK
The Participant Properties - Media Sources dialog box opens
3-43
Text Indication
3-44
Closed Caption
Transparent Endpoint Names
Permanent Display of Endpoint Names
3-45
Small Text, White on red, Top, Middle
Message Overlay
3-46
General Monitoring
Using the buttons in the toolbars
Monitoring Ongoing Conferences
3-47
Operations Menu
Multi Selection
3-48
Multi-selected
1 Click in the Chairperson Password field
Using the Chairperson Password for Filtering
To search for an ongoing conference by Chairperson Password
Conference Level Monitoring
Field
3-50
Displays conference name and type of conference
Description
3-51
Content Resource Deficiency - Content will not be
The Conference Properties - General dialog box opens
Roll Call/Audible Tones During an Ongoing Conference
To monitor a conference
3-52
IVRROLLCALLUSETONESINSTEADOFVOICE System Flag in system.cfg
Audio Only Message
Secured Conference Monitoring
3-53
Participant Connection Monitoring
Participant Level Monitoring
Monitoring Ongoing Gateway Sessions
3-54
Awaiting Conference Assistance - The participant
3-55
Awaiting Individual Assistance - The participant
Lecturer and Chairperson - The participant is
3-56
Cascade Enabled Dial-out Participant - A special
3-57
3-58
Video Preview
To preview the participant video
3-59
The Video Preview window opens
Changing the Duration of a Conference
Operations Performed During On Going Conferences
Conference Level operations
To extend or shorten a conference manually
To drag & drop participants into the Participants List
Adding Participants from the Address Book
To terminate a conference manually
1 Open the Address Book
Moving Participants
3-62
Moving a Participant Interactively
3-63
Copy Conference
Saving an Ongoing Conference as a Template
Copy and Paste Conference
To save an ongoing conference as a template
Paste Conference. or
Paste Conference
To paste a conference
3-65
Paste Conference As. or
Paste Conference As
To paste a conference as a new conference
3-66
Changing the Video Layout of a Conference
3-67
To change the video layout of a conference
3-68
3-69
Video Forcing
Video Forcing Guidelines
To video force a participant to a window
3-70
Switching between participants is renewed and is audio activated
To cancel Video Forcing for a window
3-71
5 Repeat step 3 to force participants to other windows 6 Click OK
Enabling and Disabling Video Clarity
To enable or disable Video Clarity
2 Click the Video Settings tab
3-72
Menu
Participant Level Operations
3-73
Button
3-74
3-75
To copy a participant
Copy Cut and Paste Participant
Copy Participant
3-76
3-77
Cut Participant
To cut a participant
3-78
Paste Participant
To paste a participant
3-79
Paste Participant As
To paste a participant as a new participant
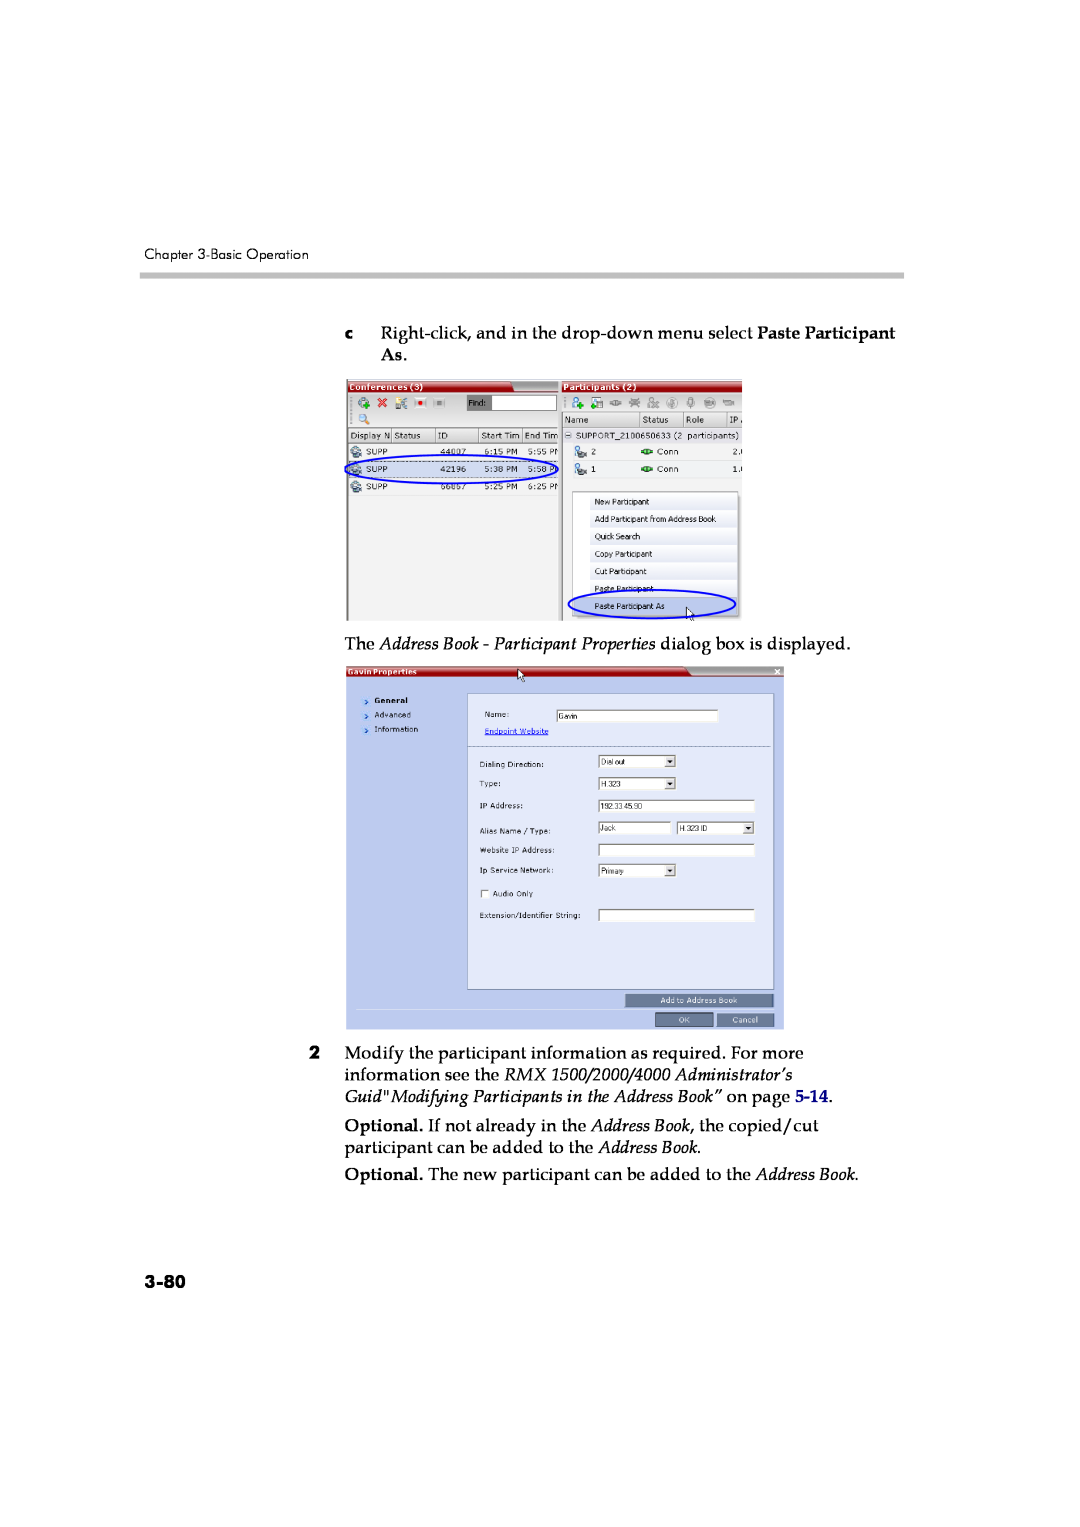
c Right-click, and in the drop-down menu select Paste Participant As
The Address Book - Participant Properties dialog box is displayed
3-80
3-81
Personal Layout Control with the RMX Web Client
To change a participant’s Video Layout and Video Forcing
3-82
Personal Layout Selection with Click&View
To change Personal Layout with Click&View
3-83
For example, if you want a four-square video layout, press
Conference Control Using DTMF Codes
3-84
Operation
3-85
Table 3-9 Default DTMF Codes to Manage Conferences and Participants
DTMF String
Requesting Help
3-86
3-87
Personal Conference Manager PCM
Guidelines
3-88
If enabled, Message Overlay is not displayed while PCM is active
3-89
Everyone /Chairperson Default DTMF Code ‘##”
3-90
PCM Interface
Initiating PCM
3-91
Remote Control Device Keys
Menu Navigation - Arrow and Zoom Keys
3-92
Table 3-11 PCM - DTMF Codes
DTMF Codes - Numeric Keys
3-93
Invite Participant
PCM Main Menu - Level
Click&View
Click&View” on page
Optional. To display all participants
5 Optional
A message, Press # or Zoom In to select, is displayed
3-95
To view and change the Participants Mute/Status
Participants Mute/Status
Participant
3-96
3-97
The status icons are summarized in Table
3-98
Camera Control
To control a far camera
3-99
Video Force
To Video Force a participant’s video
Recording
3-100
To pause recording
To use the recording functions
To start recording
To resume recording
To disconnect a participant from the conference
Drop Participant
To stop recording
3-102
3-103
Terminate Conference
To terminate a conference
3-104
Explanation
Glossary
Abbreviation
Term
Chapter A-Glossary
signal can be easily recognized by a computer. The codes
translates LAN alias addresses of terminals and gateways
Term
channels of 64 Kbps each and one D channel of 64 Kbps
Term
Abbreviation
Explanation