Hardware Guide
Page
Table of Contents
107
100
103
106
126
119
121
124
Introduction
Symbols
How to Read This Manual
This manual uses the following symbols
120
Model-Specific Information
Page
Positions of Warning and Caution labels
Power Switch Symbols
Manuals for This Printer
List of Option
Reading the Html Manuals on the CD-ROMs
Reading the Html Manuals That You Install on the Computer
This section explains how to use Html format manuals
Operating Instructions
Click the title of the manual you want to read
Open the Html manuals that you installed
Page
Exterior Front View
Guide to the Printer
Exterior Rear View
Interior
Control Panel
Control Panel
Guide to the Printer
Where to Put the Printer
Installing the Printer
Installing the Printer and Options
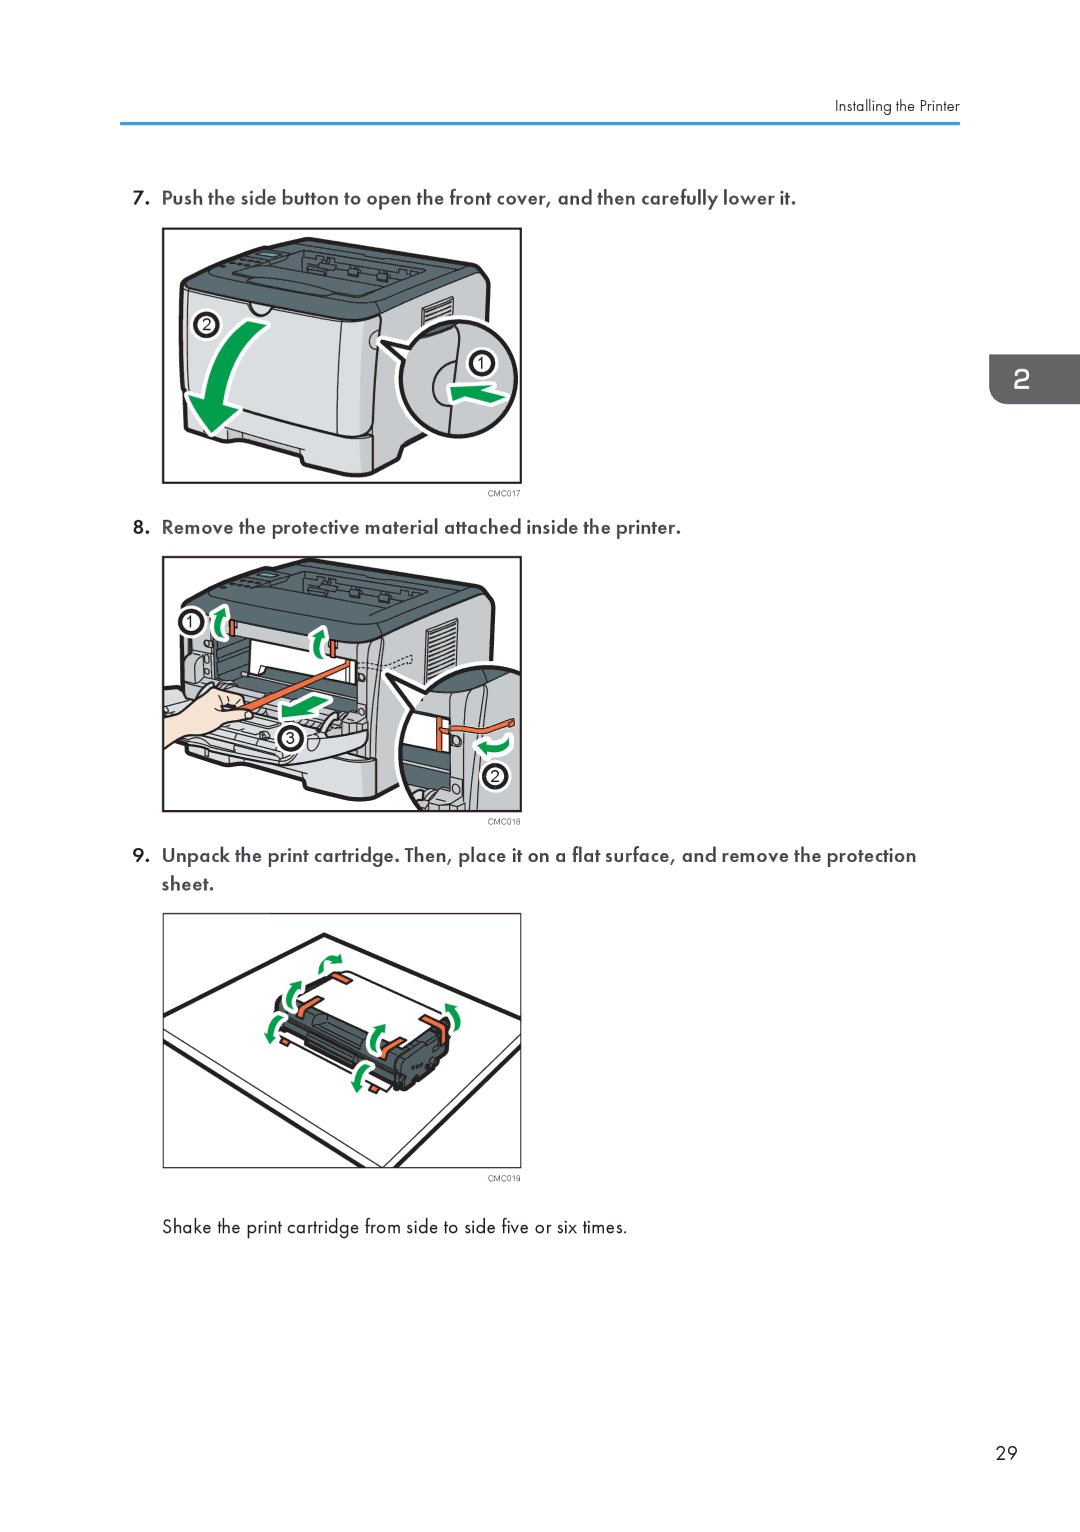
Installing the Printer
Unpacking
Installing the Printer
Do not touch the ID chip on the side of the print cartridge
CMC015
Make sure the levers are pulled up
Pull out the tape, and then remove the protective materials
Remove the protective material attached inside the printer
CMC020
Remove the protective material attached inside the tray
Carefully pull tray 1, and then pull out with both hands
Carefully push tray 1 straight into the printer
Pull out and raise the stop fence
Turning the Power On
Plug in the power cable
Menu Language
Turn the power switch to On
Selecting the Display Language
Press the Menu key
Press the Menu key to return to the initial screen
List/Test Print Config. Configuration page will be printed
Test Printing
Language English
Attaching Paper Feed Unit
Installing Option
Check the package contains Paper Feed Unit
CMC033
Network Connection
This chapter explains how to connect network and USB cables
Connect the Ethernet cable to the Ethernet port
Reading the LED Lamps
USB Connection
Connecting the Printer
Dhcp Active
Ethernet Configuration
Specifying an IP Address for IPv4 No Dhcp
Press the or key to display DHCP, and then press the OK key
Host Interface Network Setting
IPv4 Config IP Address
Menu Host Interface
Receiving an IP Address for IPv4 Automatically Dhcp
Active Address will be detected by the printer
Specifying an IP Address for IPv6 No Dhcp
Press the or key to display Off, and then press the OK key
Press the or key to display IPv6, and then press the OK key
Press the or key to display On, and then press the OK key
IPv6
Prefix Length 0 128
IPv6 Config Manual Address
Receiving an IP Address for IPv6 Automatically Dhcp
Manual Address Prefix Length
Press the or key to select On, and then press the OK key
Router/HUB Printer 10Mbps
Setting the Ethernet Speed
100Mbps Auto Select
Network Setting Ethernet Speed
13.8 to 43.0 lb 80 g/m2, 20 lb Thick Paper Plain Paper
Paper and Other Medias Supported by This Printer
OHP
13.8 to 43.0 lb Thick Paper Plain Paper
Paper and Other Medias Supported by This Printer
Types of Paper and Other Media
Paper Recommendations
Loading Paper
Storing Paper
A4, Legal 81/2 × 14 , Letter 81/2 ×
Specifications of Paper Types
Folio 81/4 × 13 , or 16K 195 × 267 mm
28.0 lb
M2 26.6 to 28.0 lb
Approximately half that of plain paper
Thick Paper 1, or Thick Paper
Paper, Thick Paper 1, or Thick Paper
Paper or Thick Paper
Print cartridges photo conductor unit
Paper thicker than 160 g/m2 cannot be printed onto
Supported paper tray Bypass tray
One by one
Down. Doing so may cause a malfunction
It is recommended to place one sheet at a time
Them to stick together and result in a misfeed
Fan envelopes, and then align their edges before loading
Paper Not Supported by This Printer
Print Area
Paper Storage Precautions
Print area Feed direction Approx .2 mm 0.17 inches
CMC044
Loading Paper in Tray
Loading Paper
Pull out tray 1 carefully with both hands
Place the tray on a flat surface
Load the new paper stack print side down
CMC052
Remove the tray 1 rear cover by pushing its center
Loading paper longer than A4
Lock the extender in the extended position
CMC060
CMC061
Setting a paper size using the control panel
Paper Input Paper Size
Menu Paper Input
Paper Size Tray 1 Ppr Size
Custom Size Horiz mm
Paper Size Tray 1 Ppr Size This example, Tray 1 is selected
Tray 1 Ppr Size Custom Size
Custom Size mm
Custom Size Vert mm
Specifying a paper type for Tray 1 and Tray
Tray Plain Paper
Loading Paper in the Bypass Tray
Paper Input Paper Type
Paper Type Tray
Open the bypass tray
Specifying standard size paper for the bypass tray
Adjust the side guides to the paper width
Paper Size Bypass Ppr Size
Specifying custom size paper for the bypass tray
Bypass Ppr Size Custom Size
Specifying a paper type for the bypass tray
Paper Type Bypass Tray
Following example explains the loading procedure for tray
Bypass Tray Plain Paper
Pull out tray 2 carefully with both hands
CMC068
Loading Envelopes in Bypass Tray
Following explains how to load envelopes into Bypass Tray
Carefully push tray 2 straight into the printer
Open the bypass tray
Open the rear cover
Adjust the side guides to the envelope width
Close the rear cover
Lower the green levers on both sides
Paper and Other Media
Replacing the Print Cartridge
This chapter explains how to replace consumables
Store print cartridge in a cool dark place
CMC096
Replacing Consumables
CMC097
CMC083
This chapter explains how to clean the printer
Cleaning the Printer
Cleaning the Friction Pad and the Paper Feed Roller
101
Wipe the friction pad with a damp cloth
Cleaning the Printer
Panel
Error & Status Messages on the Control Panel
Please wait
Unit Representative
Then try the operation again
Printing Misfeed Tray
Misfd BypssTray
Cartridge
Roller Representative Reset Tray
Tray Printing Press the Job Reset key to Cancel printing
Paper type setting
Error on the control panel
Panel Indicator
Printer Does Not Print
Windows
109
Mac OS
110
Other Printing Problems
Paper is bent or wrinkled. Use paper that have no bents or
Paper, or between the paper guide both side
Paper in the paper tray. Make sure there are no gaps
Paper is either too thick or too thin
113
Then press the OK key
Press the or key, and then select On
Prints to complete
Paper is static. Use paper that has been stored properly
Status Possible Causes, Descriptions, and Solutions
Only add paper when there is none left in the tray
Paper tray. Make sure there are no gaps
Horizontal lines appear on
Right position Match the paper size. See p.67 Loading Paper
Images are printed diagonally
To the pages Match the paper size See p.67 Loading Paper
System, and then press the OK key
Time until printing starts. To disable Energy Saver mode
If the Data In indicator on the control panel is flashing,
Just wait until it resumes
Check the paper settings of the printer driver
If the Alert indicator on the control panel lights up
Clean
Check the paper settings of this printer
Comes away from the paper, or
Additional Troubleshooting
120
This chapter explains how to remove misfed paper
When Paper is Jammed
122
Lifting the guide plate, remove the jammed paper carefully
When Misfd BypssTray Appears
125
When Misfd Dupl Unit Appears
127
Remove the jammed paper carefully
If there is jammed paper, carefully remove it
Pull tray 1 out completely with both hands
Push the blue lever
Pushing the blue lever lowers the duplex transport unit
CMC106
Lifting the guide plate, remove the jammed paper carefully
If the Printer is Not Going to Be Used for a Long Time
Turn off the power switch Pull out the plug from the socket
Preparing the Printer For a Long Period of Inactivity
Close the front cover with both hands carefully
Lower the levers with thumb fingers
133
Pull up the levers with thumb fingers
Moving and Transporting the Printer
Be sure to check the following points
If you have removed Tray 2, reinstall it
Moving over a Short Distance
Moving over a Long Distance
If Tray 2 is installed, remove it
Disposal
Print Cartridge
Consumables
Main Unit
Specifications
140
Dimensions
Printer only tray
Not extended
Specifications
Fonts
Options
Trademarks
Appendix
Guide to the printer
Connecting the printer
146
Remove misfed paper
147
148
Page
EN GB EN US M117-8504