This Camcorder is Manufactured by
Digital Video Camcorder Videocámara digital
Vistas posterior e inferior
Features
Características
Vista lateral izquierda
Selecting Audio Mode
Using the Tele Macro
Using the Fade In and Out
Using the Color Nite Shutter
Dubbing Sound Dubbed Audio Playback
Adjusting the LCD Bright/Colour during Playback
Applying Digital Effects Selecting the Digital Effects
Playback Pause Picture Search Forward/Reverse
Index
Notas referentes al giro de la pantalla LCD
Notas e instrucciones de seguridad
Notas referentes a la videocámara
Notas referentes a la condensación de humedad
Notas referentes a la limpieza de los cabezales de vídeo
Notas referentes a la batería
Nota referente al objetivo
Notas referentes al visor electrónico
Notas referentes a la empuñadura
Servicing Reparaciones
Replacement Parts Piezas de repuesto
Características
Features
Accesorios opcionales
Basic Accessories
Optional Accessories
Accesorios básicos
Front & Left View Vistas frontal y lateral izquierda
Viewfinder
Focus adjustment knob
Mode switch
Left Side View Vista lateral izquierda
Right & Top View Vistas superior y lateral derecha
Only
Charging indicator Tripod receptacle
Rear & Bottom View Vistas posterior e inferior
Memory card slot
DUB REW Play Direction
Zoom
Slow Still Stop 11. F. ADV
Attaching the Lens Cover
When You carry Your Camcorder
Hand Strap
Empuñadura
Battery Installation for the Internal Clock
Instalación de la pila para el reloj interno
Nota
Notas
Connecting a Power Source
To Select the Camcorder Mode VP-D353i/D354i/D355i only
Conexión a una fuente de alimentación
Cómo cargar la batería de iones de litio
Using the Lithium Ion Battery Pack
Charging the Lithium Ion Battery Pack
Utilización de la batería de iones de litio
Continuous recording time
Tiempo de grabación continuada
Notas
Indicador de carga de la batería
Battery Level Display
OSD in Player Mode
OSD in Camera Mode
OSD in M.Player Mode
Turning the OSD Encendido / apagado de OSD
On Screen Display On/Off Presentación en pantalla
Selecting the OSD Language Selección del idioma de la OSD
Clock Set, then press the Menu selector
Setting the Clock Ajuste del reloj
Hasta seleccionar On Actv. u Off Des. y pulse el
Remote control icon
Hasta seleccionar System Sistema y pulse el
Hasta seleccionar Remote Remoto y pulse el
Ajuste del sonido del pitido
Setting the Beep Sound
Shutter Sound, then press the Menu selector
Move the Menu selector to the left or right to select On
Or Off, then press the Menu selector
Hasta seleccionar Demonstration Demostración y
Viewing the Demonstration Visualización de la demostración
System , then press the Menu selector
Demonstration , then press the Menu selector
LCD Colour Colour de LCD entre 0 y
Adjusting the LCD Screen Ajuste de la pantalla LCD
Display , then press the Menu selector
Brillo LCD o LCD Colour Colour de LCD y pulse el
Selector
Displaying the Date/Time Visualización de fecha y hora
Seleccionar On Actv. u Off Des. y pulse el
Setting the TV Display
Ajuste de la visualización del TV
Mueva el Selector de menú a la izquierda o a la
Adjusting the Focus Ajuste del enfoque
Using the Viewfinder Uso del Visor
Introducción y expulsión de la cinta
Inserting and Ejecting a Cassette
Consejos para la grabación estable de imágenes
Hints for Stable Image Recording
Various Recording Techniques Técnicas diversas de grabación
Making your First Recording
Primera grabación
Abra la pantalla LCD
Using EASY.Q Mode for Beginners
Utilización de la modalidad EASY.Q para principiantes
Has been previously set. see
Búsqueda de grabación REC Search
Record Search REC Search
Ajuste de memoria cero Sólo VP-D353i/D354i/D355i
Zero Memory function works in both Camera and Player modes
Tape counter with
Self Record using the Remote Control
VP-D353i/D354i/D355i only Sólo VP-D353i/D354i/D355i
Grabación automática con el mando a distancia
Using the Tele Macro Utilización de la Macro telescópica
Detención de la grabación
To Start Recording
To Stop Recording Use Fade In/Fade Out
Comienzo de la grabación
Overcast
Using Back Light Compensation Mode BLC
Press the Color Nite Shutter button
√ Color N /25 , Color N /13 and off
Pulse el botón Color Nite Shutter
Peligro
Naturales
Nite Pix 0 lux recording
Nite Pix grabación con 0 lux
Grabación por ejemplo, exteriores durante el día, es
Power Nite Pix
Advanced Recording Grabación avanzada
Advanced Recording
Photo Tape
Requested mode will work in this operating mode
Selecting the Record Mode
Record using SP mode for best picture and sound quality
Selección de la modalidad de grabación
Selección de modalidad de audio
Selecting Audio Mode
Actv., y pulse el Selector de menú
Cutting Off Wind Noise Wind Cut
Corte de ruido del viento Wind Cut Antiviento
Cut, then press the Menu selector
Velocidades del obturador recomendadas al grabar
Setting the Shutter Speed & Exposure
Recommended Shutter Speeds when Recording
Ajuste de la exposición y la velocidad del obturador
Enfoque automático
Auto Focusing
Manual Focusing
Auto Focus/Manual Focus Enfoque autom. / Enfoque manual
Setting the White Balance Ajuste del balance de blanco
Camera, then press the Menu selector
White Balance, then press the Menu selector
Using Quick Menu White Balance
Utilización del menú rápido White Balance White Bal
Outdoor Exterior y pulse el Selector de menú
Setting the Digital Image Stabiliser DIS
DIS function works only in Camera mode
Ajuste del Estabilizador digital de la imagen DIS
Using Quick Menu Digital Image Stabiliser DIS
Spotlight mode
Auto mode a
Sports mode
Portrait mode
Setting the Program AE Ajustes de Program AE Program Ae
Using Quick Menu Program AE
Utilización del menú rápido Program AE Program Ae
Aplicación de efecto digital
Applying Digital Effects
Selección del efecto digital
Selecting the Digital Effects
Des. ,100x, 200x, 400x o 900x y pulse el
Zooming In and Out with Digital Zoom
Selecting the Digital Zoom Selección del zoom digital
Camera , then press the Menu selector De menú
Photo Search, then press the Menu selector
Photo Image Recording Grabación de imágenes fotográficas
Searching for a Photo Image
Búsqueda de una fotografía
You can adjust the LCD Bright/Colour during playback
Adjusting the LCD Bright/Colour during Playback
Pulse el botón PLAY/STILL para reproducir la cinta
Tape Playback Reproducción de una cinta
Connecting to a TV which has no Audio and Video Input Jacks
Playback
Reproducción
Búsqueda de imágenes adelante/atrás
Playback Pause
Pausa en la reproducción
Picture Search Forward/Reverse
X2 Playback Forward/Reverse VP-D353i/D354i/D355i only
VP-D353i/D354i/D355i only Sólo VP-D353i/D354i/D355i
Reverse Playback VP-D353i/D354i/D355i only
Reproducción hacia atrás Sólo VP-D353i/D354i/D355i
Zooming during Playback PB Zoom
Press the PB Zoom button in playback mode or in still mode
Stop button
AV In/Out, then press the Menu selector
Grabación de sonido adicional
Audio Dubbing VP-D353i/D354i/D355i only
Grabación de audio adicional Sólo VP-D353i/D354i/D355i
Dubbing Sound
Audio y pulse el Selector de menú
Audio Select, then press the Menu selector
Conexión a un PC
Connecting to a PC
Requisitos del sistema
System Requirements
It is not available for Macintosh systems
Windows 98SE/ME Full Speed USB
Computer or Printer, then press theMenu selector
Selecting the USB Device VP-D353i/D353i/D355i only
Selección del dispositivo USB Sólo VP-D353i/D354i/D355i
USB Connect, then press the Menu selector
Si el PC o el sistema operativo no admiten USB
Their specifications
USB Version, then press the Menu selector
La admitan el PC y el SO Sistema operativo
Instalación del programa
Installing DV Media Pro 1.0 Programme
Programme Installation
Instalación del programa DV Media Pro
Videocámara y el otro al conector USB del PC
Utilización de la función USB Streaming
Using the USB Streaming Function
Disconnecting the USB Cable
Using the removable Disk Function VP-D353i/D354i/D355i only
Funciones del Memory Stick
Memory Stick Functions
Inserting the Memory card
Memory Stick PRO
Still image
Selecting the Camcorder Mode
Image Format
Formato de imágenes
Card Tarj. Memoria y pulse el Selector de menú
Memory, then press the Menu selector
Memory Type, then press the Menu selector
Hasta seleccionar Memory Type Tipo de memoria y
Selección de la calidad de imagen
Selecting the Image Quality
Using Quick Menu Photo Quality
Pulse el Selector de menú
Utilización del menú rápido Photo Quality Calidad Foto
Memory File Number Número de archivos en memoria
Taking Photos Toma de fotos
Visualización de imágenes fijas
Viewing Still Images
To view the Multi Display
Visionado de varias imágenes fijas en pantalla
Multi DISP. button again
Menú
Protection from accidental Erasure
Protección contra borrado accidental
Protect, then press the Menu selector
Protect , then press the Menu selector
Des. y pulse el Selector de menú
Protección y pulse el Selector de menú
Todas?
Delete , then press the Menu selector
Message Do you want to delete? appears
Quiere borrar?
Press the Menu selector
Formatting the Memory Card Formato de la tarjeta de memoria
Format , then press the Menu selector
All files are deleted! Do you want to format? appears
Mpeg Recording Grabación de Mpeg
Saving Moving Picture Files onto a Memory Card
Pulse el botón Start/Stop para detener la grabación
Reproducción de Mpeg
Mpeg Playback
Selec.M.Play y pulse el Selector de menú
Photo or Movie , then press the Menu selector
Película y pulse el Selector de menú
Select M.Play Select , then press the Menu selector
Recording an Image from a Cassette as a Still Image
Foto y pulse el Selector de menú
Selector de menú
Then press Menu selector
Memory , then press the Menu selector
Atrás, This File Este archivo o All Files
OptionsBack , This File or All Files
Eliminación de la marca de impresión
Menú
De menú
Removing the Print Mark
Print Mark , then press the Menu selector
Press the Menu selector Pulse el Selector de menú
Selección de imágenes
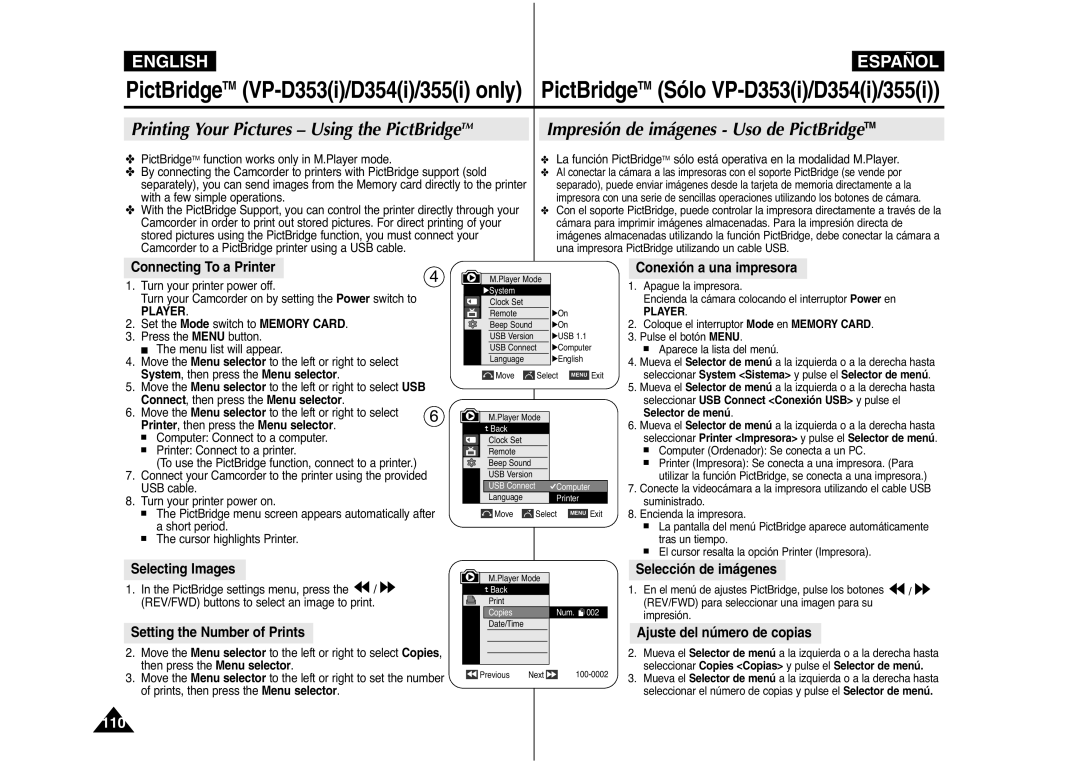
Setting the Number of Prints
Conexión a una impresora
Selecting Images
Impresión de imágenes
Setting the Date/Time Imprint Option
Selector
Printing Images
After Finishing a Recording Tras finalizar una grabación
Maintenance
Cleaning the Video Heads Limpieza de los cabezales de vídeo
Maintenance Mantenimiento
PAL-compatible Countries/Regions
Power sources
Colour system Fuentes de alimentación
Sistema de colour
Condensación de humedad
Self Diagnosis Display
Pantalla de autodiagnósticos
Moisture Condensation
Troubleshooting Solución de problemas
Síntoma Explicación/Solución
Symptom Explanation/Solution
Sistema
Model Name VP-D351i/D352i/D353i/D354i/D355i
System
General
Index Índice alfabético
Memo
España Spain