5SAVING RECORDED IMAGES
Downloading to a PC
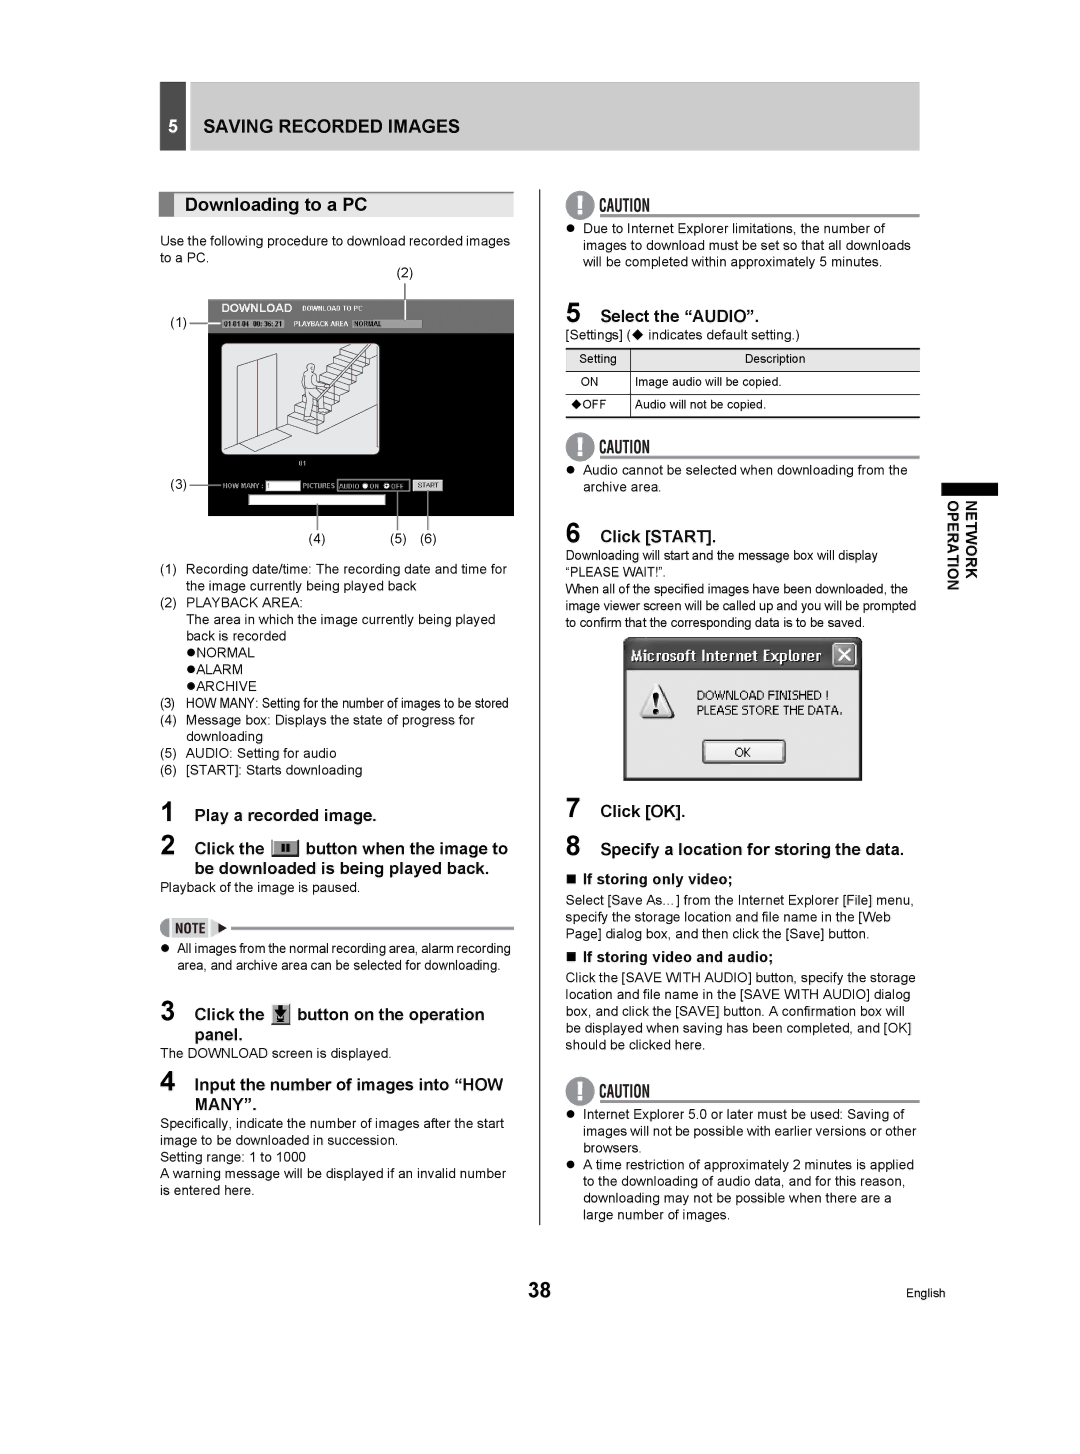
Use the following procedure to download recorded images to a PC.
(2)
(1)
(3)
(4)(5) (6)
(1)Recording date/time: The recording date and time for the image currently being played back
(2)PLAYBACK AREA:
The area in which the image currently being played back is recorded
zNORMAL zALARM zARCHIVE
(3)HOW MANY: Setting for the number of images to be stored
(4)Message box: Displays the state of progress for downloading
(5)AUDIO: Setting for audio
(6)[START]: Starts downloading
1 Play a recorded image.
2 Click the ![]() button when the image to be downloaded is being played back.
button when the image to be downloaded is being played back.
Playback of the image is paused.
zAll images from the normal recording area, alarm recording area, and archive area can be selected for downloading.
3 Click the  button on the operation panel.
The DOWNLOAD screen is displayed.
4 Input the number of images into “HOW MANY”.
Specifically, indicate the number of images after the start image to be downloaded in succession.
Setting range: 1 to 1000
A warning message will be displayed if an invalid number is entered here.
zDue to Internet Explorer limitations, the number of images to download must be set so that all downloads will be completed within approximately 5 minutes.
5 Select the “AUDIO”.
[Settings] ( indicates default setting.)
Setting | Description |
ON | Image audio will be copied. |
|
|
OFF | Audio will not be copied. |
|
|
zAudio cannot be selected when downloading from the
archive area.
6 | Click [START]. | NETWORK OPERATION |
|
Downloading will start and the message box will display “PLEASE WAIT!”.
When all of the specified images have been downloaded, the image viewer screen will be called up and you will be prompted to confirm that the corresponding data is to be saved.
7 Click [OK].
8 Specify a location for storing the data.
If storing only video;
Select [Save As…] from the Internet Explorer [File] menu, specify the storage location and file name in the [Web Page] dialog box, and then click the [Save] button.
If storing video and audio;
Click the [SAVE WITH AUDIO] button, specify the storage location and file name in the [SAVE WITH AUDIO] dialog box, and click the [SAVE] button. A confirmation box will be displayed when saving has been completed, and [OK] should be clicked here.
zInternet Explorer 5.0 or later must be used: Saving of images will not be possible with earlier versions or other browsers.
zA time restriction of approximately 2 minutes is applied to the downloading of audio data, and for this reason, downloading may not be possible when there are a large number of images.
38 | English |
