DIRECT VENT ROOM HEATER
SAPPHIRE DV425TR
FRONTS SOLD SEPARATELY
DV425TR SERIES ROOM HEATER
TABLE OF CONTENTS
PLEASE RETAIN THIS MANUAL FOR FUTURE REFERENCE
LISTINGS AND CODE APPROVALS
SPECIFICATIONS
NOTICES
Located on back of stove
SERIAL LABEL
02/01
Page
SAFETY NOTICES
OVERVIEW OF INSTALLATION TO OPERATION
Kit center-linedimension is reduced by
DIMENSIONS
17-1/2 21-1/2 21-1/2 22-1/8
14-3/8 8 14-5/8
SAPPHIRE MINIMUM CLEARANCES TO COMBUSTIBLES
CLEARANCES TO COMBUSTIBLES
FRONT OPTIONS
REAR VENT CONVERSION INSTRUCTIONS
FIG. FIG
REAR VENT CONVERSION INSTRUCTIONS, cont
FIG. FIG
REAR VENT CONVERSION INSTRUCTIONS, cont
PROPANE
NATURAL GAS
FIG. FIG
LP CONVERSION INSTRUCTIONS
NATURAL GAS
LP CONVERSION, CONT Valve Regulator Replacement
DV425TR DIRECT VENT ROOM HEATER
LOGSET INSTALLATION
Fig. Fig. Fig. Fig
# in Fig
BLOWER INSTALLATION, cont
HEARTH LEGS INSTALLATION
BLOWER INSTALLATION PART #844-9030
Wire Harness Connector
THERMOSTAT INSTALLATION
GRILL COVER INSTALLATION
REMOTE CONTROL
INSTALLATION PRECAUTIONS
GENERAL VENTING INSTRUCTIONS
TOP PRIORTO COMPLETING VENTING INSTALLATION
INSTALLATION METHODS & NOTES
SAFETY PRECAUTIONS FOR THE INSTALLER
INSERT TOP GRILL ONTO STOVE
DURA-VENTGS
SIMPSON DURA-VENTPARTS LIST
Venting System Components
Catalog #
HTI COMPONENT #
HTI VENTING PARTS LIST, cont
Venting System Components
Description
FIG. 1 - HORIZONTAL TERMINATION
INSTALLATION METHODS
FIG. 2 - VERTICAL TERMINATION
INSTALLATION METHODS, cont
VERTICAL TERMINATION CAP
COLLAR FLASHING FIRESTOP SUPPORT BOX PIPE LENGTH
INSTALLATION METHODS, cont
FIG. 3 - CLASS A METAL CHIMNEY USA only
RETRO CONNECTOR
TERMINATION
FIG. 4 - A & B INTO A MASONRY CHIMNEY USA only
FIG. 5 - 45 ELBOW IN CORNER INSTALLATION
INSTALLATION METHODS, cont
Co-Axialto Co Linear Connector 923GCL
= area where terminal is not permitted
HORIZONTAL TERMINATION REQUIREMENTS
V = vent terminal
A = air supply inlet
HORIZONTAL INSTALLATION VENT GRAPH
Step
HORIZONTAL INSTALLATION, cont
Step
Step
HORIZONTAL INSTALLATION, cont
FIG. 6-A
CENTER OF HOLE CENTER LINE WALLCENTER THIMBLELINE
Step
HORIZONTAL INSTALLATION, cont
1/4 FOLD STRAP SHEET METAL SCREW
HORIZONTAL INSTALLATION, cont
WALL THIMBLE COVER/CEILING
FIRESTOP AS REQUIRED BY LOCAL JURISDICTION STRAP
USING GS SERIES PIPE
VERTICAL INSTALLATION INSTRUCTIONS
FIG. Step
Step
VERTICAL INSTALLATION INSTRUCTIONS, cont
Step
Step
VERTICAL INSTALLATION, cont
Step
Step
Step
VERTICAL INSTALLATION, cont
Step
VERTICAL INSTALLATION, cont
NAILS CEILING FIRESTOP
MIN. 1 CLEARANCE MIN. 1 CLEARANCE
VERTICAL INSTALLATION, cont
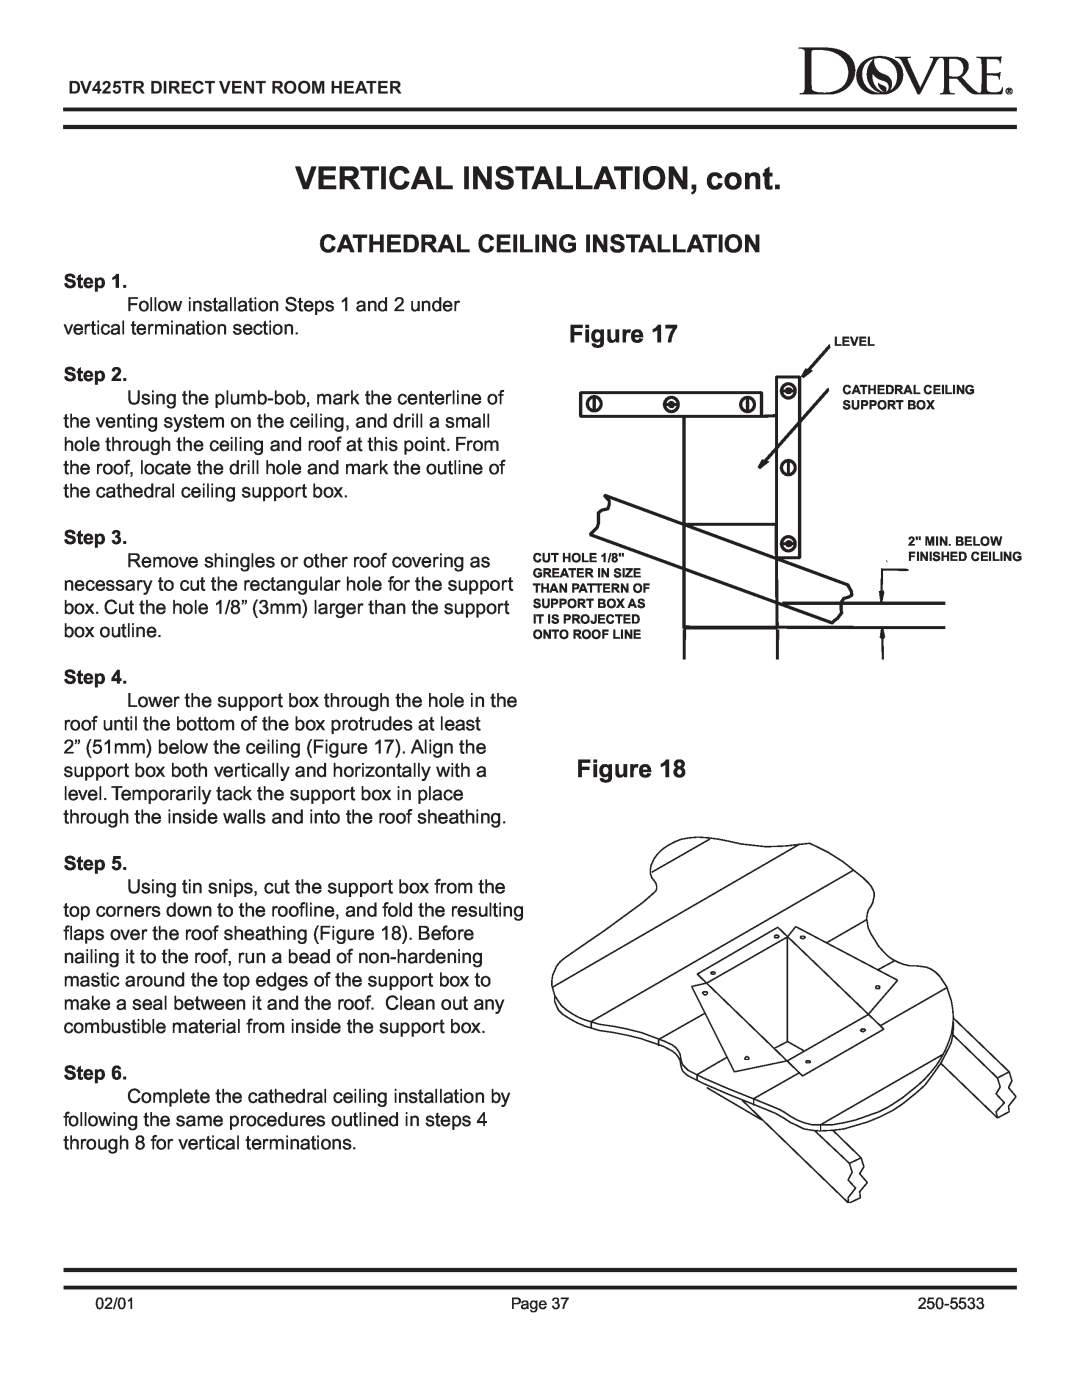
CATHEDRAL CEILING INSTALLATION
Step
Step
Step
VERTICAL INSTALLATION, cont
Step
Step
Step
VERTICAL INSTALLATION, cont
Step
Step
USA ONLY
INSTALLATION INTO AN EXISTING MASONRY CHIMNEY
VERTICAL INSTALLATION, cont
Step
USA ONLY
VERTICAL INSTALLATION, cont
Step
Step
USA ONLY
VERTICAL INSTALLATION, cont
Step
Step
USA ONLY
VERTICAL INSTALLATION, cont
Step
Step
Fuel
GAS LINE REQUIREMENTS
Gas Line Connection
Checking Gas Inlet Pressure
Gas Line Connection, cont
Step
Step
PILOT HOOD FLAMEFLAME
LEAK TEST
MILLIVOLT GENERATOR
THERMOCOUPLE
FOR YOUR SAFETY READ BEFORE LIGHTING
LIGHTING INSTRUCTIONS
LIGHTING INSTRUCTIONS
TOTURNOFFGASTOAPPLIANCE
TOP VENT INSTALLATIONS
VERTICAL DAMPER ADJUSTMENT
REAR VENT INSTALLATIONS
Make adjustment
HIGH ALTITUDE OPERATION
NORMAL OPERATING SOUNDS
OPERATION
Blower
GLASS CLEANING
MAINTENANCE
GOLD - CARE AND TREATMENT
YEARLY MAINTENANCE PROCEDURES
PILOT ASSEMBLY Ignitor Red ON/OFF Switch Red
ELECTRICALSCHEMATICS
PINS
FEMALE MOLEX MALE PINS
Problem
TROUBLE SHOOTING
Solutions
Possible Cause
TROUBLE SHOOTING continued
Problem
TROUBLE SHOOTING continued
Solutions
Possible Cause
Catalog #
PARTS & ACCESSORIES
DESCRIPTION
Model Name Serial Number Date Purchased
Dovre Sapphire DV425TR
Dealership Dealer Phone Additional Information
Important! Complete now for future reference
LIFETIME WARRANTY
WARRANTY
THREE-YEARWARRANTY
ONE-YEARWARRANTY
Installation Instructions to the Consumer
ATTENTION INSTALLER Please return these Operating