UX-460
1. Installation 2. Using the Answering Machine 3. Sending Documents
7. Special Functions 8. Option Settings 9. Printing Reports and Lists
10. Maintenance 11. Troubleshooting
ABOUT THE TELEPHONE CONSUMER PROTECTION ACT OF
FOR YOUR RECORDS
Vertical
Introduction
Replacement roll
Horizontal
Manual feeding
Automatic feeding
Important safety information
∙ Use caution when installing or modifying telephone lines
Sending Documents
Table of Contents
Installation
Using the Answering Machine
Special Functions
Chapter
Unpacking Checklist
Installation
1. Installation
3 REPEAT key
A Look at the Operation Panel
1 SPEED DIAL key
2 REDIAL key
6 RECEPTION MODE key
19 COPY/HELP key
16 DELETE key
17 STOP key
18 START/MEMORY key
Connections
Points to keep in mind when setting up
About condensation
Connect the handset as shown and place it on the handset rest
Handset
Plug the power cord into a 120 V, 60 Hz, grounded 3-prong AC outlet
Power cord
Option Settings
Telephone line cord
Comments
Trays
Extension phone optional
1 Remove the seal covering the TEL. SET jack
2 Connect the extension phone line to the TEL. SET jack
Loading the Imaging Film
DO NOT DISCARD THE FOUR GREEN GEARS
If you are installing the imaging film for the first time, go to Step
4 Remove the used film from the cartridge
5 Remove the four green gears from the used film
6 Remove the new roll of imaging film from its packaging
8 Insert the large gear into the large holder on the imaging film cartridge make sure it clicks into place, and then insert the small gear on the other end of the spool into its holder
When to replace the imaging film
Loading Printing Paper
LETTER LEGAL
1 or
1 or
# key
Entering Your Name and Fax Number
3 key
FUNCTION key
Example
7 Press the START/MEMORY key to save your name in memory
Setting the Date and Time
Setting the Date and Time
START/MEMORY
Daylight Saving Time
1 or
Selecting the Reception Mode
Setting the reception mode
TAD mode
DOWN key UP key
Volume Adjustment
Volume Adjustment
Speaker
Ringer
1 Lift the handset 2 Press the UP or DOWN key
Using the
Answering Machine
Recording an Outgoing Message
and then replace the handset
Recording an Outgoing Message
GENERAL TRANSFER
To listen to or erase an outgoing message
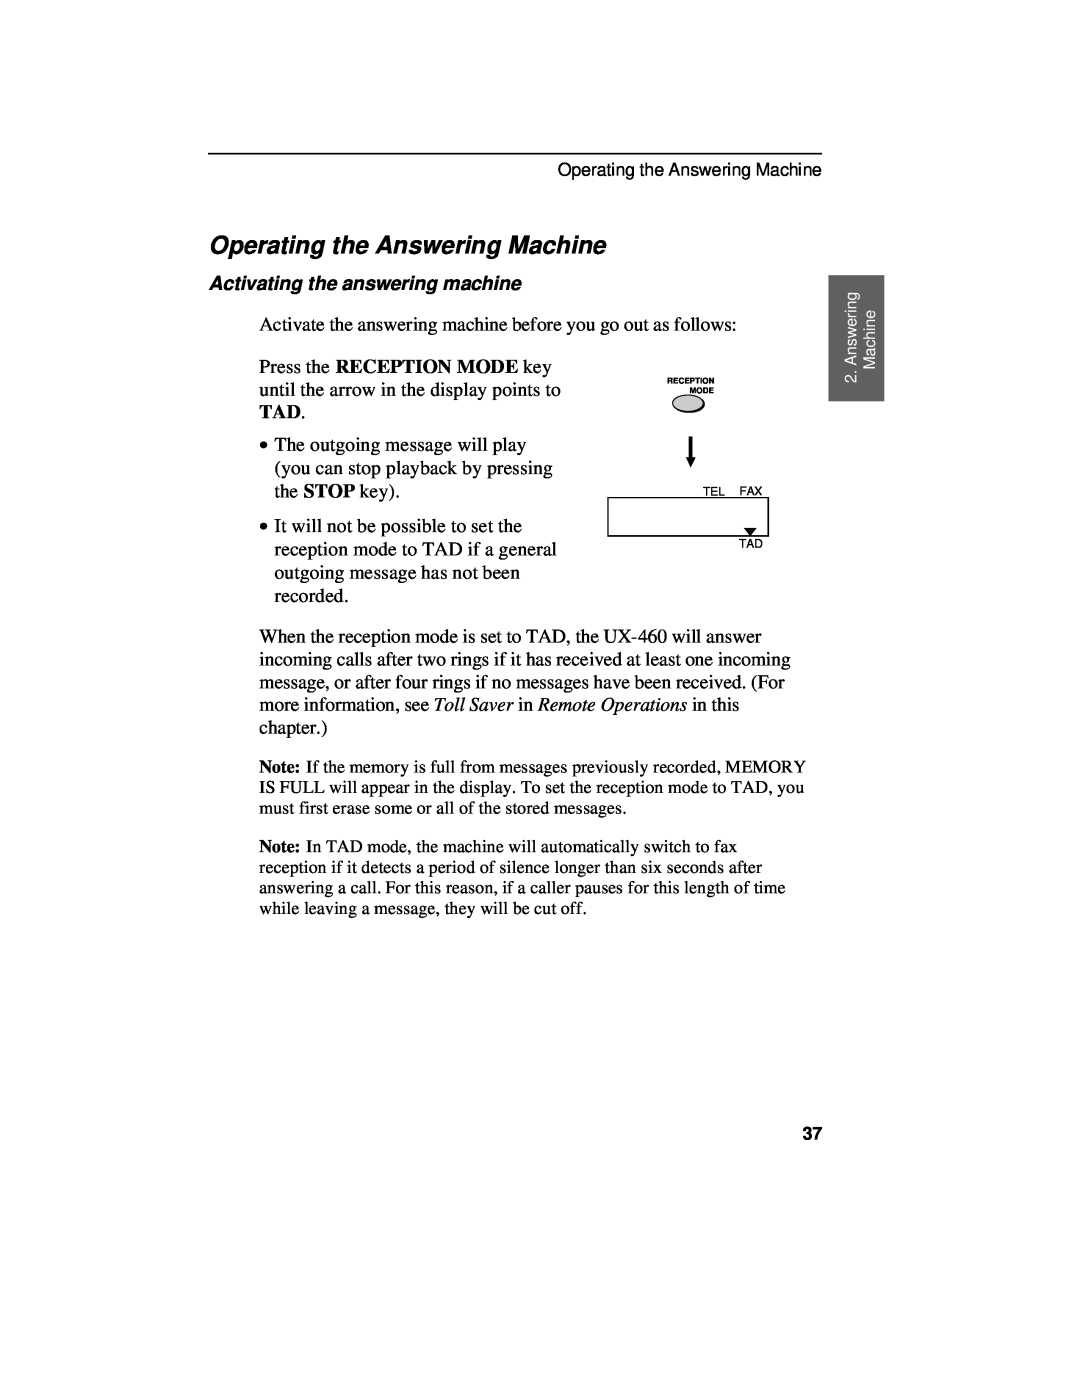
Activating the answering machine
Operating the Answering Machine
Listening to received messages
Using the REC/MEMO key
Erasing received messages
∙ Erasing all messages To erase all
Date and time of ICMs
Optional Answering Machine Settings
Setting ICM time
1 Press these keys
Fax reception on TAD failure
Calling Party Control detection
1 or
OGM only mode
Programming the transfer number
Transfer Function
Recording the transfer message
Turning the Transfer function on and off
Programming the override code
Override Ringing
Overriding the answering machine
Remote code number
Remote Operations
Toll Saver
operations
Retrieving your messages
∙ Erase all messages To erase all of
∙ Play new messages To listen to
only your new messages, first stop
∙ Erase a message To erase the
messages again, press 7 and #
∙ Repeat playback To listen to your
Other remote operations
Changing the fax reception mode
Recording a new outgoing message
Changing the transfer telephone number
Turning the Transfer function on or off
Recording a Memo
Recording a new transfer message
To turn off OGM only mode, press 1, 2, and #
Minimum size Minimum weight
Chapter 3 SendingDocuments
Transmittable Documents
Size and weight
Other restrictions
5 mm
4 mm
4 mm 5 mm
Loading the Document
it clicks into place
Removing a document from the feeder
2 Remove the document
3 Close the operation panel, making sure
Resolution and Contrast
Resolution settings
Contrast settings
1 Load the documents
Sending a Fax by Normal Dialing
Beep
Using the REDIAL key
Sending a Fax by Automatic Dialing
SPEED DIAL key SPEED DIAL key
Rapid keys
Storing fax and telephone numbers for Automatic Dialing
Step 3 or
Storing area codes and access codes
A lithium battery keeps automatic dialing numbers in memory
Clearing numbers
Making changes
desired
Rapid Key Dialing
START/MEMORY
Speed Dialing
2 Enter the number of the receiving
of the digits to access a special
service or an outside line, press the
Direct Keypad Dialing
HOLD SEARCH
Using the HOLD/SEARCH key
Automatic redialing
made
Receiving Documents
Using FAX Mode
Answering with the fax’s handset
Using TEL Mode
Answering with an extension phone
1 or
2 in 1 Print
Reception Ratio
STOP
Substitute Reception to Memory
COPY/HELP
Making Copies
3 Press 1 MULTI COPY if you do not
YES NO
Copy Cut-off
Making Telephone Calls
Chain Dialing
Redial
Making Telephone Calls
Hold
Special Functions
Caller ID
1 or
How Caller ID operates
CLEAR
Example
SEARCH
Display messages
Viewing the Caller ID list
HOLD
Priority Call
To delete calls from the Caller ID list
Blocking voice calls
Distinctive Ring
TEL FAX
1 RING PATTERN 1 Two short rings
Broadcasting
5 Press the START/MEMORY key. Transmission will begin
Cover Sheet
Selecting a header message optional
2 IMPORTANT
3 Select a message by entering a number
from 1 to
1 URGENT
Batch Page Numbering
∙ If you need to cancel a batch number entry, remove the document from the feeder or press the STOP key
Blocking Reception of Unwanted Faxes
5 5 1 2 3
Sending Documents From Memory
If the memory becomes full
full number
Requesting transmission
Polling Requesting a Fax Transmission
1 or
Being polled polling standby
Polling security
Step 4 or
Storing and clearing fax numbers for polling permission
Setting a timer operation
Timer Operations
RESOLUTION
To cancel an operation
Setting 1 FINE RESOLUTION PRIORITY
Chapter 8 OptionSettings
Setting 2 NUMBER OF RINGS TO ANSWER
Setting 3 RECALL INTERVAL
Setting 4 RECALL TIMES
Setting 5 TEL/FAX REMOTE NUMBER
Setting 6 REMOTE RECEPTION SELECT
FUNCTION
Setting 8 DIAL MODE
Setting 7 TRANSACTION REPORT PRINT SELECT
Setting 9 DISTINCTIVE RING
Setting 10 FAX SIGNAL RECEIVE
Setting 11 JUNK NUMBER CHECK
Setting 13 CALLER ID
Setting 12 POLLING
Setting 14 AUTO COVER SHEET
Setting 15 ACTIVITY REPORT AUTO PRINT OUT
AUTO PRINT OUT
Printing Reports and Lists
Printing a list
Activity Report
Explanation of headings
Printing Reports and Lists
Timer List
This list shows the timer operations that are currently set
Telephone Number List
Passcode List
Option Setting List
This list shows the current status of the option settings
Caller ID List
Anti Junk Number List
Message List
TAD Program List
Transaction Report
Print Setup List
10. Mainenance
Maintenance
Fax print head
Chapter10
Maintenance
5 Wipe the print head and roller with denatured alcohol
Roller Print head
6 Place the imaging film cartridge back in the print compartment
Scanning glass and rollers
The housing
Problem
Chapter11 Troubleshooting
Problems and Solutions
Line error
TEL. SET jack
Dialing and transmission problems
Problems and Solutions
SPEAKER key
TEL. LINE jack, and not the TEL. SET jack
Reception and copying problems
The quality of copies is poor
General problems
Imaging Film and Loading Printing Paper in
Transmittable Documents in Chapter
Messages and Signals
Display Messages
section, Clearing Paper Jams
see Substitue Reception to Memory in Chapter 3. If
Sending Documents from Memory in Chapter
Printing Paper in Chapter
Fax by Automatic Dialing in Chapter
Audible signals
See Using the HOLD/SEARCH key in Sending a
Redialing in Sending a Fax by Automatic Dialing in
Clearing a jammed document
Clearing Paper Jams
Clearing jammed printing paper
4 Close the print compartment cover press down on both sides to make sure it clicks into place, and then close the operation panel
Part distribution centers
Ordering parts
FCC Regulatory Information
Section 2. Supplier’s Name and Address
SHARP
MATERIAL SAFETY DATA SHEET
Section 1. Product Identification
Section 7. Fire and Explosion Data
Section 6. Physical Chemical Characteristics
Section 9. Precautions for Safe Handling and Use
Date Issued Dec.22,1998 MSDS No. B-1006
Index
Index
Timer List, 120 Timer operations, 109 Transaction Report
Volume keys, 9
TEL. LINE jack, 14 TEL. SET jack
Remote Operation Guide
REMOTE OPERATION CARD
∙ TRANSFER FUNCTION
REMOTE COMMANDS
∙ PLAYBACK
∙ FAX RECEPTION MODES
SHARP ELECTRONICS CORPORATION
LIMITED WARRANTY
SHARP CORPORATION
Sharp Plaza, Mahwah, New Jersey
SHARP ELECTRONICS CORPORATION