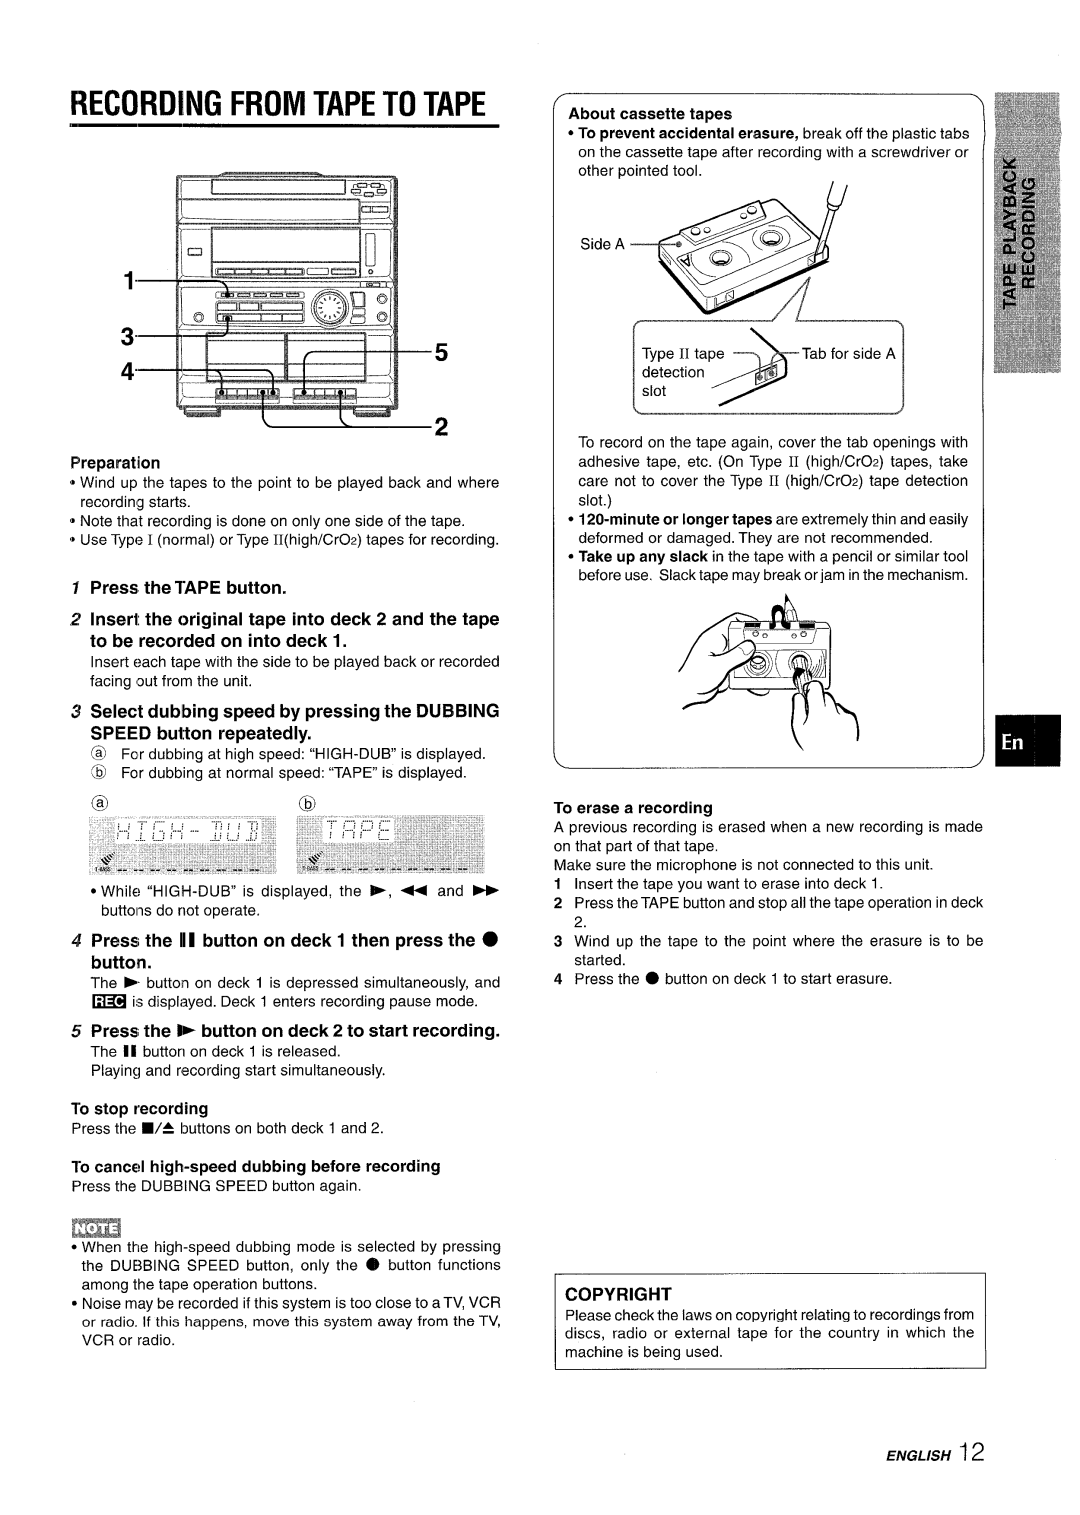
RECORDING FROM TAPE TO TAPE

1“

3“

5

4“

Preparation

*Wind up the tapes to the point to be played back and where

recording starts.

@Note that recording is done on only one side of the tape. @Use Type I (normal) or Type II(high/CrOz) tapes for recording.

Press the TAPE button.

Insert the original tape into deck 2 and the tape to be recorded on into deck 1.

Insert each tape with the side to be played back or recorded

facing out from the unit.

Select dubbing speed by pressing the DUBBING SPEED button repeatedly.

6For dubbing at high speed: “HIGH-DUB is displayed.

@For dubbing at normal speed: “TAPE” is displayed.

@@

While “HIGH-DUB” is displayed, the -, + and _ buttons do not operate.

Press the II1 button on deck 1 then press the button.

The E button on deck 1 is depressed simultaneously, and

~is displayed. Deck 1 enters recording pause mode.

Press the P button on deck 2 to start recording.

The II button on deck 1 is released.

Playing and recording start simultaneously.

10 stop recording

Press the 9/4 buttons on both deck 1 and 2.

To cancel high-speed dubbing before recording

Press the DUBBING SPEED button again.

[m

When the high-speed dubbing mode is selected by pressing the DUBBING SPEED button, only the @ button functions

among the tape operation buttons.

c Noise may be recorded if this system is too close to a TV, VCR or radio. if this happens, move this system away from the TV, VCR or radio.

About cassette tapes

To prevent accidental erasure, break off the plastic tabs on the cassette tape after recording with a screwdriver or other pointed tool.

Side A

,

<Q;;9


q


*

I L@


Type

II tape

Tab for side A


detection


slot

.9;

To record on the tape again, cover the tab openings with adhesive tape, etc. (On Type 11 (high/CrOz) tapes, take care not to cover the Type II (high/CrOz) tape detection slot.)

120-minute or longer tapes are extremely thin and easily deformed or damaged. They are not recommended.

Take up any slack in the tape with a pencil or similar tool before use, Slack tape may break or jam in the mechanism.

To erase a recording

A previous recording ~ erased when a new recording is made on that part of that tape.

Make sure the microphone is not connected to this unit.

1Insert the tape you want to erase into deck 1.

2Press the TAPE button and stop all the tape operation in deck 2.

3Wind up the tape to the point where the erasure is to be started.

4Press the button on deck 1 to start erasure.

Please check the laws on copyright relating to recordings frOm discs, radio or external tape for the country in which the

~

ENGLISH12

Page 13
Image 13
Sony CX-ZR525 manual Recording from Tape to Tape, Press the II1 button on deck 1 then press the button

CX-ZR525 specifications

The Sony CX-ZR525 is a standout addition to Sony's line of high-performance camcorders, designed for both amateur filmmakers and seasoned professionals. With a focus on advanced features, exceptional image quality, and user-friendly operation, the CX-ZR525 is equipped to meet the demands of a wide range of video recording situations.

At the core of the CX-ZR525 is its impressive 4K HDR (High Dynamic Range) capability, allowing users to capture stunning video footage with incredible detail and vibrancy. The camcorder's 1-inch Exmor RS CMOS sensor excels in low-light conditions, ensuring exceptional image clarity even in dim environments. This sensor works harmoniously with the BIONZ X image processor, optimizing processing speeds and image quality, making the CX-ZR525 highly efficient for both video and still photography.

One of the defining features of the CX-ZR525 is its 20x optical zoom lens, which provides versatility in framing shots, whether up close or at a distance. The lens also includes a fast f/2.8 aperture, enhancing performance in low-light situations. Coupled with Optical SteadyShot technology, this camcorder minimizes shake and blur, ensuring smooth, stable footage, which is particularly crucial for handheld shooting.

The CX-ZR525 is also engineered with advanced audio capabilities, boasting a high-quality built-in microphone along with options for external microphone support. Users can enjoy clear sound even in dynamic environments, enhancing production quality for speech, interviews, or ambient recordings.

An intuitive touch panel LCD screen provides easy navigation and control over settings, making it accessible for all users. The camcorder supports various formats including XAVC S and AVCHD, catering to different project needs and providing flexibility in post-production workflows.

Connectivity is also a strong suit of the CX-ZR525, featuring Wi-Fi and NFC compatibility, allowing for quick sharing of videos and images to smartphones or other devices. Furthermore, with options for live streaming, the camcorder is particularly appealing for content creators looking to engage audiences in real-time.

With its combination of cutting-edge technology and thoughtful design, the Sony CX-ZR525 stands as an excellent choice for anyone serious about videography, delivering professional-quality results in a compact form. Whether for personal use, education, or professional media production, this camcorder proves to be a versatile tool for storytelling.