HKDV-507/507D
BKDW-509
HKDV-502
HKDV-503
Pour les clients européens
Do not USE ANY Other Power Cord
For the customers in U.S.A
For the customers in Europe
Für Kunden in Europa
Vorsicht
Page
Table of Contents
Table of Contents
Simultaneously Monitoring Playback of Video and Audio
Selecting the HD-SD Conversion Mode
Improving the Vertical Resolution during Slow-Motion
Recording/Playback Chapter Editing
Glossary Menu List
Appendix
Hdcam Format
Features
Features of the HDW-F500
Advanced Recording and Playback Functions
Features
Features for Ease of Operation
Full complement of storage/recall functions
Features of the Control Panel
Menu-driven operations for a variety of purposes
Full range of editing functions
References
Optional Accessories
Page
Locations
Control Panel
Phones jack
Power switch
Control Panel Upper Control Panel
Display FULL/FINE button
REC recording level controls
Indicator window
Phones level control
PB playback level controls
Input Select button
REF Sync reference signal indicators
£ Remote buttons and RS-232C indicator
Control Panel
Lower Control Panel Menu Operations Section
Alarm indicator
Memory Card indicator
Access button
Maintenance switch Activates the Maintenance menu
Lower Control Panel Editing Operations Section
RCL recall button
@ Preread indicator
Numeric buttons and +/- buttons
¡ SFT shift button
@¢ Eject button
Lower Control Panel Tape Transport Operations Section
@£ Standby button
@§ PREVIEW/REVIEW button
@¶ Servo indicator
#¡ REC Inhibit indicator
@∞ Preroll button
#¢ Shuttle button
Lower Control Panel Search Operations Section
# VAR button
#£ JOG button
#∞ Search dial
System Set-Up Panel
Control Panel switch
For the Audio Input CH1/2/3/4 CUE connectors
Connector Panel
Connectors, the type male or female of input/output
⁄AC in connector and connector
CONV. OUT Option Sync connector BNC
REF. in SD connectors BNC and 75 Ω termination switch
REF. in HD connectors BNC and 75 Ω Termination switch
Connector Panel
Setting Description
@£ Pull Down OUT Option connectors BNC
@¢ Time Code OUT connector XLR-3-31
@∞ Time Code in connector XLR-3-32
Page
Making Digital Connections
Connecting External Equipment
This example shows how to connect the HDD/HDDP
Connecting External Equipment Making HD Analog Connections
Output
Making NTSC/PAL Digital Connections
Input
On the recording VTRs, set 613.TC Output Menu to through
Connecting External Equipment Cascade connection
Signal in Regene Mode in the VTR Setup
Reference Signals for Output Video
Reference Signals for Video Output and Servo System
For recording signals from a HD VTR
Reference signal connections
For recording signals from a switcher or signal generator
For playback
Inserting a cassette
Handling Cassettes
Recommended Cassettes
Inserting and Ejecting Cassettes
Removing slack in the tape
To cancel ejecting a cassette
Preventing Accidental Erasure
Ejecting the cassette
Page
PF1&2 Assign menu
Registering and Storing Menu Settings
Menu Configuration
VTR Setup menu
To return to the first
Changing menu settings using the cursor control buttons
To scroll the menu faster
Registering Items to the PF1/2 Menus
Registering items to the PF1/2 menus
To unregister the selected item
VTR Memory Bank Function
Registering and Storing Menu Settings
Storing the current VTR menu settings to a VTR memory bank
Contents of Setup Bankf cannot be changed
To cancel the recalling operation
Recalling menu settings from a VTR memory bank
To cancel the storage operation
Preventing accidental erasure after saving settings
Press the button on the right side of the insertion slot
Memory Card Function
Formatting a memory card
To eject the memory card
To store all VTR memory banks
To cancel formatting
To store the current VTR menu settings
Move the cursor z to the C Current Setup position
Storing cue point lists to a memory card
Press the SET UP button SET UP menu appears in the display
91 4,6
Recalling the contents of a memory card
Recalling a cue point list from a memory card
To change the current VTR menu settings
Move the cursor z to C Current Setup
Press the f or F button to select a letter
Adding Titles to the Data
Move the cursor z to item to be filled
If you enter a wrong character
To cancel the procedure to start again
Details on VTR Memory Bank and Memory Card Functions
To enter a space
Consider data copied from VTR a to VTR B and then to VTR C
Memory Card Data Compatibility
To activate the Home menu
Information that includes the VTR operation mode
Home Menu
Home menu sets the basic VTR operation
Button Indication Function Settings
Home Menu
Selecting the Output SignalsPB/EE
Record Inhibit Mode REC INH
Output Signal Selection
Still-Picture Output Freeze
Preread Settings PRE Read
Selecting assemble edit mode
Selecting the insert edit mode
Setting the preroll time
Setting the Preroll Time
Recalling Edit Points Last Edit
Selecting DMC Playback DMC
VTR operation mode, time code of the current
TC Menu
TC menu allows you to set time code-related
To activate the TC menu
Display
Selecting the time data display
Display shows the following types of time data
Time data type
F9 DF/NDF Time code and user bits recorded
TC Menu
Selecting the time code and the user bits to be recorded
To cancel entered values
Setting time codes
Setting the Time Code Reader TCR SEL
Press the Input Check button
Selecting the Drop Frame Mode DF/NDF
Setting
To check the running of the internal time code generator
TC Menu Inserting Vitc input source Vitc
When 30F is selected in the step
When 24F is selected in the , Skip this step
Press the F2 Pdtime SET key
Press the SET button to set the input data
Button Indication Function
To preset the 24F Starting TC using the numeric buttons
Press the SET button to set the time code
Frames TC
Conv
Conversion of Time Code During Playback in 25F Mode TC
TC Menu Superimposition Character Information PD
Contents of superimposed data
To display a warning message
Display Operation mode Block
To display remaining time on the tape
Changing the superimpose position
01000124
To preset the 25F Starting TC using the numeric buttons
Conversion of Time Code During Playback in 24F Mode TC
To activate the CUE menu
CUE Menu
Mode
CUE Menu Selecting a Multi-Cue Mode
Extend mode
Registering Cue Points
To select the cue number directly by the numeric buttons
Registering cue points by the numeric buttons
To select the cue number directly by numeric buttons
To modify current cue point data
CUE Menu
Erasing Cue Point Data
To erase all cue point data
Prerolling to a Cue Point
Prerolling to a cue point
Press the SET button while holding down the Audio in button
CUE Menu Changing a Cue Point Into an Edit Point
Backspace Editing
To change an edit point into an Audio in point
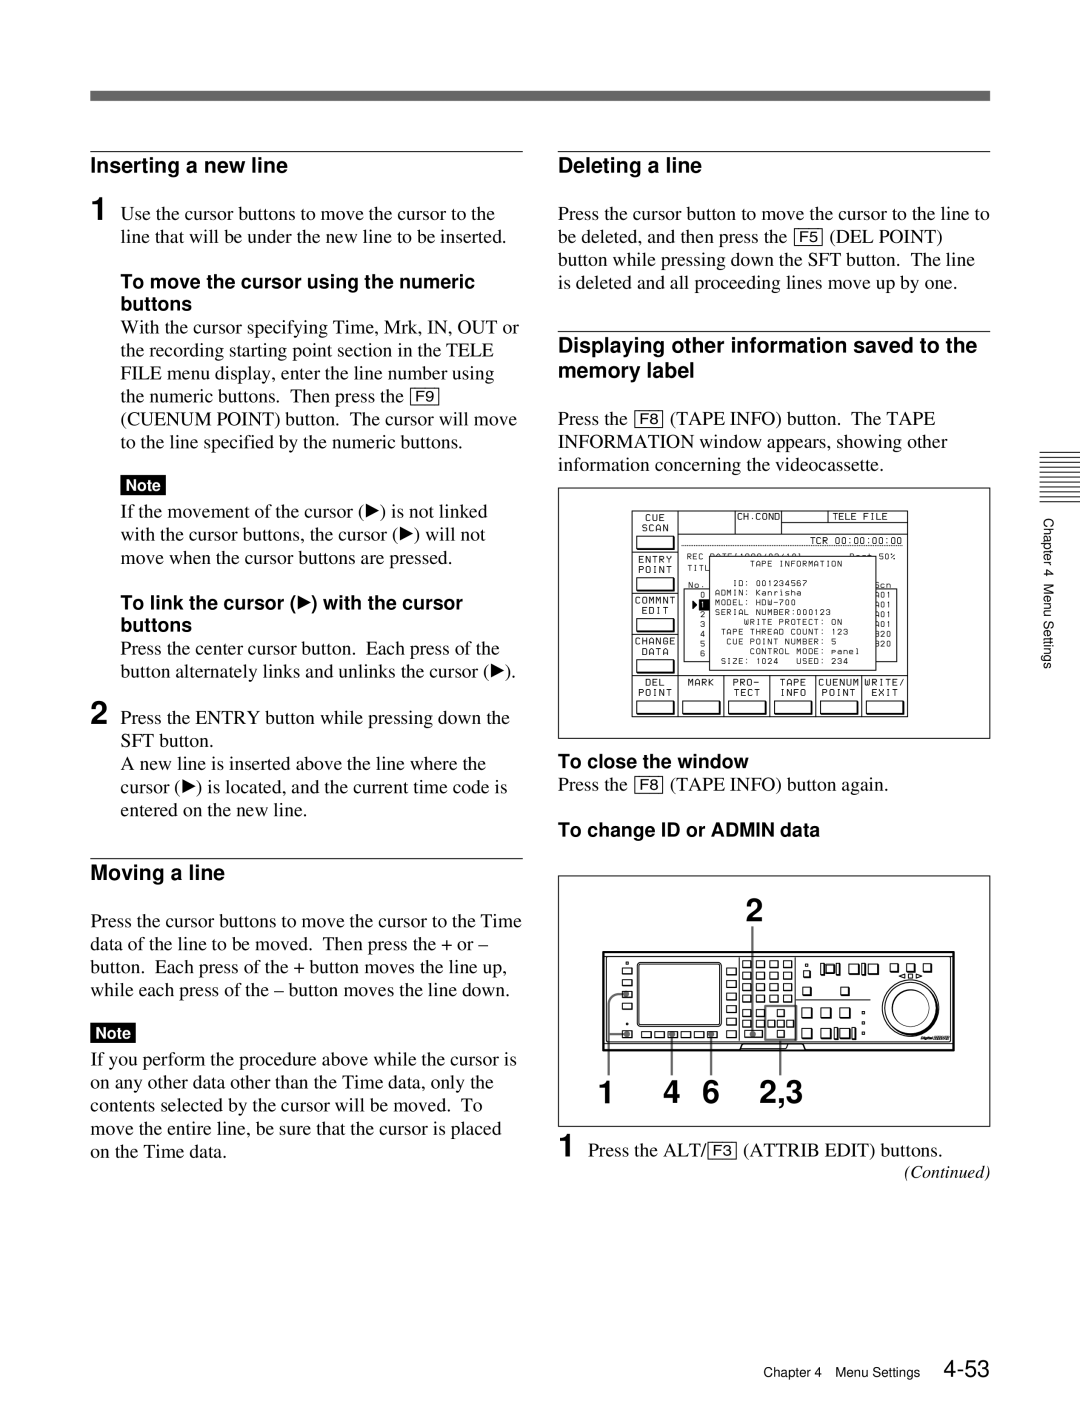
To change the information displayed in the Tele File menu
Tele File Menu
Opening the Tele File menu
Exiting the Tele File menu
8Tk
5Recording start point setting
3Time
4Mrk
Prohibiting Tele File menu operations
To cancel the formatting operation
Formatting a memory label
Press the f or F button to select a character
To start the procedure over again
Press the F9 Cancel button to start again
Changing a title
Changing time data
Changing Mrk data
Changing the recording starting point setting
To cancel the copy operation
To enter or modify IN/OUT point data using the Entry button
To recall IN/OUT point data to the data entry window
To clear the IN/OUT point data
Status of input data Point OUT point
When OUT point data is entered or modified
To enter the current time code continuously
To preroll to an IN/OUT point
Changing Cut data
Changing Tk data
To copy Cut data
Changing scene data
To change Comment data
Changing Comment data
To copy Scn data
To display comment data, press the button several times
If the entered text is longer than the comment box
To cancel a write-protection
Write-protecting cue point data
Moving a line
Inserting a new line
Deleting a line
Displaying other information saved to the memory label
If entered text is longer than the ID or Admin box
Press the F9 Cancel button to start agai
Press the PF1 button
PF1 Menu Factory Settings
To activate the PF1 menu screen
Adjusting the output video signal
Adjusting the Output Video Signal Master Level to Fine
Adjusting the PR output level HD
Adjusting the master output level HD
Adjusting the Y output level HD
Adjusting the PB output level HD
PF1 Menu Factory Settings
Press the PF2 button
PF2 Menu Factory Settings
To activate the PF2 menu screen
Setting Emphasis Emphasis
PF2 Menu Factory Settings
Selecting the Audio Input Signal A-IN CH-1~CH4
Selecting the Monitor Output Signal MON-L SEL/MON
SET UP Menu
When the F9 Remote 50-PIN button is set to on
SET UP Menu
Selecting remote operation mode
When the F8 Remote 9-PIN button is set to on
Press the SET UP button, then press the F6 VTR Setup button
VTR Setup Menu
To activate the VTR Setup menu
To search the menu by category
Scrolling items in the VTR Setup menu
Changing settings
Press the Gand gto scroll the items in the VTR Setup menu
To activate the Panel Setup menu
Panel Setup Menu
Disabling the upper and lower control panel buttons
Setting the keyboard sound
Setting the alarm
Setting the elapsed time until screen- saver activated time
Preparing for Recording
Setting Switches and Menus
To adjust the audio output level of the Phones jack
Preparing for Recording Selecting Audio Signals
Selecting the audio input signals
Selecting audio signals to be monitored
Selecting the display range of the audio level meters
Adjusting the Audio Recording Level
Selecting non-audio data as the audio input signal
Adjusting the recording level
Recording with emphasis
Monitoring signals being recorded
Preparing for Recording
Recording Analog Audio
If the recording continues to the end of the tape
To record, follow the procedure below
Recording
Preparing for Playback
Adjusting the Audio Playback Level
To adjust the audio playback level manually
Squeeze mode Squeeze
When HKDV-501A is installed
When 139 is selected
Press the F9SYSTEM Menu button
To cancel the execution
Preparing for Playback
Press the F9OTHERS Check button
When 1080 is selected in the procedure
Select the conversion mode in the VTR Setup menu below
When 1035 is selected in the procedure
10Chapter 5 Recording/Playback
Variable Speed Playback
Follow the procedure below to play back at normal speed
Playback
Normal-Speed Playback
Follow the procedure below to play back in shuttle mode
Jog mode playback
Shuttle mode playback
Follow the procedure below to play back in jog mode
Press the Play button
Variable mode playback
Follow the procedure below to play back in variable mode
To return to normal-speed playback
Storing playback speeds in memory
Capstan Override Playback
DMC Playback
Overview of DMC playback
Performing DMC playback
Playing Back Non-audio Data
Output of Pull Down Signal
Time code multiplexed to pull down signal output
To exit DMC playback mode
Pull down audio output
Pull down output phase lock
Output delay
Page
Automatic edit modes
Editing precautions
Basic Automatic Editing
Overview of AutomaticSteps in automatic editing Editing
Before editing, set the following switches as shown below
Basic Automatic Editing Setting Switches and Menus
Select assemble or insert mode
Selecting the Edit Mode
Setting Edit Points
Positioning and setting edit points
To delete entered data
Setting edit points with the numeric buttons
About automatic edit point setting
Basic Automatic Editing
Split editing
Automatic setting of OUT points
Automatic setting of in points
Positioning and setting edit points
About automatic split edit point setting
Editing Non-audio Data
Automatic setting of edit points by correcting in points
Using a VTR without the split editing function
To cue up the tape to an edit point
Basic Automatic Editing Confirming Edit Points
Cuing Up and Prerolling
Displaying the duration between two edit points
To stop previewing
Follow the procedure below to preview the edit
Previewing
Changing the preroll time
Deleting edit points
Modifying Edit Points
Moving an edit point position with the numeric buttons
To cancel the entered value
Moving an edit point position by one
Frame at a time
Basic Automatic Editing Performing Automatic Editing
To stop automatic editing
Monitoring signals during editing
To perform automatic editing
To confirm the results of the editing
Press the REC/EDIT button VTR performs automatic editing
Modifying edit points for automatic editing later
Overview of DMC editing
Setting edit points and playback speed
Advanced Automatic Editing
Performing DMC Editing
To confirm the results of DMC editing
To exit DMC editing mode
Advanced Automatic Editing
Performing DMC editing
Animation Editing
Perform preread editing after selecting the insert
Advanced Automatic Editing Performing Preread Editing
Home menu and select video, audio, or a/v
Make the required connections for preread editing
Manual Editing
Follow the procedure below to perform manual editing
Page
Moisture Condensation
Maintenance
Head Cleaning
If ERROR-10 appears immediately after turning the VTR on
Digital video system
Specifications
General
Tape system
Analog audio Cue track
Input connectors
Digital audio signal format CH-1 to CH-4 Sampling frequency
Digital audio system
Remote connectors
Specifications
Output connectors
Parallel/serial converter
Accessories supplied
Optional accessories
Recommended accessories
Selecting items to be displayed
Setting of item T02 Displayed information
Setting of item T03 Displayed information
Operation Information Display
Messages are displayed in the following order of priority
Setting of item T04 Displayed information
Display priority of display messages
Protection Mode
Error Messages and Warning Messages
Error Messages
Appendix Appendix A-9
To clear a warning message
Error Messages and Warning Messages
Button Display Function Setting
Error Log Menu
Openig the error log menu
Clearing warning messages
Adjusting the clock
Glossary
Glossary
Item number Function
Menu List
Items Related to the Hours Meter H01~
Item number Settable range Function
Values enclosed in a box are factory settings
Menu List Items Related to VTR Operations 001~
External
Enable
SERVO/AV
Reference
Sub items
Menu List
Stand by on
PB/EE Select
Menu
Stand by OFF PB/MU
Menu List Items Related to Operation Panels 101~
Effective Area
Switch
DT Mode
POWER-ON Menu
System
Control Mode
Display
Information
Running
Items Related to Remote Interface 201~
Parallel
Menu List Items Related to Editing 301~
CUE
Edit Preset
Analog Audio
Replace for
Mode SMS
Play Command
Delay Start
Mode VBV
Items Related to Prerolling 401~
Menu List Items Related to Recording Protection 501~
Items Related to the Time Code 601~
REC RUN/FREE
Regene Mode
TCG Regene
TCG/UBG
Correction
Signal
Phase
TC Output
CONV. OUT Option Composite Super
Character H
Position
Type
Original TC
Char Warning
Remain Time
TC Conversion
Menu List Items Related to the Video Control 701~
Values enclosed in a box are the factory settings
Active Line
Setup Level
Convert Mode
Effect Edit
Level D2
Mode Letter BOX
Squeeze
Video Output
Detail Gain
Chroma Level
Cross Color
Crop Position
Threshold
Input Check Enable
Letter BOX Mode
Level Depend
Items Related to the Audio Control 801~
Output Mixing
Audio CH3/4
Input Source
Arrange
AES CH34 MODE5
SDI CH12 MODE1
SDI CH34 MODE2
AES CH12 MODE4
KEY Panel
Freeze Mode
Menu List Items Related to Digital Processing 901~
Control from
Stop Tension OFF Stdby OFF
Stop freeze opration
Stop Freeze
Menu List Items Related to the Pull Down Control A01~
24F Time Code
Time Code ID
PD Character
Menu List Other Items T01~
Audio Input AES/EBU
Index
Index
Y, Z
Page
Tableof
DefaultSettings
Factory
Functions
Page
Page
Sony Corporation