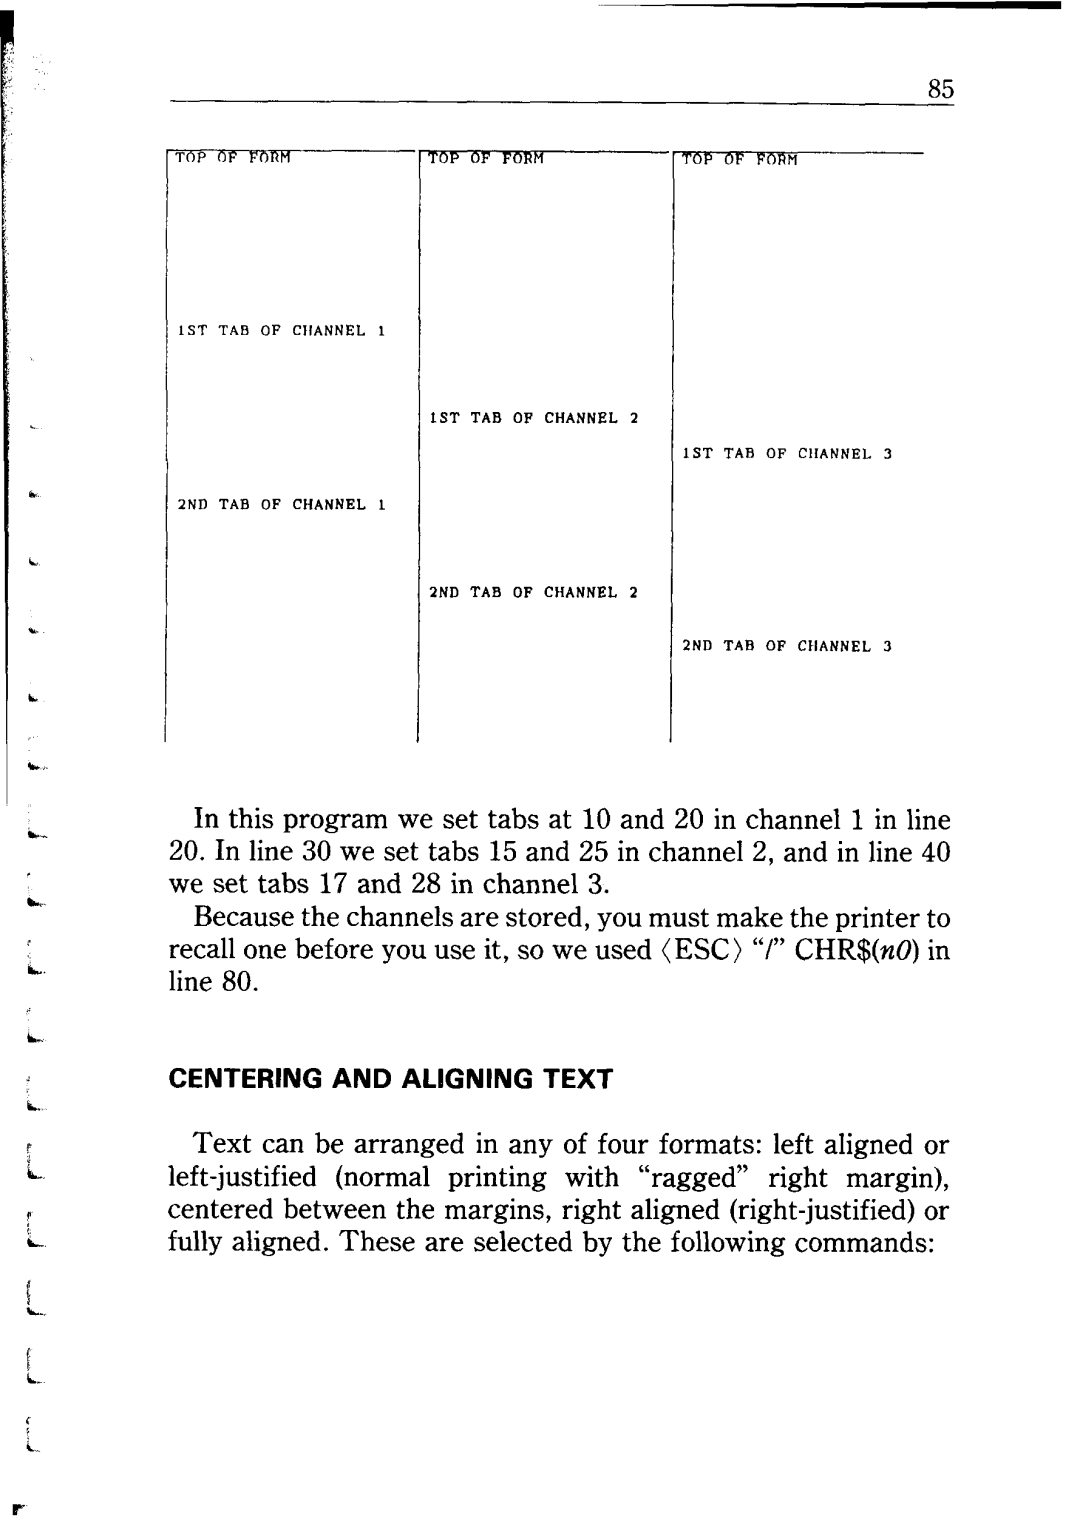
USER’S MANUAL
NOT INTENDED FOR SALE 1PN 80821223
OReorient the receiving antenna
A Special Message to the New Owner
Chapter Chapter
Table of Contents
Setting Up Your Printer
Getting to Know
Chapter 3 Using the Printer with Commercial 25 Software
Some basics of BASIC First steps
Immediate-print Adjusting the width of space between characters
Standard
mode
Serial busy protocols XON/XOFF protocol ACK protocol
Appendix H Serial Interfack Specifications
Configuring the serial interface The serial protocols
Index239
CHAPTER
SETTING UP YOUR PRINTER
Choosing a suitable place for your printer Unpacking Setting up
Subjects covered in Chapter 1 include
W Removing the printer cover
Figure 1-2. Remove the printer cover by lifting carefully
n Removing shipping screws 15-inch type only
Page
i ‘igure 1-6. To thread the ribbon, slide the print head carriage
E I L
n Installing the font cartridge
GETTING TO KNOW YOUR PRINTER
Parts of the printer - what they’re for and how to use them
Paper selection and loading Adjustment Testing printer operation
Subjects covered in Chapter 2 include
Printer cover
Figure2- 1. Front and rear views.of the printer printer
Mute cover
panelh
I15 inch type1 lo inch type1
TOP OF FORM KEY
current
w Extra functions
n Other controls
n Loading single sheets
2-6. Raise the paper guide for loading single sheets
To align paper that is not in straight
n Loading sprocket-feed paper
Figure 2-10. Close the sprocket covGGw?pGa tioned correctly I
~-- ~-~
Try different positions until you get the best printing results
1. Plug in the printer don’t turn it on yet
The self-tests show you what the printer can print
Self-test Standard mode IBM mode
2-13
Figure 2-14. Connect the cable like this
fghijklmnopqrstuvwxyz~- !~$g&*+,-./0123456789=?@~CDEFGH
MEMO
Controlling the printer with the Panel mode
USING THE PRINTER WITH COMMERCIAL SOFTWARE
Subjects covered in Chapter 3 include- * Using commercial software
CHAPTER
WORD PROCESSING WITH THE PRINTER
W The escape code
Technically speaking, initializing the printer clears the print
values defined by their respective DIP switch settings
n Using Letter Quality LQ
The escape code sequence to turn the LQ set on is ESC “x”
1. Printing from the Print List Form screen
use italic, expanded, emphasized and italic-underline print
El201
42. Single Underline Support Zj Using Character
n A sample printout with EasyWriter
Print the document. Your printout should look like this
1 PX
USING THE PRINTER WITH WORDSTAR
Subscript
User’s Manual for instructions or contact your dealer for assistance
Page
And, on August 12, 1986, the results might look like this
Print
Quality
ADVANCED PANEL FUNCTIONS
Clear the print
H Clearing the print buffer
1. Set the Off Line mode by pressing the On Line key
Paper Feed key - Right margin set
2. While holding the On Line key, press the Type Style key
PRINTING WITH BASIC
CHAPTER
4 First steps
w ASCII codes and the CHR$ function
n Control codes
10 Demo of ASCII code 20 LPRINT CHR$7 30 END RUN
B The escape codes
n A note on command syntax
ESC “W”
n Selecting the right software mode
n Draft and Letter Quality characters
commands
This line is in ITALIC characters
n Characters in the Font Cartridge
Selects internal characters
In this program underline is turned on in line 30 with ESC
30 LPRINT This line is SEMI-CONDENSED pitch 40 LPRINT CHR$27M
CHANGING THE PRINT PITCH
10 Demo of print pitches 20 LPRINT CHR$27g
50 LPRINT This line is ELITE pitch 60 LPRINT CHRS27P
When you run this program you should get this
return with CHR$20, as done in line
Demonstrationof CONDENSEDprinting
Page
MAKING WORDS STAND OUT
This line is BOLDFACE printing
your printer is set for normal printing
Summary notes
CHAPTER
FORMATTING TEXT
1 command to the printer
DIP switch 2-6 is on see below
DIP switch
return. Each time the printer receives a CHR$13 it returns the
70 LPRINT LINE SPACING IS SET TO l/6 INCH NORMAL. 80 LPRINT CHR$272
20 FOR I=1 TO 30 IF I=13 THEN 40 LPRINT CH.R$27ACHR$I
50 LPRINT THIS LINE SPACING IS SET TO1 60 NEXT
90 END
This is what you will get with the Standard mode
and run the program again. Now the results will look like this
By comparing with the results between the Standard mode and the IBM modes, you’ll notice that the ESC “A” CHR$n command with the IBM modes defined the line spacing as n/72 of an inch, instead of n/60 of an inch
One-timelinefeedof .-,Ion I--L
I’ESC “J” C”‘n
Here is what your printer will produce with Standard mode
a- 1-w-----m
n Reverse form feed
50 LPRINT PAY TO THE ORDER OF 60 END
NEW 10 Demo of variable form lengths 20 LPRINT CHR$27CCHR$OCHR$7
30 LPRINT PAY TO THE ORDER OF 40 LPRINT CHR$lZ
TOP AND BOTTOM MARGINS
When you run this program it will print 150 lines right down
Now when you run the program, your printer skip the first six lines and the last six lines on each page. Always send a form feed after setting the top margin, or it will not work on the first page printed. That’s because the top margin only takes effect after a form feed
Try setting the margins with this program
Run the program. The results will look like this
ESC “D” is the command to begin setting horizontal tabs. It
n One-time horizontal tabs
Print pitch
Units of motion for the relative horizontal tab commands
Unit of motion
Draft characters
Now, let’s set some vertical tabs of our own. Add these lines
to the program
There’s a one-time vertical tab command that works just like
10 ’ Demo of print positions 20 LPRINT ‘I* 1st Line, 1st Column”
H Vertical tab channels
In this program we set tabs at 10 and 20 in channel 1 in line
Alignment
commands
5-12
Function
CHAPTER
SPECIAL FEATURES OF THE PRINTER
Subjects covered in Chapter 6 include Printer’s bell Master reset
Uni-directional printing International character sets
The code to sound the “bell” is CHR$7, which is ASCII code
Some miscellaneous commands
The following program shows how these codes works
20 A$= INPUT TYPE A CHARACTERS,A$ 30 IF A$= THEN 40 LPRINT A$ GOT0
Units of motion for the adjustment of the character width
Unit of motion Print pitch Draft characters Letter Quality characters
60 LPRINT LPRINT 70 LPRINT CHR$27Ul 80 FOR I=1 TO 90 LPRINT 100 NEXT
20 LPRINT CHR$27ACHR$6 30 FOR I=1 TO 40 LPRINT 50 NEXT
110 LPRINT CHR$l2CHR$27g
n The seven bit dilemma
80 FOR J=128 TO 254 STEP 90 FOR I=J TO Jt4 100 IF I254 THEN
10 LPRINT CHRS27O 20 LPRINT CHR$276 30 FOR J=3 TO
40 LPRINT JCHR$JCHR$9 50 NEXT J 60 LPRINT 21 CHR$21 70 LPRINT
110 LPRINT ICHR$ICHR$9 120 NEXT 130 LPRINT LPRINT 140 NEXT J
Figure 6-1. Character set #2
110 LPRINT ICHR$27CHR$ICHR$27= CHRS9
Here is what this program prints n International character sets
The characters that change are shown beneath their ASCII code in Table
A note for IBM-PC users
101 110 OUT &H378,1 OUT &H37A,5 OUT &H37A,4
THIS IS QUAD
When you run this program, you will get this
102 THIS IS DOUBLE SIZED PRINTING
SIZED PRINTING
Automatic
sheet feeder commands
1Control ctide
FABCDEFG HIJKLH#O PORSTUYW XYZ\l ‘abcdefg hlJkimn0 pqrstuvv xyz,l
104 10 FOR I=0 TO 20 LPRINT U-IRSI 30 NEXT 40 LPRINT 50 END
“PS%b’
BABCDEFG
Notice that your printer receives decimal code 13 hex OD together with hex OA, which is really decimal 10. In addition, your printer does not receive decimal code 26 hex 1A
MEMO
Designing and printing your own characters User-designed graphics
DOWNLOAD CHARACTERS AND DOT GRAPHICS
Subjects covered in Chapter 7 include
CHAPTER
DESIGNING YOUR OWN CHARACTERS
downloadedand stored in RAM Random Access Memory for use
draftcharacters
Figure 7-3. Use thisgridoronesimilartoittodefineyourown
ASCII code 2nd byte Data 1% 2nd 3rd 4th 3rd 5th byte6th 7th 8th 9th
Page
n Assigning a value to your character
ESC “&,, CHR$O nl n2 m0 ml m2 dl d2 d3 ... dx
Now let’s send the information to the printer. The following
ESC “%” n
FS “” CHR$O CHR$O CHR$O only for the IBM-P mode
380 LPRINT CHR$9 390 FOR I=0 TO 488 STEP 400 LPRINT CHR$61 410 NEXT
117 310 NEXT 320 LPRINT 330 LPRINT GERMANYCHR$g
340 FOR I=0 TO 412 STEP 350 LPRINT CHR$60 360 NEXT 370 LPRINT
420 LPRINT 430 LPRINT JAPANCHR$g 440 FOR I=0 TO 347 STEP
LQ characterswithpicapitch
Maximum Maximum
Draftcharacters
LQ characterswithelitepitch
STORlNG THE DOWNLOAD CHARACTERS
USER-DESIGNED DOT GRAPHICS
ESC “*” n0 nl n2 ml m2
Page
COMPATIBILITY WITH EXISTING SOFTWARE
n2 ml
nl n2 ml
721n2 ml
nl n2 ml
MEMO