Page
Self Declaration
Introduction
HOW to USE this Manual
Troubleshooting and maintenance Reference
Setting UP the Printer Unpackingand inspection Settingup
Index Command Summary
Ink jet printing system
Features of the Printer
Auto-capping system
Easy maintenance
Way power supply
Easy operation
Versatile paper handling
Extensive software support
Printer Components
AC adapter cable connector
Requirements
Requirements of the power supply
Location of the printer
Requirements of the Ink Cartridge
Unpacking and Inspection
ST P
Seiting UP
Connecting the power supply
Install the Ink Cartridge
IOCKl
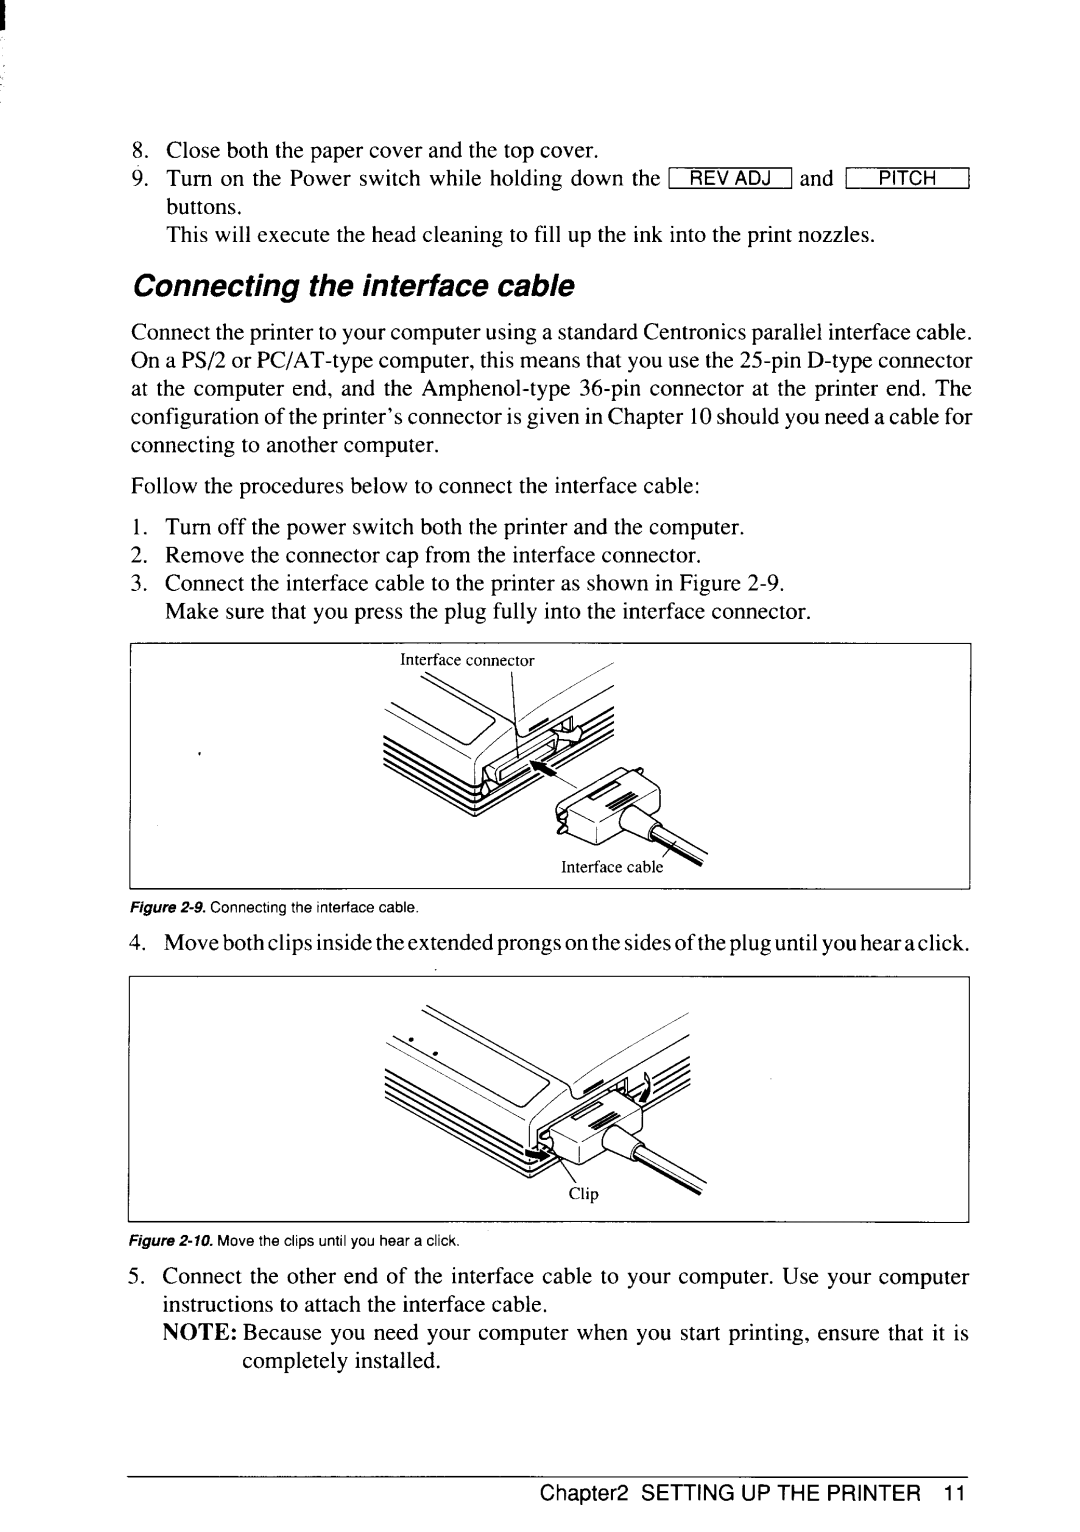
Connecting the interface cable
Page
Selection of Paper
F.,,,=,,,m
Adjusting the Printing GAP
Loading the paper from the front slot
Loading Paper
Page
Loading the paper from the flat feed slot
Removing Paper Jams
Online button
Buttons and Indicators
Revadj button
Line Feed button
FWD ADJ button
Pitch button
Form feed
Switch Combination Functions
Flat feed
Top of form
Head cleaning
Clearing the buffer/All reset
Short test mode
POWER-UP Functions
Charge the optional battery pack
Ver
Long test mode
Next Lprint END
Hexadecimal dump
Return
Pitch lock mode
Chapter
Location of the DIP Switches
IBM
Functions of the DIP Switches
OFF
Page
Printer Control Commands
Select Economy mode
Font Control Commands
Select High Quality mode
Select print quality
Select H-Gothic font
Cancel emphasized printing
Select italic characters
Select upright characters
Start underlining
Cancel double-strike printing
Stop underlining
Start overlining
Superscript
Select score
Select ornament character
Subscript
Cancel superscript or subscript
Select standard character set
Character SET Commands
Select IBM character set
Select character set #l
Select IBM code
Enable printing of all character codes
Select international character set
Select normal zero
Enable printing of all character codes on next character
Select slash zero
Select pica characters with High Quality mode
Select pica characters with Economy mode
Select elite characters with Economy mode
Pica pitch
Select condensed characters with Economy mode
Select elite characters with High Quality mode
Select condensed characters with High Quality mode
Semi-condensed pitch
Cancel expanded printing
Cancel condensed printing
Cancel one-line expanded printing
Expanded printing
Select character width
Select proportional characters with High Quality mode
Select proportional spacing
Select fixed spacing
Select double or quadruple size
Select master print mode
Increase character spacing
Return to normal height
Select character size
Print double-height characters
Select character height, width, and line spacing
Set line spacing to 7/60 or 7/72 inch
Set line spacing to 1/8 inch
Set line spacing to 1/6 inch
Set line spacing to n/360 inch
Set line spacing to n/60 inch or n/72 inch
Set line spacing to n/180 inch or n/216 inch
Execute ESC a
Line feed
Feed paper n lines
Cancel bottom margin
Set top of page at current position
Set bottom margin
Set vertical tab stops in channel
Set vertical tab stops every n lines
Select vertical tab channel
Vertical tab
Set left margin
Horizontal Position Commands
Set right margin
Set left and right margjns
Set automatic line feed
Cancel automatic line feed
Backspace
Left justify
Set horizontal tab stops
Reset all tab stops
Set horizontal tab stop every n co/umns
Horizontal tab
Relative horizontal tab in inches
Relative horizontal tab
Absolute horizontal tab in inches
Absolute horizontal tab in columns
Print normal-density 8-bit graphics
Graphics Commands
Print double-density 8-bit graphics
Print quadruple-density 8-bit graphics
Print hex-density 48-bit graphics
Print hex-density 24-bit graphics
On ml, m2
Select graphics mode
Convert graphics density
Define 24-dot download characters
Download Character Commands
Select download character set
Define 48-dot download characters
Select ROM character set
Shift download character area
Set MSB to
Cancel last line
Set MSB to O
Accept MSB as is
Bi-directional printing
Set printer on-line
Uni-directional printing
One-line uni-directional printing
Manual feed
Reset printer
Auto feed
Eject paper from ASF
Defining Your OWN 24-DOT Characters
Assigning the character data
Sample program
Assigning a value of character space
Lprint
IFFUS1 on Ranges of Cars & Telephones
Defining Your OWN 48-DOT Characters
For LPRIN’T SCALE$ Next
Iffus / on Ranges of Cars & Telephones
CPI
Installing Application Software with Your Printer
T e r
Embedding Printer Commands
Aprint README. DOC
Programming the Printer with DOS Commands
ESC
MS-DOS Andyourprinter
Programming with Basic
Lprint Lprint
MS-DOSANDYOUR Printer
3380
224 3610
4750
How the program works
Quad-s ized
Ii’!’=~q’.’fii’~~ðL,,!,,‘‘.$‘~’~
Troubleshooting
Power supply
Troubleshooting and Maintenance
Paper feeding
LINEindicator Illuminated?
Maintenance
100Cps
Specifications
720
Battery pack BP-1O
Busy
Pinout of Interface Connector
Character Sets
Standard character set #2
Hiid
# $ s ‘ @ @
International character sets
IBM character set #2
Page
Code Page#850 Multi-lingual
104
Page
Page
A I B
Character set #1
IBM special character set
Page
Page
Page
Top
NO nl n2
ESC f
Rd n2 ml m2 Nl n2 ml m2 m3
Page
Nl n2 mO ml m2
Page
Page
Pm oe