Printing Guide
Page
Preface
„ How to read this manual ‰ Symbols in this manual
‰ Screens
‰ Trademarks
Page
Contents
Other Printing Methods
Overview
Features and Functions About Printer Drivers
Extensive Client Platform Support
Features and Functions
„ For UNIX/Linux
About Printer Drivers
„ For Macintosh
Page
Setting Up Print Options
Before Using the Printer Driver
Printing from an Application
Printing with the Best Functions for Your Needs
„ Configuring the options
Before Using the Printer Driver
‰ Configuring options manually
Setting the Configuration tab manually
Click Drawer Settings
Set the following options and click OK
„ Setting the department code
Click Apply and OK to save settings
Entering department code
Click Apply and OK to save the settings
„ Copying the PPD file for Windows
„ Considerations and limitations
Printing from an Application
Printing from Windows applications
„ How to print
Click OK to save the settings
Click Print to print a document
„ How to set up
Setting Up Print Options
‰ Setting initial values of print options
‰ Setting print options for each print job
Saving profiles
Configure the print options on each tab
Click Save Profile in the Profile group
Enter the profile name and click OK
Click Yes to delete the selected profile
Loading profile Select a profile in the Profile box
„ Print options
How to display
Effect tab
Configuration tab
Others tab
Fonts tab
Cancel
Restore Defaults
Store to e-Filing
Preview window
Original Paper Size
‰ Basic tab
Print Paper Size
Manual Scale
Paper Type
Paper Source
Number of Copies
Orientation
Tab Manufacturer
Primary Tab Dialog
Tab Extension
Image Shift Width
Copy Handling
‰ Finishing tab
Sided Printing
Direction of print
Number of pages per sheet
Draw Borders Around Pages
Staple
Setting Up Print Options
Hole Punch
Use Custom Margin
Booklet Details
Output Document Layout
Order
Staple Down the Center
Margin Center
Margin Outer
Destination
‰ Paper Handling tab
Use Front Cover
Source
Use Back Cover
Print Style
Duplicate
Insert Pages
Interleave Pages
Number of tabs per Bank
Insert Pages
Use Tab Paper
10Units
Setting Up Print Options
‰ Image Quality tab
Watermark
‰ Effect tab
Edit
Add
Delete
Print on First Page Only
Add/Edit Watermark
Default Menu Setting
13Restore Defaults
‰ Others tab
Draw as Outline
PostScript Settings
Letterhead Print Mode
TopAccess
Toner Save
How to export custom settings
How to import custom settings
Import
Export
Custom Paper Size
13Restore All Defaults
Paper Size List
Name
Print Error Information
PostScript Settings
Output Format
Compress Bitmap
Fonts tab for PCL6/PS3 Fonts tab for XPS
‰ Fonts tab
Substitution Table Edit
TrueType Options
‰ Configuration tab
Update Automatically/Manual
Enable Snmp Communication
Update Now
Drawer Settings
Attribute
Drawer Settings
Override Application Paper Source Settings
Account Settings
‰ Printing Scheduled Print jobs
Printing with the Best Functions for Your Needs
„ Printing various print job types
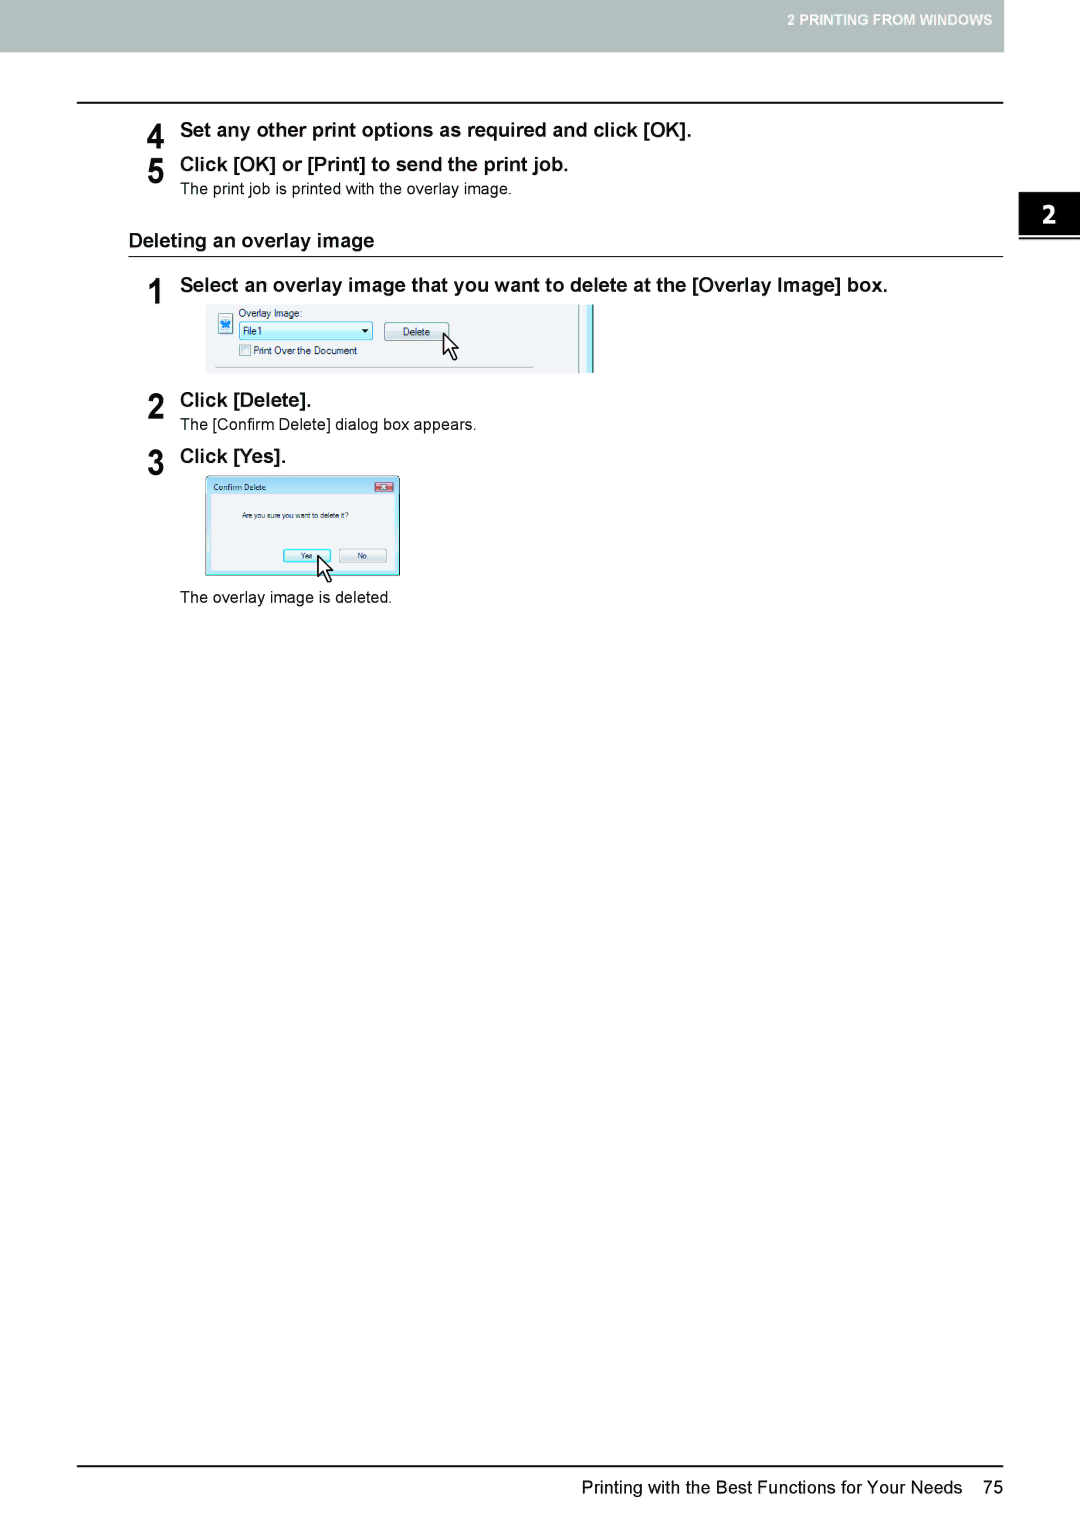
Set any other print options as required and click OK
‰ Printing Private Print jobs
Click OK
‰ Printing Hold Print jobs
Select the desired user name and press Password
‰ Printing Proof Print jobs
Enter an overlay image name and then click OK
‰ Creating an overlay file
‰ Storing to e-Filing
For the user box in the Password box if required
‰ Fitting images within paper size
„ Layout and finishing options in the Basic tab menu
Sorting printed documents according to
„ Layout and finishing options in Finishing tab menu
‰ Sort printing
‰ Printing on both sides of a sheet
Select the booklet size in the Output Document Layout box
‰ Making a booklet
Printing with the Best Functions for Your Needs
Sheet box
‰ Printing several pages on one sheet
‰ Stapling
‰ Hole punching
‰ Inserting different types of paper
„ Finishing options in the Paper Handling tab menu
‰ Interleaving pages
‰ Printing with watermarks
„ Finishing options in the Effect tab menu
Enter the watermark text in the Caption box
Click Yes
‰ Printing with an overlay file
Deleting a watermark
Print job is printed with the overlay image
Place the tab paper on the Bypass Tray
„ Using various types of paper
‰ Printing on tab paper
Select Custom when you use other manufactured tab paper
‰ Printing on paper larger than standard sizes
Printing from an Application on Mac OS X 10.2.4 to Mac OS X
Printing from Macintosh
Printing from an Application on Mac OS X 10.2.4 to Mac OS X
‰ Setting options and printing from Macintosh computers
„ How to print from Mac OS X 10.2.4 to Mac OS X
Click Print to print a document
‰ Page Attributes
„ Page Setup dialog on Mac OS X 10.2.4 to Mac OS X
Format for
Scale
Click +
‰ Custom Page Sizes
Click OK
Rename the custom page size
Click New
Click Save and click OK
Printer Margins boxes
‰ Copies & Pages
„ Print dialog on Mac OS X 10.3.x to Mac OS X
‰ Layout
‰ Scheduler
‰ Output Options
Reverse page order
‰ Paper Handling
Print
Destination Paper Size Select the output paper size
Destination Paper Size
‰ ColorSync
To Print
‰ Cover
‰ Color Matching
Print Cover
Cover Page Type
‰ Paper Feed
‰ Error Handling
Department Code
‰ Print Mode
Print Mode
Finishing
‰ Printer Features
Stapling
Printing from an Application on Mac OS X 10.2.4 to Mac OS X
Cover Pages
Booklet
Use Front Cover
Quality
‰ Summary
„ Print dialog on Mac OS X
Binding
‰ Duplex
Print on Both Sides
Output Options menu, you can save a print job as a file
‰ Paper Feed
Select the width of space added to the center
Finishing
Stapling
Printing from Macintosh
Printing Modes
Department Code DC Digit
Printing Modes DC
Password Digit
Private Document Password
Printing from an Application 114
Printing from UNIX/Linux
„ Generic lp and lptap options ‰ How to print files
„ Printing using lp command
‰ Copies
‰ Title
‰ Print Language
„ General options
‰ Output Bin
Output bin can be specified using the following options
‰ Duplexing
‰ Media Type
‰ Paper Source
‰ Printing Modes
‰ Paper Size
‰ Smoothing
‰ Department Code
‰ Distinguish Thin Lines
‰ Do not Print Blank Pages
‰ Booklet Modes
‰ Outer Margin
‰ Page Layout
‰ Center Margin
‰ Orientation
‰ Collate
‰ Font Pitch
‰ Page Length
‰ Text Wrapping
„ PCL5e Specific Options
‰ Left Margin
‰ Right Margin
‰ Banner
Banner Media Type
Banner Options
Banner Paper Source
Page
Viewing the Print Job Log 151
Monitoring the Print Job Status 128
„ Normal Print/Scheduled Print jobs
Monitoring the Print Job Status
Then press Delete
When Delete OK? appears, press Delete
‰ Deleting jobs
Pausing jobs
‰ Pausing/Resuming jobs
List, and then press Move
‰ Changing the job order
On the control panel, press the Print button Press Proof
„ Proof Print jobs
‰ Displaying the Proof Print job list
Press Print
‰ Printing remaining copies
Press Delete
‰ Deleting Proof Print jobs
‰ Displaying the Private Print job list
„ Private Print jobs
Monitoring the Print Job Status
‰ Printing Private Print jobs
‰ Deleting Private Print jobs
On the control panel, press the Print button Press Hold
„ Hold Print jobs
‰ Displaying the Hold Print job list
On the Hold Print job list, select the desired user name
On the Hold Print job list P.139, select a job for printing
‰ Deleting Hold Print jobs
On the control panel, press the Print button Press Invalid
„ Invalid jobs
‰ Displaying the Invalid job list
On the Invalid job list P.143, select the job for printing
‰ Printing Invalid jobs
Delete
‰ Deleting Invalid jobs
On the control panel, press the Print button
„ Printing files from USB media USB Direct Printing
Press USB
Specify the following items as required
Before Disconnecting the USB Storage Device
Press Password
Press OK
Viewing the Print Job Log
Press Print
This equipment also supports the following printing methods
FTP Printing 154 Email Printing 155
File is sent to this equipment and spooled in the queue
Printing a file using the FTP command
FTP Printing
Email Printing
Printing a file using the email client
Page
Internal Fonts List 158
Appendix
„ Internal PCL fonts list
Internal Fonts List
„ Internal PS fonts list
Internal Fonts List
Index
131
41 , 43
Index
DP-2090/2520/3000/3570/4570 OME08018200
Multifunctional Digital Systems