Names of each part on the control panel and remote control
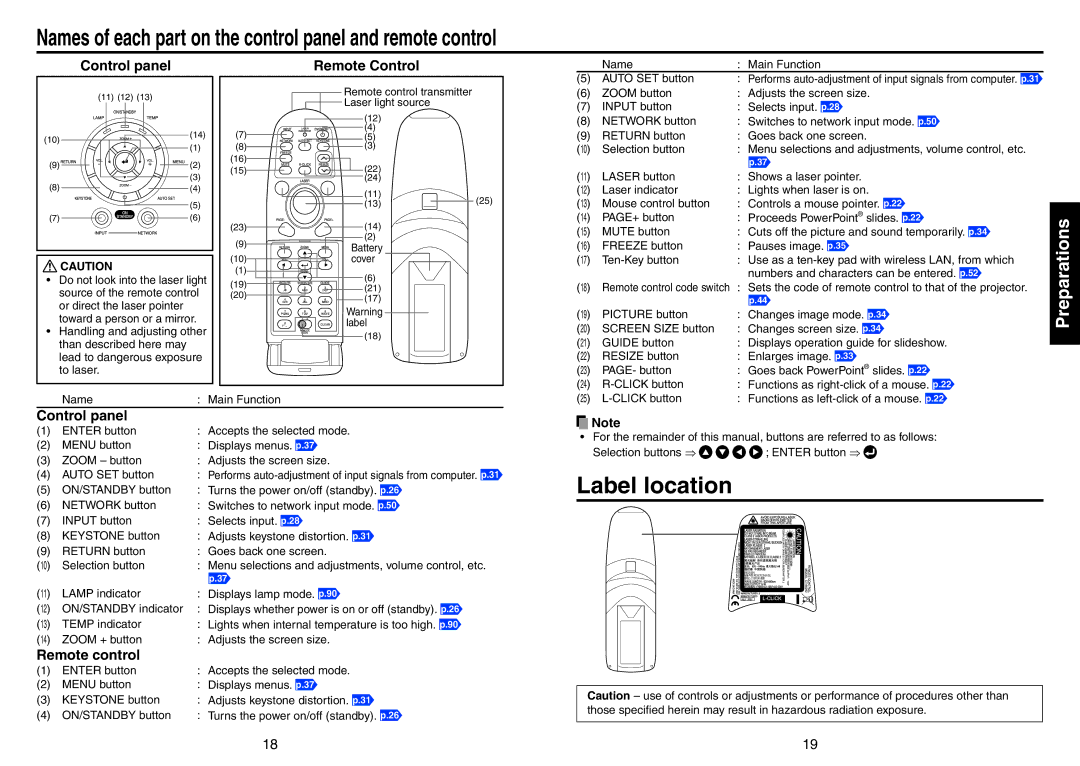
Control panel | Remote Control |
Name | : | Main Function |
(5) AUTO SET button | : | Performs |
| (11) (12) (13) | |
(10) | (14) | |
(1) | ||
| ||
(9) | (2) | |
| (3) | |
(8) | (4) |
(5)
(7) ![]()
![]()
![]() (6)
(6)
![]() CAUTION
CAUTION
•Do not look into the laser light source of the remote control or direct the laser pointer toward a person or a mirror.
•Handling and adjusting other than described here may lead to dangerous exposure to laser.
(7)
(8)
(16)
(15)
(23)
(9)
(10)
(1)
(19)
(20)
Remote control transmitter
![]() Laser light source
Laser light source
(12)
(4)
(5)
(3)
(22)
(24)
(11) | (25) | |
(13) | ||
|
(14)
(2)
Battery cover
(6)
(21)
(17)
Warning label
(18)
(6) | ZOOM button | : Adjusts the screen size. |
(7) | INPUT button | : Selects input. p.28 |
(8) | NETWORK button | : Switches to network input mode. p.50 |
(9) | RETURN button | : Goes back one screen. |
(10) | Selection button | : Menu selections and adjustments, volume control, etc. |
|
| p.37 |
(11) | LASER button | : Shows a laser pointer. |
(12) | Laser indicator | : Lights when laser is on. |
(13) | Mouse control button | : Controls a mouse pointer. p.22 |
(14) | PAGE+ button | : Proceeds PowerPoint® slides. p.22 |
(15) | MUTE button | : Cuts off the picture and sound temporarily. p.34 |
(16) | FREEZE button | : Pauses image. p.35 |
(17) | : Use as a | |
|
| numbers and characters can be entered. p.52 |
(18) | Remote control code switch | : Sets the code of remote control to that of the projector. |
|
| p.44 |
(19) | PICTURE button | : Changes image mode. p.34 |
(20) | SCREEN SIZE button | : Changes screen size. p.34 |
(21) | GUIDE button | : Displays operation guide for slideshow. |
(22) | RESIZE button | : Enlarges image. p.33 |
(23) | PAGE- button | : Goes back PowerPoint® slides. p.22 |
(24) | : Functions as |
Preparations
| Name | : Main Function |
Control panel |
| |
(1) | ENTER button | : Accepts the selected mode. |
(2) | MENU button | : Displays menus. p.37 |
(3) | ZOOM – button | : Adjusts the screen size. |
(4) | AUTO SET button | : Performs |
(5) | ON/STANDBY button | : Turns the power on/off (standby). p.26 |
(6) | NETWORK button | : Switches to network input mode. p.50 |
(7) | INPUT button | : Selects input. p.28 |
(8) | KEYSTONE button | : Adjusts keystone distortion. p.31 |
(9) | RETURN button | : Goes back one screen. |
(10) | Selection button | : Menu selections and adjustments, volume control, etc. |
|
| p.37 |
(11) | LAMP indicator | : Displays lamp mode. p.90 |
(12) | ON/STANDBY indicator | : Displays whether power is on or off (standby). p.26 |
(13) | TEMP indicator | : Lights when internal temperature is too high. p.90 |
(14) | ZOOM + button | : Adjusts the screen size. |
Remote control |
| |
(1) | ENTER button | : Accepts the selected mode. |
(2) | MENU button | : Displays menus. p.37 |
(3) | KEYSTONE button | : Adjusts keystone distortion. p.31 |
(4) | ON/STANDBY button | : Turns the power on/off (standby). p.26 |
(25) | : Functions as |
![]() Note
Note
•For the remainder of this manual, buttons are referred to as follows:
Selection buttons ⇒ ![]()
![]()
![]()
![]() ; ENTER button ⇒
; ENTER button ⇒ ![]()
Label location
Caution – use of controls or adjustments or performance of procedures other than those specified herein may result in hazardous radiation exposure.
18 | 19 |
