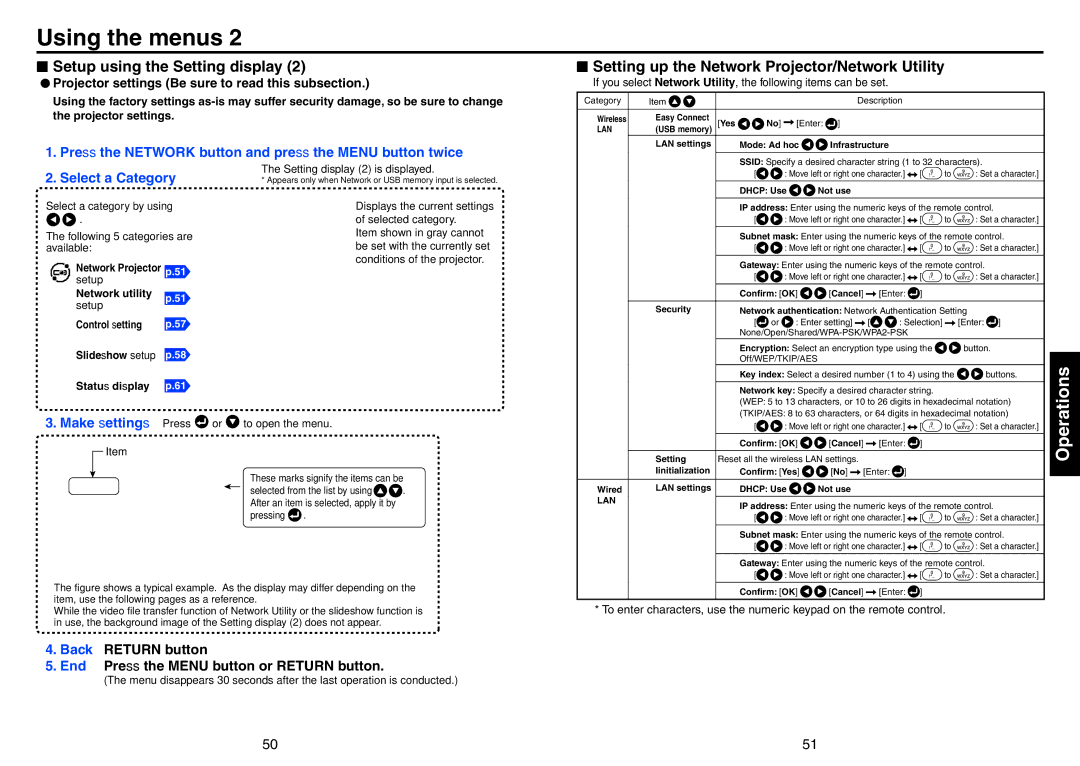
Using the menus 2
N Setup using the Setting display (2)
L Projector settings (Be sure to read this subsection.)
Using the factory settings
1. Press the NETWORK button and press the MENU button twice
N Setting up the Network Projector/Network Utility
If you select Network Utility, the following items can be set.
Category | Item |
|
|
| Description |
Wireless | Easy Connect | [Yes | No] | [Enter: | ] |
LAN | (USB memory) | ||||
| LAN settings |
| Mode: Ad hoc | Infrastructure | |
|
|
|
| ||
|
|
| SSID: Specify a desired character string (1 to 32 characters). | ||
2. Select a Category
Select a category by using
![]()
![]() .
.
The following 5 categories are available:
Network Projector p.51
setup |
| |
Network utility | p.51 | |
setup | ||
| ||
Control setting | p.57 | |
Slideshow setup | p.58 | |
Status display | p.61 |
3. Make settings Press
![]() Item
Item
The Setting display (2) is displayed.
* Appears only when Network or USB memory input is selected.
Displays the current settings of selected category.
Item shown in gray cannot be set with the currently set conditions of the projector.
![]() or
or ![]() to open the menu.
to open the menu.
These marks signify the items can be
selected from the list by using ![]()
![]() . After an item is selected, apply it by
. After an item is selected, apply it by
pressing  .
.
|
| [ |
| : Move left or right one character.] | [ | to | : Set a character.] | |||
|
| DHCP: Use | Not use |
|
|
|
|
| ||
|
|
| ||||||||
|
| IP address: Enter using the numeric keys of the remote control. | ||||||||
|
| [ |
| : Move left or right one character.] | [ | to | : Set a character.] | |||
|
|
| ||||||||
|
| Subnet mask: Enter using the numeric keys of the remote control. | ||||||||
|
| [ |
| : Move left or right one character.] | [ | to | : Set a character.] | |||
|
|
| ||||||||
|
| Gateway: Enter using the numeric keys of the remote control. | ||||||||
|
| [ |
| : Move left or right one character.] | [ | to | : Set a character.] | |||
|
|
|
|
|
|
|
| |||
|
| Confirm: [OK] | [Cancel] | [Enter: | ] |
|
| |||
|
|
| ||||||||
| Security | Network authentication: Network Authentication Setting | ||||||||
|
| [ | or | : Enter setting] | [ | : Selection] |
| [Enter: ] | ||
|
|
|
|
| ||||||
|
| Encryption: Select an encryption type using the |
| button. | ||||||
|
| Off/WEP/TKIP/AES |
|
|
|
|
|
| ||
|
| Key index: Select a desired number (1 to 4) using the | buttons. | |||||||
|
|
|
|
| ||||||
|
| Network key: Specify a desired character string. |
|
| ||||||
|
| (WEP: 5 to 13 characters, or 10 to 26 digits in hexadecimal notation) | ||||||||
|
| (TKIP/AES: 8 to 63 characters, or 64 digits in hexadecimal notation) | ||||||||
|
| [ |
| : Move left or right one character.] | [ | to | : Set a character.] | |||
|
|
|
|
|
|
|
| |||
|
| Confirm: [OK] | [Cancel] | [Enter: | ] |
|
| |||
|
|
|
|
|
|
|
| |||
| Setting | Reset all the wireless LAN settings. |
|
|
|
|
| |||
| Iinitialization | Confirm: [Yes] | [No] | [Enter: ] |
|
|
| |||
|
|
|
|
|
|
|
|
| ||
Wired | LAN settings | DHCP: Use | Not use |
|
|
|
|
| ||
LAN |
| IP address: Enter using the numeric keys of the remote control. | ||||||||
|
| |||||||||
|
| [ |
| : Move left or right one character.] | [ | to | : Set a character.] | |||
|
|
| ||||||||
|
| Subnet mask: Enter using the numeric keys of the remote control. | ||||||||
|
| [ |
| : Move left or right one character.] | [ | to | : Set a character.] | |||
|
|
| ||||||||
|
| Gateway: Enter using the numeric keys of the remote control. | ||||||||
|
| [ |
| : Move left or right one character.] | [ | to | : Set a character.] | |||
Operations
The figure shows a typical example. As the display may differ depending on the item, use the following pages as a reference.
While the video file transfer function of Network Utility or the slideshow function is in use, the background image of the Setting display (2) does not appear.
4. Back | RETURN button |
5. End | Press the MENU button or RETURN button. |
| (The menu disappears 30 seconds after the last operation is conducted.) |
Confirm: [OK] | [Cancel] [Enter: ] |
* To enter characters, use the numeric keypad on the remote control.
50 | 51 |