Ucgba
Iimportant Safety Instructions
FCC Information for US customers
We Want You Listening For a Lifetime
Special Instructions for U.K. Model
For US customers
Contents
Using the MusicCAST with a Yamaha AV receiver
About this manual
Features of the MusicCAST server
Getting started
What is the MusicCAST system?
Getting started
Supplied accessories
Front panel
Client Status indicators
Controls and functions Yamaha standard
Level control
Getting started Rear panel
Active indicator
Cursor left
Getting started Remote control
ALL Songs
Battery replacement
Preparing the remote controls
Preparing the MusicCAST server remote control
Using the remote control
Component check list
Checking your system connections
Power on
MusicCAST server standby and power modes
Using this manual
Operating the MusicCAST server
Storing music on the MusicCAST server
Music storage formats
Loading a CD into the MusicCAST server
Press OPEN/CLOSE to close the disc tray
Storing music on the MusicCAST server
Press TOP Menu
Use / to move the cursor to Recording and press Select
CD contents display screen
Use / / / to move the cursor to Start and press Select
Storing music on the MusicCAST server Storing a CD
Appears on the on-screen display
When storage is complete, the following screen
Auto-storing CDs
Check component connections
When using a source component with a digital output jack
When using a source component with analog output jacks
Server
Storing music on the MusicCAST server Recording
Select the input to use
Storing music on the MusicCAST
Use / / / to move the cursor to REC Start and press Select
Adjusting the recording level
Adjust the recording mode as necessary
Set the recording level as necessary
Synchro auto track marking
Setting the recording mode
Manual
Synchro full auto
Press Select
Selecting a song by its artist
4, 5 Press TOP Menu Use / to move the cursor to Library
Use / to select a song and press Select
Playback
Use / to move the cursor to Artists and press Select
Use / to select an Album and press
To playback all songs from an artist
Selecting a song by its album
To stop playback
To temporarily halt playback
Use / to select an album and press Select
To playback all songs from an album
Use / to move the cursor to Albums and press Select
Use / to move the cursor to Genres and press Select
Selecting a song by its genre
4, 5,6 4,5,6 Press TOP Menu
Use / to move the cursor to Library and press Select
Genres
To playback all songs from a genre
Use / to move the cursor to All Songs and press Select
Selecting a song by its name
Playback Using song linking
Use / to move the cursor to Bookmarks
Selecting a song from the list of bookmarks
Press TOP Menu Use / to select a song and press Select
Play Information screen time display
Using the Play Information screen submenu
Play Information screen
Press Submenu
4, 5 Use / to move the cursor to Playlists and press Select
Playback of songs from a preselected list Playlist
4, 5 Press TOP Menu
Use / to select a playlist and press Select
Use / to select a collection and press
Skipping to another song
Searching for a specific part of a song Search
Listening to albums
Groups
Skipping groups during playback
Listening to artists
Listening to genres
Playback Listening to Playlists
Repeat Playback
Random Playback
Use / to move the cursor to CDand press
Using the MusicCAST server to listen to CDs
Place the CD in the MusicCAST server in the disc tray
To stop playback
Start playback on the external component
Using the MusicCAST server to listen to external components
Use / to select Input monitor and press
Use / to select the component you want to listen to
Use / to select Recorded songs and press
Listening to songs recorded from external components
Use / to select a song to listen to
Use / to move the cursor to CD and press
MP3 CD specifications
Listening to MP3 CDs
Press OPEN/CLOSE to open the disc tray Press TOP Menu
Attaching a bookmark from the Play Information screen
Bookmarking songs for listening
To attach a bookmark
To playback a bookmarked song
Deleting all bookmarks
Removing a bookmark
Use / to select a playback method and press Select
Playback using the Song Statistics screen
Press TOP Menu Use / to move the cursor to Song
Statistics and press Select
Displaying library item properties on screen
Editing
Editing capabilities of the MusicCAST server
Artist list Artists screen
Song lists Songs screen
Editing
Genre list Genres screen
Opening the album editing screen sub menu
Editing album details
Use / / / to select characters, and enter the album name
Editing Creating a new album
Changing an album name
Editing Moving an album to another artist
Deleting an Album
Use / to move the cursor to Move to and press select
Moving an album to another genre
Use / to move the cursor to an artist and press Select
Use / to move the cursor to a genre and press Select
Opening the artist editing screen sub menu
Editing artist details
Use / / / to select characters, and enter the artist name
Editing Creating a new artist
Editing Deleting an artist
Opening the genre editing screen sub menu
Editing Genre details
Use / / / to select characters, and enter the genre name
Editing Creating a new genre
Changing a genre name
Editing Deleting a genre
Opening the song editing screen Sub menu
Editing songs
Use / / / to select characters, and enter the song name
Editing Changing a song name
Use / to move the cursor to Recorded songs and press Select
Editing songs recorded from external components
Use / / / to move the cursor to OK and press Select
Deleting a song
Editing Moving a song
Create a playlist in and press Select
Making playlists
Press TOP Menu Use / to move the cursor to Playlists
Use / to select the collection you want to
Use / to select Add a link and press
Use / / / to select characters and enter the playlist name
Repeat until you finish creating the playlist
Select songs to add to the playlist
Use / / / to select a character, and press
Using the on-screen keyboard to enter characters
Other keyboard functions
Using a PS/2 keyboard with the MusicCAST server
Connecting a PS/2 keyboard to the MusicCAST server
CD recording song formats
Creating CDs
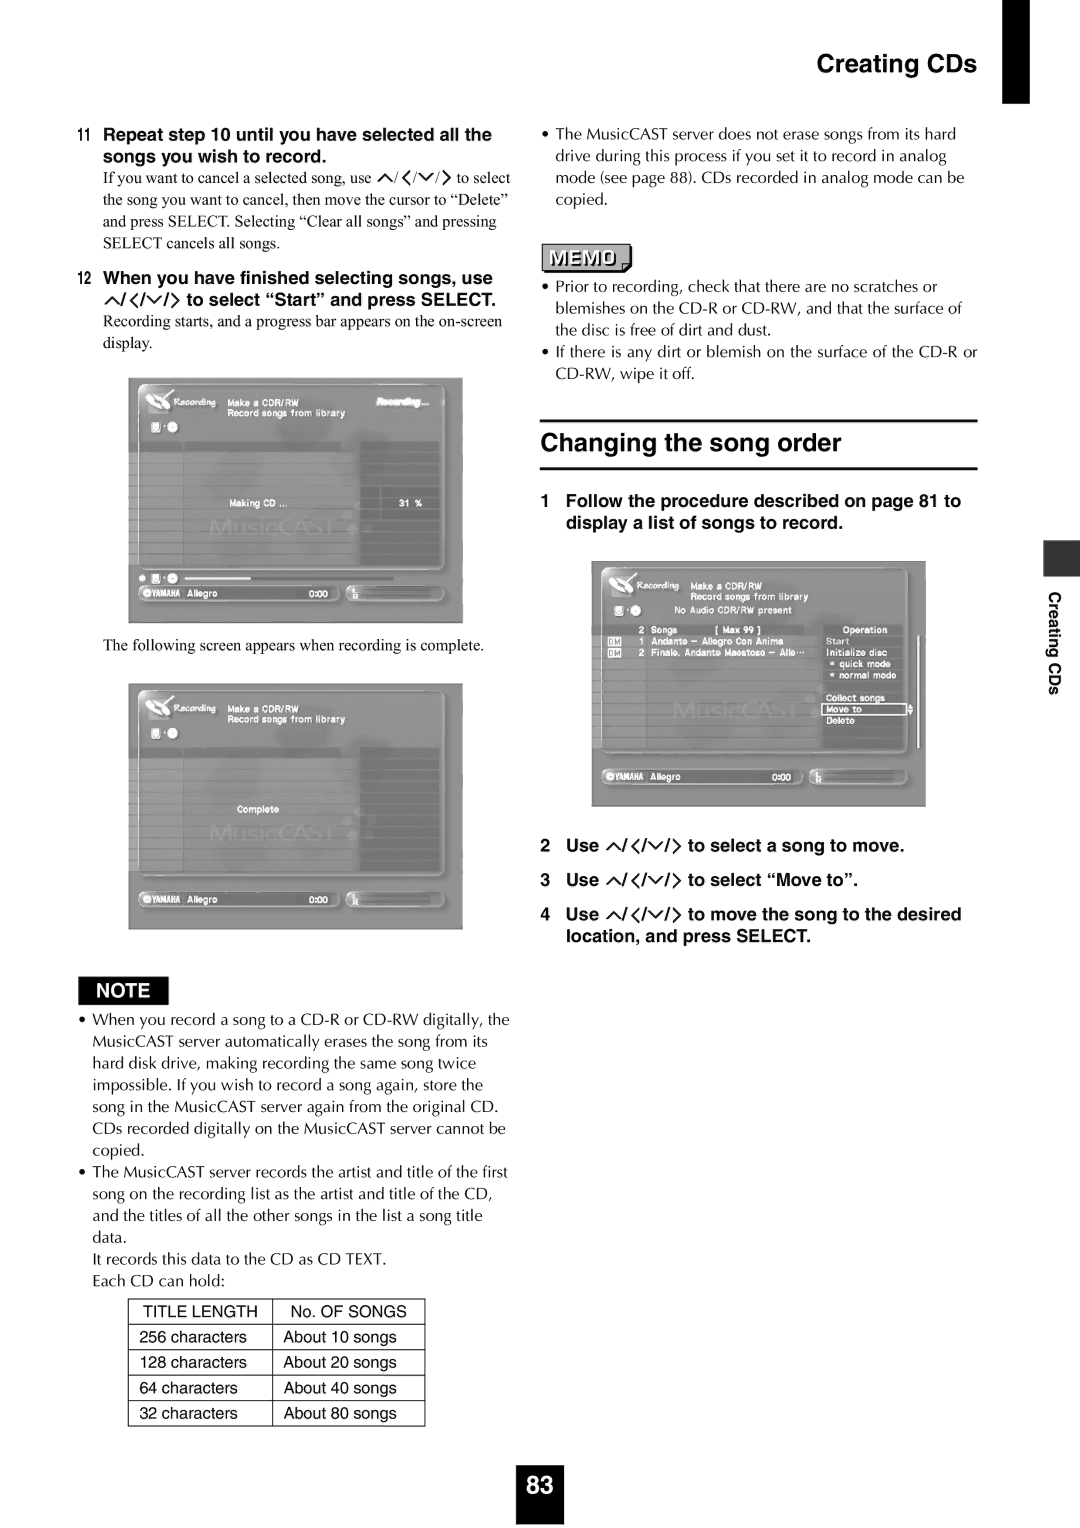
Select the songs you want to record
Creating CDs
Use / to move the cursor to Make a CDR/ RW and press Select
Set the recording parameters as necessary
To select songs from the Song statistics list
To select songs from a playlist
Changing the song order
Use / to select OK and press Select
Creating CDs Removing a song from the recording list
Recording a CD to a CD-R Duplicating a CD
Use / to move the cursor to Start and press Select
Use / to move the cursor to CD Duplicate and press Select
What is Finalization?
Making a high quality recording
Setting recording parameters
Setting recording speed
Setting the Recording auto level function
Deleting a CD-RW Initialization
Quick mode
Normal mode
Use / to move the cursor to AV Receiver and press Select
Use / to change the setting of the parameter
Press TOP Menu Use / to move the cursor to the parameter
You want to change
Using the MusicCAST with a Yamaha AV receiver
Using the MusicCAST with a Yamaha AV receiver
Client you want to check and press
Checking the status of a MusicCAST client
Press TOP Menu Use / to move the cursor to the MusicCAST
Client you wish to operate and press Select
MusicCAST client playback from the MusicCAST server
Locking and unlocking MusicCAST clients
Controlling MusicCAST clients
Stop all clients
Press SUB Menu Use / to move the cursor to Lock On/Off
Stop
Play all clients
Editing MusicCAST client names
Controlling MusicCAST clients
Use / to move the cursor to Playback Timer and press Select
MusicCAST Server Timer functions
Setting playback Timer details for the MusicCAST server
Use / to move the cursor to Timer Setup and press Select
Select an item to start playback from
Using the Timer function for playback and recording
Function for playback and recording
Activating the MusicCAST Timer function
100
101
MusicCAST client Timer functions
Setting playback Timer details for MusicCAST clients
102
103
104
Configuring the MusicCAST network
MusicCAST network
105
106
MusicCAST network configuration
Configuring the MusicCAST network
107
Configuring the MusicCAST network
108
MusicCAST Server network Expert Settings
IP address screen
Use / to move the cursor to IP Address and press Select
Setting the IP address of the MusicCAST server
109
110
Dhcp service screen
What is DHCP?
111
Wireless LAN screen
Press TOP Menu Use / to move the cursor to System Setup
Viewing the MusicCAST Server network status
Use / to move the cursor to Network
112
Press TOP Menu Use / to move the cursor to Manual
MusicCAST client ID manual configuration
Configuration and press Select
113
114
115
System Setup menus
Default system settings
116
System setup
117
Opening the system setting screens
Setting the date and time
System setup
To set the date and time manually
118
Set the date and time
Select the output type
Setting the video output parameters
Setting the Gracenote Cddb connection
119
Set the connection parameters
Setting the auto-play function
120
Type of data stored in library
Set the MusicCAST server data storage format
121
Use / / / and Select to select a format
122
Setting AV receiver parameters
Audio connection settings
Control Settings
Off
Tuner distribution setting
123
Use / to select the option you want and press Select
Setting the screen display
Turning the Auto Levelling function on and off
124
125
Enabling PCM format playback on MusicCAST clients
126
Setting up a PS/2 keyboard
Setting the standby mode
Mode and press Select
Use / / / to select a standby mode, and press Select
Setting the brightness of the front panel display
Press Back to return to the System Setup screen
127
Delete all PCM data
Deleting data from the hard disk drive
Updating the MusicCAST system
128
Press STANDBY/ON once again to turn the MusicCAST server on
Resetting the MusicCAST server to factory defaults
Use / to move the cursor to System Reset and press Select
129
Use / to move the cursor to Information and press Select
Opening the system information screens
130
131
Checking hard drive capacity
Checking the number of songs stored in the MusicCAST server
Checking system information
132
Checking MP3 encoding status
Checking the system version
133
Checking AV receivers the MusicCAST server can control
134
CD/CD-R/CD-RW compatible with this unit
To prevent a malfunction of this unit
Appendix
135
Handling of discs
136
Rules of digital recording and notes on system
Rules of digital recording
137
Troubleshooting
138
Appendix
139
140
Terms used in this manual
Network connections
141
Hardware
Menu
Appendix Software
142
Database
143
Specifications
144
Index
Group
145
146
Page
WB18700