Securing the projector
Using a security cable lock
The projector has to be installed in a safe place to prevent theft. Otherwise, purchase a lock, such as the Kensington lock, to secure the projector. You can locate a Kensington lock slot on the rear side of the projector. See item 10 on page 5 for details.
A Kensington security cable lock is usually a combination of key(s) and the lock. Refer to the lock’s documentation for finding out how to use it.
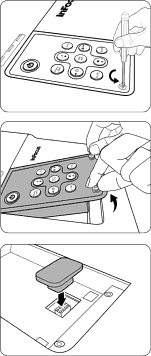
Removing the control keypad on the projector
The control keypad on the projector is detachable. Once the keypad is removed from the projector, it is not possible to operate it without the control keypad or remote control. We suggest that you keep the control keypad and remote control far from the projector in case they are taken together with it.
To remove the control keypad:
1.Locate the screw locations on the lower corner of the control keypad.
2. Completely loosen the screws.
3. Lift the control keypad by pulling the screws.
4. Remove the control keypad from the projector.
5.After removing the control keypad from the projector, you can use the keypad plug supplied to cover the keypad socket if necessary.
Utilizing the password function
For security purposes and to help prevent unauthorized use, the projector includes an option for setting up password security. The password can be set through the
![]() You will be inconvenienced if you activate the password functionality and subsequently forget the password. Print this reference guide (if necessary) and write the password you used in this guide, and keep it in a safe place for later use.
You will be inconvenienced if you activate the password functionality and subsequently forget the password. Print this reference guide (if necessary) and write the password you used in this guide, and keep it in a safe place for later use.
24 Operation