JVC HRS6960E specifications 38 EN, Entering Character, Delete Tape Data, Delete the tape data

Page 38

38 EN

PROGRAMME NAVIGATION (cont.)

Entering Character

Press the appropriate number key, then press e to enter each character.

Refer to the example below.

(Example) Enter “JVC NEWS”

APress 5 (JKL) once to enter “J”, then press e.

BPress 8 (TUV) three times to enter “V”, then press e. C Press 2 (ABC) three times to enter “C”, then press e. D Press 0 (I) twice to enter “I (space)”, then press e. E Press 6 (MNO) twice to enter “N”, then press e.

F Press 3 (DEF) twice to enter “E”, then press e. G Press 9 (WXYZ) once to enter “W”, then press e.

H Press 7 (PQRS) four times to enter “S”, then press e.

NUMBER KEY

CHARACTER


1

. , / – + f ( ) 1


2

A B C 2 Ä À Á Â Ã Å Æ


3

D E F 3 È É Ë Ê


4

G H I 4 Î Ï Ì Í


5

J K L 5


6

M N O 6 Ö Ô Ò Ó Õ Ø Ñ


7

P Q R S 7


8

T U V 8 Ü Ù Û Ú


9

W X Y Z 9


0

0 I


NOTES:

If you make a mistake, press w e to select the character, then enter the correct character.

If you want to delete a character, press w e to select the character, then press &.
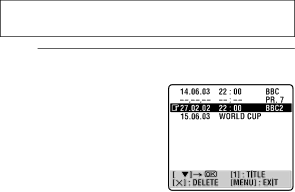
Delete Tape Data

Perform steps 1 to 3 of “Navigation Playback” on page 36 before continuing.

A Delete the tape data.

Press & for more than

3 second. All the programme data on the tape are deleted, then normal screen appears.

It is impossible to delete each programme information.

NOTE:

When you delete the tape data, only the tape information is deleted from the recorder’s memory. The actual recording on the tape is not erased.

Image 38
Contents Video Cassette Recorder Safety Precautions Moisture Condensation Front View Rear View Tape Speed SP/LP/EP  pg Counter can display up to +/ 195959. IfPlayback or recording time exceeds this limit ON-SCREEN Display Remote Control How To Use Operating JVC TVsSituate the recorder Check the contents10 EN Connect the recorder to TVSelect your country Auto Set UpTurn on the recorder Before starting, make sure of the followingSelect the language Perform Auto Set Up12 EN Confirm/Set video channelPress rt to select CH - and press OK or e Perform Preset DownloadSet the video channel Set the video channel to off manually.  pgJust Clock 14 ENLanguage for the on-screen display Language Access the Main Menu screenAccess the Country Set screen Return to the normal screenSituate the Satellite Controller Installing Satellite Controller16 EN Attach the Satellite ControllerSelect the satellite receiver’s channel for testing Setting satellite receivers brand and channelAccess the Sat Control Set screen Turn on the satellite receiverNextView Link TV Auto Power On18 EN VCR Auto Standby Direct RecBasic Playback Picture Search 20 ENSlow Motion Pause during playbackSkip Search Variable Speed SearchIndex Search Instant ReviewRepeat Playback 22 ENNext Function Memory Manual TrackingSet the tape speed Recording Resume FunctionChoose a programme Start recordingTape Remaining Time Instant Timer Recording ITR24 EN Receiving Stereo and Bilingual Programmes Engage the S-VHS ET modeSuper VHS ET S-VHS ET Recording 26 ENPlayback Before performing the Showview Timer Programming Access the Showview screenAccess the Showview Program screen Enter the Showview numberEngage the recorder’s timer mode Set the VPS/PDC modeAccess the Title Edit screen 28 ENEnter the programme start time Express Timer ProgrammingAccess the Programme screen Enter the programme stop timeVPS/PDC Recording To Timer-Record Weekly Or Daily Serials30 EN Enter the channel positionSet the programme start/stop time and channel Enter the programme modeBefore performing the 24 Hour Express Timer Programming Return to the timer mode Disengage the timer modeCancel or change a programme 32 ENSelect the programme to modify Cancel or change programme settingConfirm the overlapping programmes Overlapping programmes blink on the TV screenProgramme Recording Select the L-2 Select modeRecording mode 34 ENWhen inserting a cassette with the record safety tab Intact NavigationProgramme Navigation Screen 36 ENNavigation Playback Load a recorded cassetteEdit Programme Title Select the programmeDelete Tape Data 38 ENEntering Character Delete the tape dataEdit From a CamcorderAnother 40 ENOutput and L-1 Input Setting Output/Input Set B Access the Output/Input Set screenDecoder connector 42 ENConnecting To a Satellite Receiver Simple Connections44 EN Perfect ConnectionsSet the tuner Select the input modeConnect the decoder Set L-2 Select to DECODER.  pg46 EN Make connectionsSelect the mode Mode SetAccess the Mode Set screen Select the mode setting48 EN For Example On the remote control, or press 7 on the recorderEntire programme while timer-recording in SP mode 50 EN Colour System 52 EN Access the Auto Channel Set screenTuner Set Auto Channel SetPress OK twice Perform Auto Channel SetView the Confirmation screen 54 EN Manual Channel SetWhen Receiving a Scrambled Broadcast Delete a ChannelSet Stations B 56 ENSet Stations a TV Station And ID List Station Name58 EN Access the Clock Set screenClock Set Set the source channel position for clock data Set the date and timeSet Just Clock Start the clock operationVideo Channel Set Access the Video Channel Set modeExit the Video Channel Set mode 60 ENPower 62 EN RecordingOther Problems 64 EN PlaybackScan system Signal-to-noise ratio 45 dB Horizontal resolutionMemory backup time Approx min Lines VHS66 EN Memo