Citizen D710/D716 instruction manual Infrared Communication Mode Operating Procedure

Page 72

B. Infrared Communication Mode Operating Procedure

The procedure for data transfer is performed with the “Infrared Communication Mode” of the watch.

Infrared Communication

(1)

The watch enters the infrared communication mode

Mode (Initial Display)


initial display when the lower left button (D) is pressed


for at least 2 seconds and then released in any mode.

(C)


(B)

(2)

The menu changes each time the upper left button


(C) is pressed once, and the menu of the selected


menu is displayed when either the upper right button


(B) or the EL light button is pressed once. (The menu


indicated with an the mark is the selected menu.)


(D)


(A)

(3)

The selected communication menu is activated when


*


the upper right button (B) or the EL light button is


pressed once when the lowermost menu is displayed.


EL light button


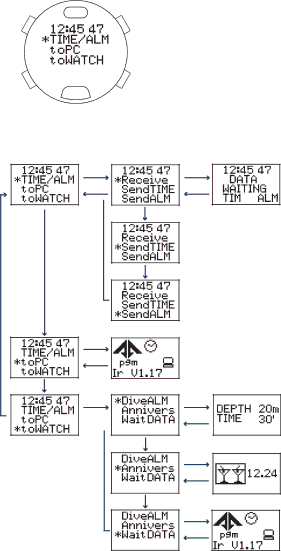
<Display Sequence in Infrared Communication Mode>

<Initial display>

(B)

(A)

(B)

(A)

(C)

[Data Reception Standby Display]

(C)

(C)

(B)

(A)

(C)

[Time Data Transmission Display]

(C)

[Alarm Data Transmission Display]

[Data Transfer Standby Display]

(B)

(C)

(A)

(C)

(B)

(A)

(C)

(B)

(A)

(C)

(B)

(A)

[Dive Alarm Data Transmission Display]

[Anniversary Data Transmission Display]

[Data Reception Standby Display]

72

Image 72
Contents D710/ D716 Page Before Using English English English EnglishIntroduction Safety Precautions Observe at All Times Important NotesGeneral Cautions Regarding Diving Page Page Page Contents Page Using the Scuba Diving Log Mode and Skin Diving Log Mode Watch Checking Accessories Prohibited Prohibited Use During Diving Page Page Features Various watch functions can be set on your PCThis watch is of the rechargeable type Other Convenient FunctionsCharger Names and Functions of ComponentsPcs. of size AA Alkaline Batteries Installation Procedure Charging the Watch Watch Display During Charging Standard Mode Names of ComponentsWatch Display Modes Functions Dive Plan Mode Scuba Diving Log ModeSkin Diving Log Mode Dive ModeCharge Level Indicator and Continuous Usage Time How to Read the Charge Level Indicator of the watchAmount of Charge Usage timeUsingUsingthetheELELLightLight Continuous Usage TimeSwitching the Mode Standard ModeDive Plan Page Using the Standard Mode Using the Time ModeSwitching the Display Day DisplaySetting the Time and Date Daily Graphic Display Using the Travel Time Mode Setting the Travel TimeNormal Display Time Difference Display Procedure Before InterchangingAfter interchanging During interchangingUsing the Destination Timer Mode Setting the Destination TimerArrival Time Remaining Time Display DisplayDestination Timer Measuring Procedure Remaining Time Time upElapsed Time Display Displaying Arrival Time Set during MeasurementUsing the Alarm Mode Alarm ON/OFF and Alarm MonitorSetting the Alarm Alarm on Alarm OFFPage Using the Chronograph Mode Chronograph Timing ProcedureReading the Display Using the Timer Mode Setting the TimerTimer Setting Display Timer Measuring Procedure Setting display Timing Stop Time upRepeating Measurement Using the System Monitor Mode Charge Level IndicatorCharge Level Indicator Flash Memory Status Display Garbage CollectionGarbage Collection Operating Procedure Flash Memory Status DisplayPage Locations Displayed by this Watch Locations Pre-registered in this WatchLocation IrWW During AIR diving File Error Warning Explanation of Warning FunctionsInsufficient Charge Warning Abnormal Pressure Detection Error Warning Water Sensor Check WarningAscent Rate Warning Abnormal Depth WarningDecompression Diving Error Permanent Error WarningExceed Maximum Depth Warning Decompression Diving WarningPermanent Error PO2 limit ErrorOxygen Toxication Time Error PO2 Limit WarningDiving Terms Used by this Watch Safety Stop Repetitive DivingDecompression Diving Decompression StopMinimum Water Temperature Min.w.temp Dive TimeTime Maximum Depth Max. DepthUsing the Dive Plan Mode Switching the DisplayDive Condition Display Dive Plan Display Dive Alarm Display AIR DivingNitrox Setting High-Altitude SettingNitrox Setting and Oxygen Concentration Setting Switching from Nitrox Setting to AIR SettingAIROxygen Concentration Setting StateNITROX Dive Condition MarksDive Alarm Depth AlarmDive Time Alarm Calling Up No-Decompression Limit TimeSetting the Dive Alarm Dive Alarm MonitorDepth No. of times Alarm sounds Dive time Calling Up Scuba Diving Log Data AIR diving Nitrox divingCalling Up Skin Diving Log Data Deleting Log Data Using the Dive Mode Water Depth Measurement Display Skin divingDisplay during AIR Setting Explanation of Display During Water Depth MeasurementDuring Decompression Diving Display during Nitrox Setting Safety Stop Graph and Decompression Stop Graph Safety Stop Graph DisplayDepth Measurement Decompression Stop GraphWater Temperature Measurement Ending the Dive ModeDive Time Measurement No. of Dives Per Day and Recording Log DataUsing the Surface Mode Low power mode Temporary function Time Display Date Display No Display Setting the Time and Date Data Communication Functions Infrared CommunicationCommunication Range Infrared Communication Mode Operating Procedure Display Sequence in Infrared Communication ModeWatch Settings Communication by USB InterfaceData Communication with PC Diving Log and Profile DataPreparations for Communication USB CommunicationVAttachment of Ferrite Core Data Communication Between Watches Sending and Receiving DataProcedure Receiving Transmitting WatchWatchAll Reset Formatting Flash Memory Accessory Software Operating EnvironmentWhen Registering Animated Images in an Album PrinterWeb Browser Installing CAPgm Watch Setting Software Page Startup and Ending Aqualand Graph Nx and CAPgm Startup of Aqualand Graph Nx and CAPgmEnding Aqualand Graph Nx and CAPgm Communication Unit USB Cable Connector Leg RemovableUsing the Communication Unit Installing BatteriesAttaching and Removing the Watch Installing the USB Driver Windows98 or Windows98 SEPage Windows Me Windows2000 Confirm that your personal computer has started up normallyWindowsXP Page Troubleshooting Problem Possible Cause Corrective Action ReferenceUnable to Slow Sounds Handling Precautions for the watch Examples of Use IndicationCleaning the Watch TemperaturesStatic Electricity Shocks Chemical Agents, Gases and MercuryStorage Specifications WatchCharger Communication Unit Sold Separately