Maytag MD98 warranty Drying Accessories, Installing the Drying Rack, Using the Drying Rack

Page 23

DRYING ACCESSORIES

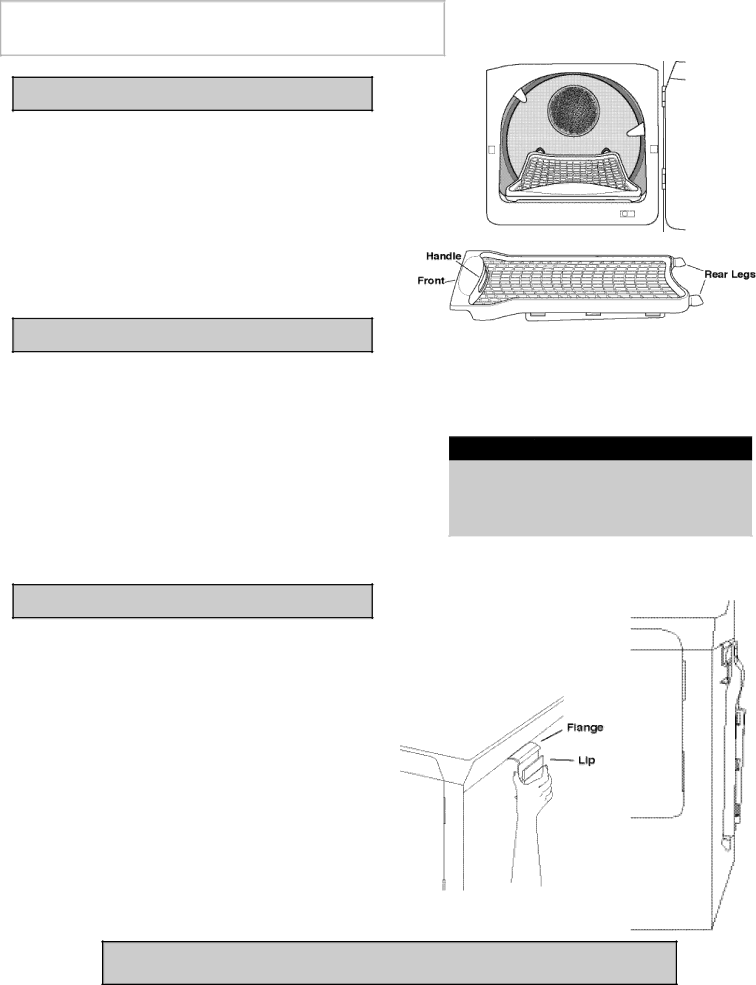
INSTALLING THE DRYING RACK

1)Open dryer door.

2)Position drying rack in tumbler placing the two rear legs in the two recessed areas in the back wall of the dryer.

3)Place the front lip of the drying rack on top of the lint filter.

4)Place items to be dried on the rack, leaving space between them so air can reach all the surfaces.

5)Close the dryer door.

6)Use the “time dry” cycle. Select time according to moisture and weight of item. Start the dryer. It may be necessary to reset the timer if a longer drying time is needed.

USING THE DRYING RACK

SUGGESTED ITEMS

SUGGESTED TEMP. SETTINGS


Washable sweaters (block to

Heat

shape and lay flat on rack)


Stuffed toys (cotton or

Heat

polyester fiber filled)


Stuffed toys (foam or

Air Fluff

rubber filled)


Foam rubber pillows

Air Fluff


Sneakers

Air Fluff or Heat


WARNING

Drying foam rubber, plastic or rubber on a heat

setting may cause damage to the item and

could lead to a fire hazard.

STORING THE DRYING RACK

On Dryer Sides:

The drying rack hanger fits between the dryer top and the dryer cabinet.

1)Place the flange on the hanger in the seam between the top and the cabinet. Push all the way in.

2)Face the top of the drying rack toward the side of the dryer cabinet.

3)Place the drying rack handle over the lip of the hanger.

On Dryer Back:

1)Place the drying rack hanger between the dryer top and the dryer cabinet just below the back of the control panel.

2)Place the flange in the seam and push all the way in.

3)Face the top of the drying rack toward the back of the dryer cabinet.

4)Place the drying rack handle on the lip of the hanger.

NOTE: If not included with your dryer, contact your Maytag dealer for the accessory kit MAL1100AXX

or call 1-877-232-6771 USA or 1-800-688-8408 Canada.

22

Image 23
Contents USE & Care If you have questions call Recognize Safety SYMBOLS, WORDS, LabelsShould you need assistance in the future, it is helpful to Date of Purchase Model Number Serial NumberImportant Safety Notice & Warning Dryer Exhaust Tips ADD a Fabric Softener Sheet if Desired Clean the Lint FilterOperating Tips Load the Dryer ProperlyTouchscreen An interactive Control PanelMedium , delicate or extra low Setting Sensor DRYSelect appropriate temperature regular ContSetting Time DRY Select air fluff from the Home screen Setting AIR FluffAir fluff tumbles the load with room temperature air More Cycles Setting Wrinkle ReleaseSetting Freshen UP For Best Performance Setting DryelContinue when done Dryel cycleStart/Pause FavoritesCreate a Favorite Touch create a favoriteName a Favorite Cycle Touch Edit a FavoriteChanging the Name of a Favorite Cycle Press continue to name your favorite cycleTouch edit a favorite Changing Settings of a Current FavoriteTouch continue Deleting a Favorite Move a Favorite CycleLaundry Hints Using HelpLock out feature and select preferences Before YOU CallEach topic Operating TipsSelect operating tips Use of your dryer. TouchSelect preferences allows you to select Lock OUT FeatureSelect Preferences Select select preferencesTouch loud, medium, soft or POP-UP WindowsUse sensor dry Special Laundry TipsAvoid Dryer Drying Instructions for replacing the bulb Care and CleaningReplace Drum Light Reverse the DoorTroubleshooting Storing the Drying Rack Drying AccessoriesInstalling the Drying Rack Using the Drying RackFull One Year Warranty Clothes Dryer Warranty33-34 Instructions de sécurité importantes 25-2630-31 31-32CE QU’IL Faut Savoir À Propos DES Consignes DE Sécurité Date d’achat Numéro de modèle Numéro de sériePour éviter incendie ou explosion Avertissement ET Avis Important SUR LA SécuritéNettoyer tout vieux conduit Conseils Pour LE Circuit D’ÉVACUATIONPermettre à la sécheuse d’évacuer facilement l’air humide Ajouter UNE Feuille D’ASSOUPLISSANT LE CAS Échéant Charger Convenablement LA SécheuseConseils D’UTILISATION Nettoyer LE Filtre À CharpieStart/Pause Mise en marche/Pause Appuyer Tableau DE CommandeSuite SÉCHAGE-CAPTEURSélectionner la température appropriée « Sécher en sécheuse à température moyenne »« continuer » Séchage MinutéSélectionner « duvetage » à lécran daccueil DuvetageRéglage Rafraîchissement Autres CyclesRéglage Défroissage Pour obtenir une performance maximale Réglage DryelAppuyer sur « autres cycles » Appuyer sur « Dryel »Appuyer sur « création 1 favori » FavorisCréation D’UN Cycle Favori Favori » Modification DUN Cycle FavoriModification D’UN NOM D’UN Cycle Favori Nommer un cycle favoriModification DES Paramètres D’UN Cycle Favori « cycles favoris » de l’écran d’accueil Transfert D’UN Cycle FavoriAnnulation D’UN Favori Appuyer sur la touche « modificationAppuyer sur la touche Help Utilisation DE LA Fonction D’AIDEAvant UN Dépannage Conseils DE SéchageConseils D’UTILISATION ’écran « fonction de verrouillage » permet Fonction DE VerrouillageSélection DES Préférences De verrouillage »Appuyer sur « continuer » pour accepter le paramètre choisi Pour sélectionner le niveau de volume des signaux sonoresFenêtres Escamotables Sélectionner « fort », « moyen », « bas » ou « arrêt »« séchage-capteur » et la température « standard » Conseils SpéciauxÉviter DE Placer Dans LA Sécheuse Inversion DU Sens D’OUVERTURE DE LA Porte Remplacement DE L’AMPOULE DU TambourRemplacement de l’ampoule Entretien ET NettoyageRecherche DE Pannes Rangement DE LA Grille DE Séchage Accessoires Pour LE SéchageInstallation DE LA Grille DE Séchage Utilisation DE LA Grille DE SéchageRésidents canadiens Garantie DE LA SécheuseGarantie complète dune année Garantie limitée57-58 49-5054-55 55-56Canadá Lunes a Viernes, 800 a.m. 800 p.m. Hora del Este Información Sobre LAS Instrucciones DE SeguridadFecha de Compra Número de Modelo Número de Serie Si tiene alguna consulta llame aNo altere los controles Aviso Y Advertencia Importante Sobre SeguridadIncorrecto Sugerencias Para EL Escape DE LA SecadoraCorrecto Agregue UNA Hoja DE Suavizador DE Telas SI LO Desea Sugerencias Para EL FuncionamientoLimpie EL Filtro DE LAS Pelusas Cargue LA Ropa EN LA Secadora EN Forma AdecuadaPanel DE Control Continuar Programación DEL Sensor DE SecadoProgramación DEL Tiempo DE Secado Seleccione aire frío en la pantalla de Comienzo Programación DE Aire FríoProgramación DE Refrescar Otros CiclosProgramación DE Inarrugables Notas Programación DE DryelPara un Mejor Rendimiento Oprima crear un ciclo favorito FavoritosCrear UN Favorito Para Poner Nombre a un Ciclo Editar UN FavoritoCambio DE Nombre DE UN Ciclo Favorito Oprima editar un favorito Cambio DE LOS Ajustes DE UN Ciclo Favorito ActualOprima continuar Oprima suprimir un favorito Mover UN Ciclo FavoritoSuprimir UN Favorito Oprima la tecla ‘Help’ Como Usar AyudaAntes DE Solicitar Servicio Sugerencias Para EL SecadoSugerencias DE USO La opción característica de bloqueo Característica DE BloqueoSeleccionar Preferencias BloqueoCambiar Contraste DEL Monitor Despliegue DE Ventanillas InstantáneasUse sensor de secado Sugerencias Especiales Para EL SecadoEvite Secar EN LA Secadora Instrucciones para reemplazar el foco Cuidado Y LimpiezaReemplazo DE LA LUZ DEL Tambor Inversión DE LA PuertaLocalización Y Solución DE Averías Almacenamiento DE LA Rejilla DE Secado Accesorios DE SecadoInstalación DE LA Rejilla DE Secado USO DE LA Rejilla DE SecadoCanadá llamada gratis Garantía DE LA Secadora DE RopaNotas Segundo Año Todas las piezas
Related manuals
Manual 72 pages 28.05 Kb