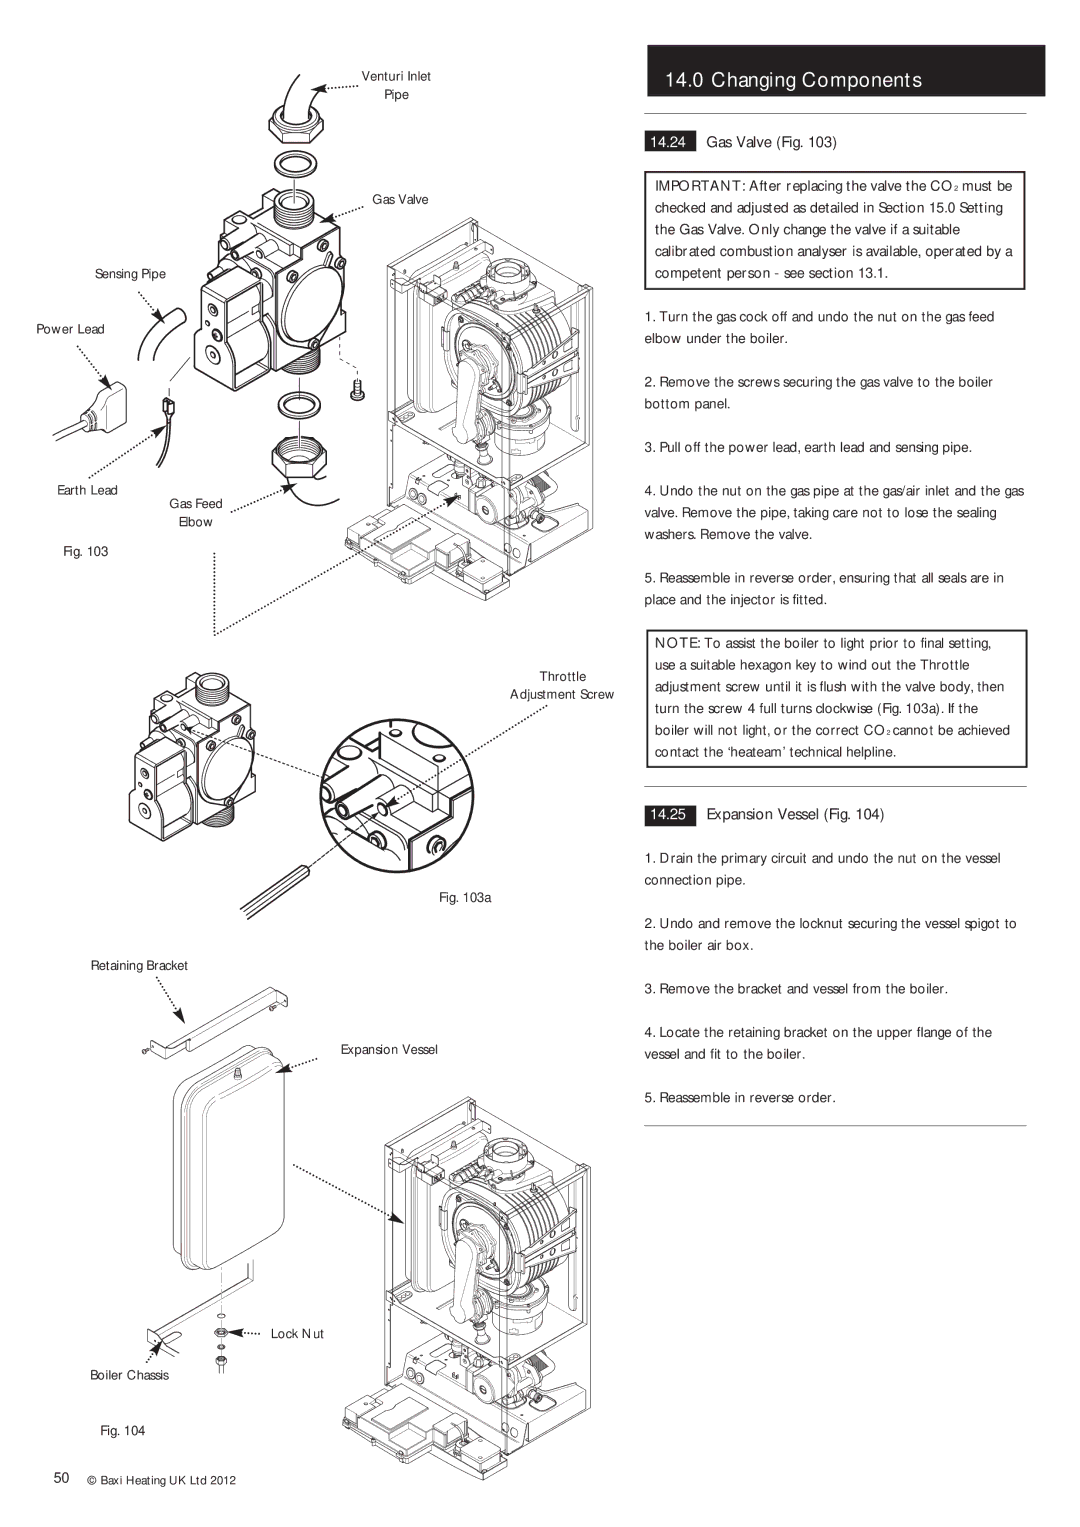
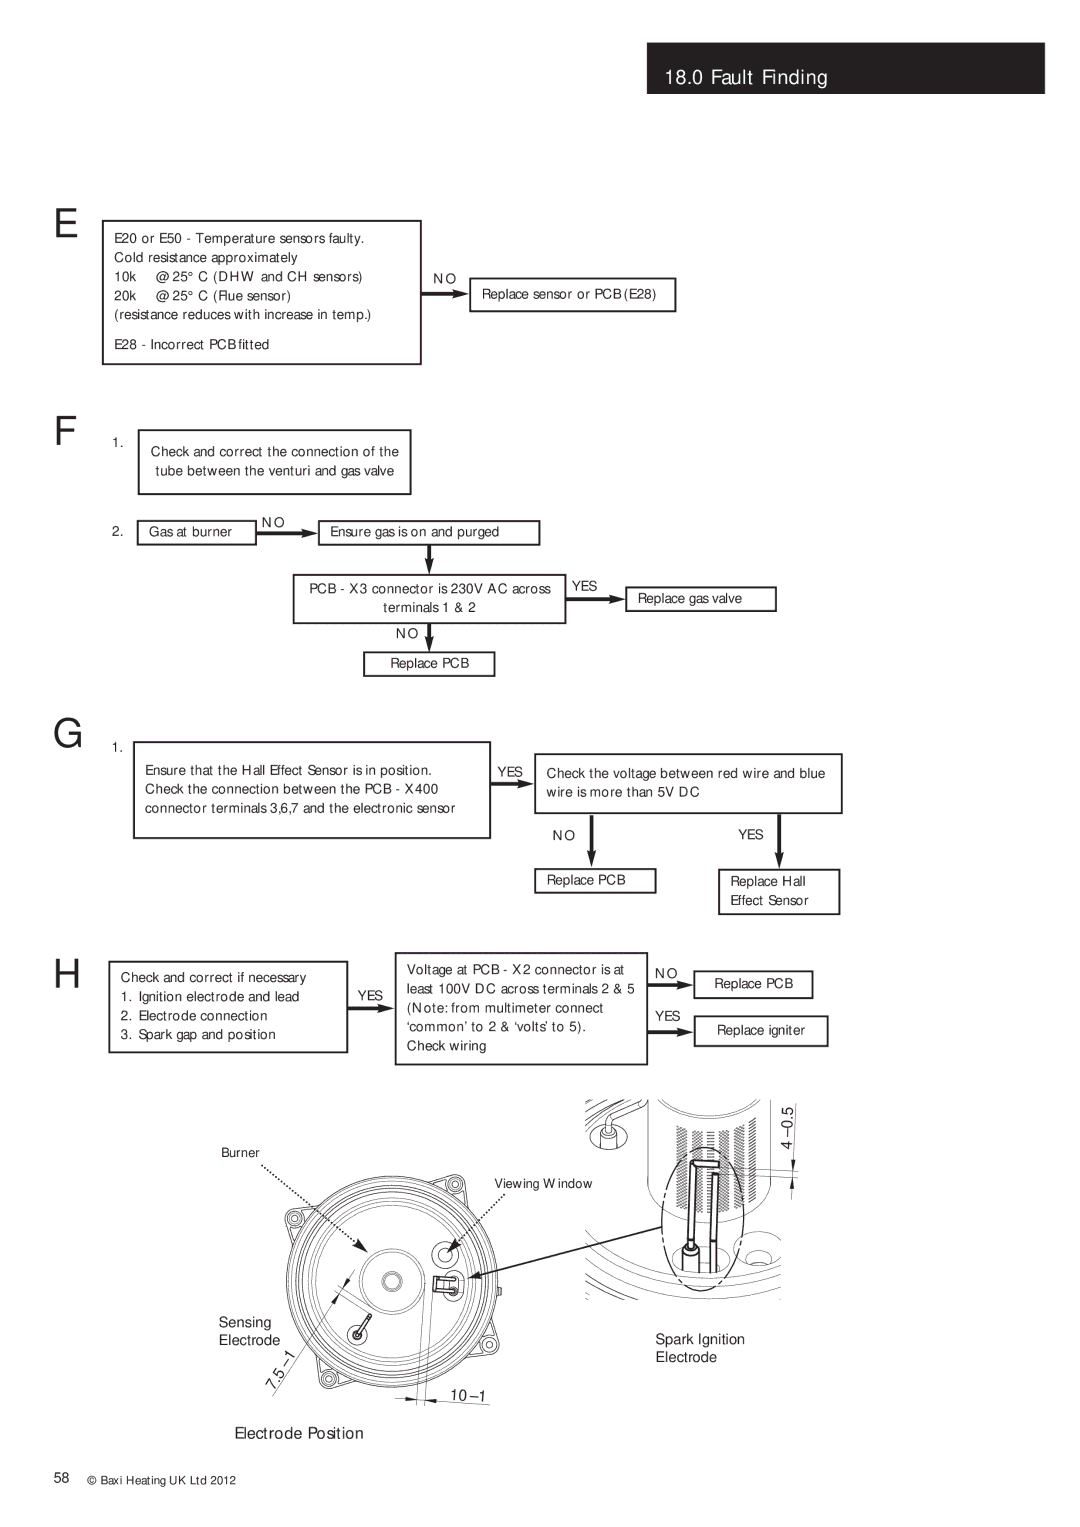
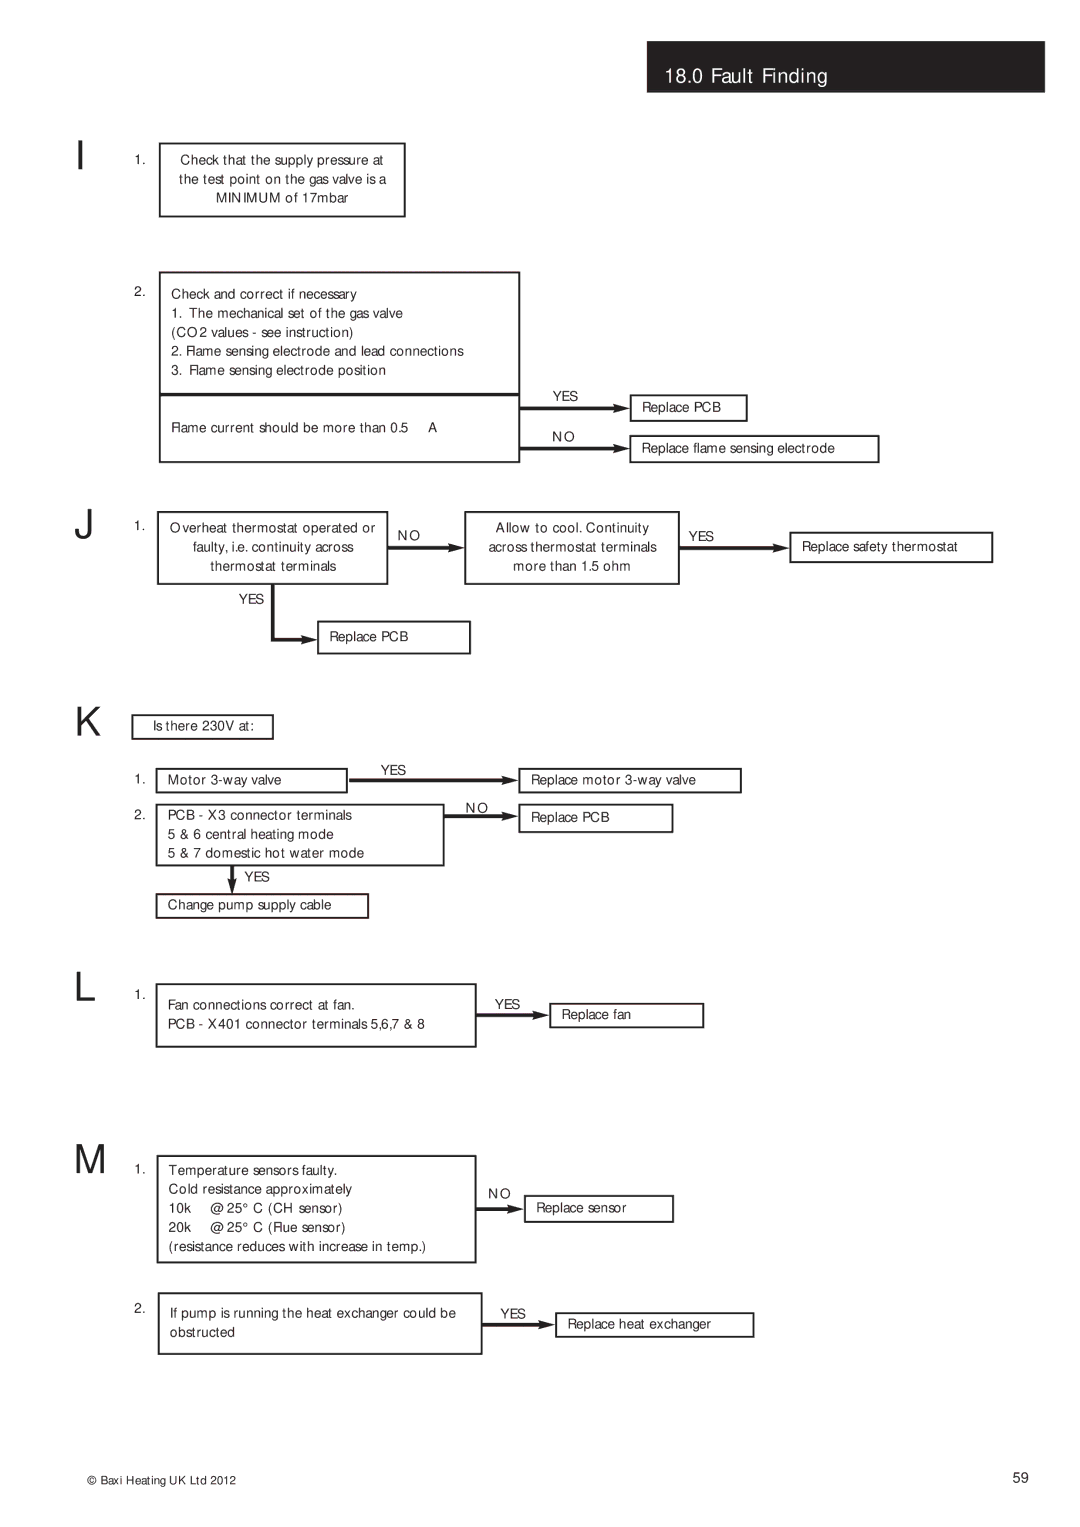
Potthof & Co 24kw, 33kw, 28kw Setting the Gas Valve CO2 check, CO2 should be 8.4% ± Reduce CO2

Page 51

x 2

Central Heating


Domestic Hot Water


Temperature Control

Fig. 105

Temperature Control


Selector Switch

Display


1


2


12


3


11


4


10

Reset


2

5


9


PM


3


8


7


7


8


AM


0

4

9


0

5


bar

10


4


11


3


12

1

2


15.0Setting the Gas Valve

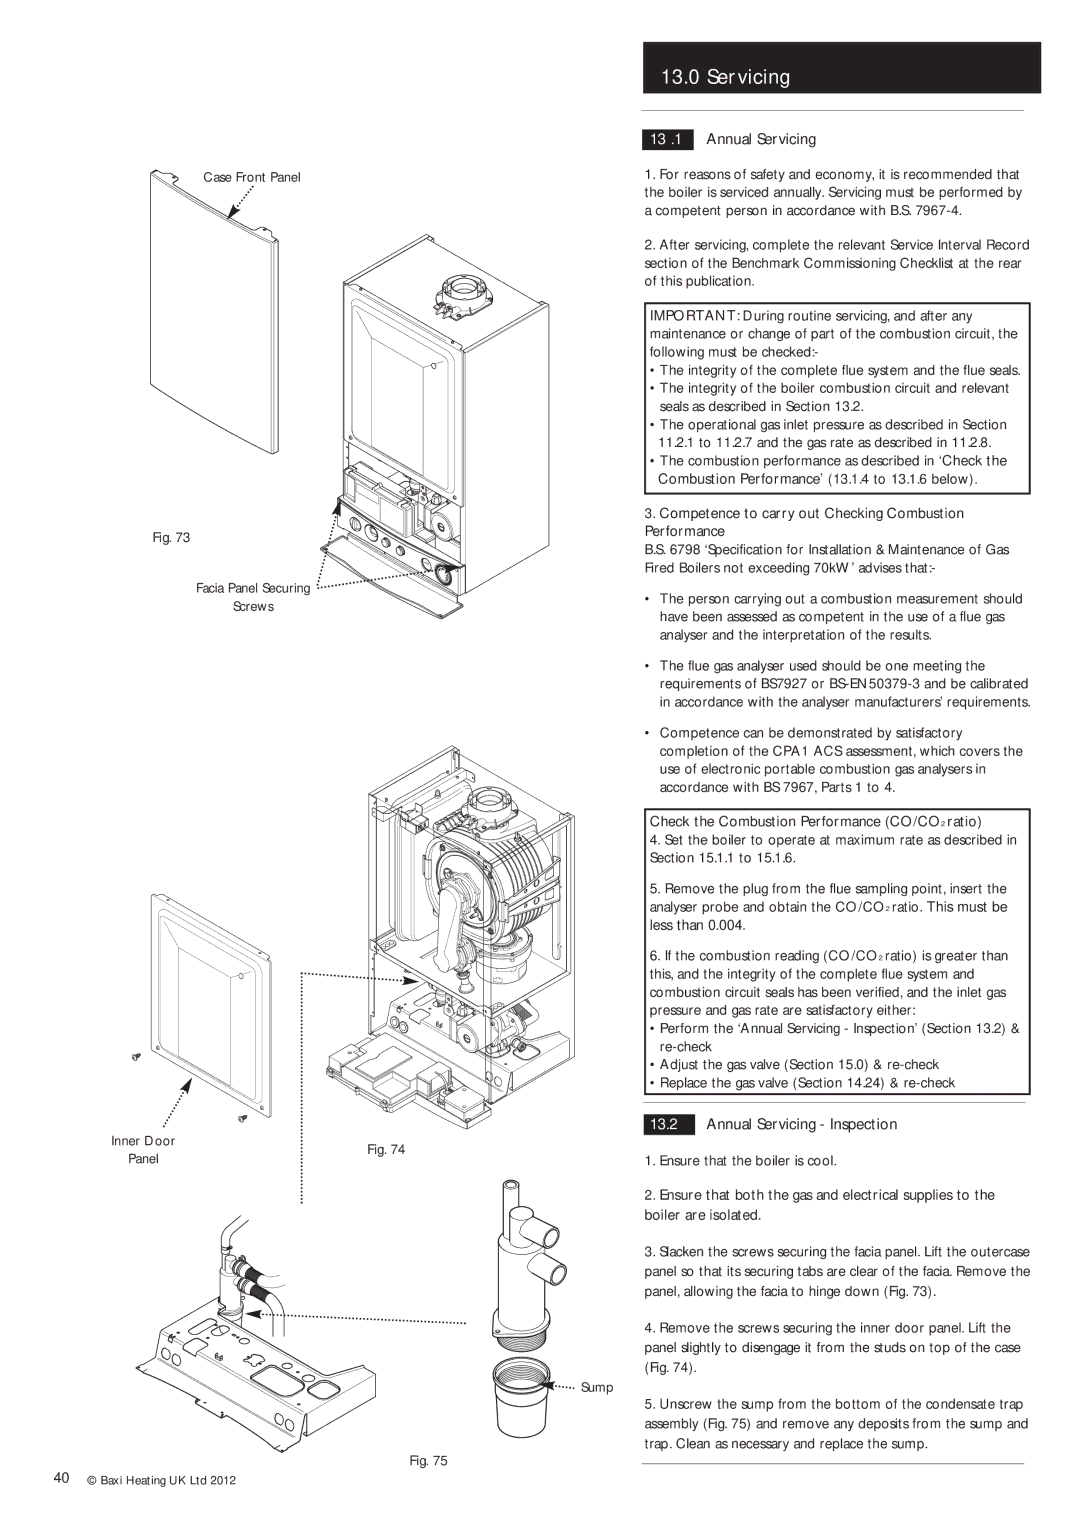
15.1Setting the Gas Valve (CO2 check)

IMPORTANT: The CO2 must be only be checked and adjusted to set the valve if a suitable calibrated combustion analyser is available, operated by a competent person - see Section 13.1

1.The combustion (CO2) may be checked after running the boiler for several minutes. To do this it is necessary to set the boiler to ‘Calibration Mode’.

2.Ensure that all external controls are calling for heat. The actual current boiler temperature is shown on the display.

Central Heating

Domestic Hot Water

Temperature Control

Temperature Control

Fig. 106

Fig. 107

Fig. 108

Fig. 109

Fig. 110

Flue Adaptor Test

Point

Plug

Analyser Probe

Fig. 111

Offset


Adjustment Screw

Throttle

(cap fitted)

Adjustment Screw


(cover removed)

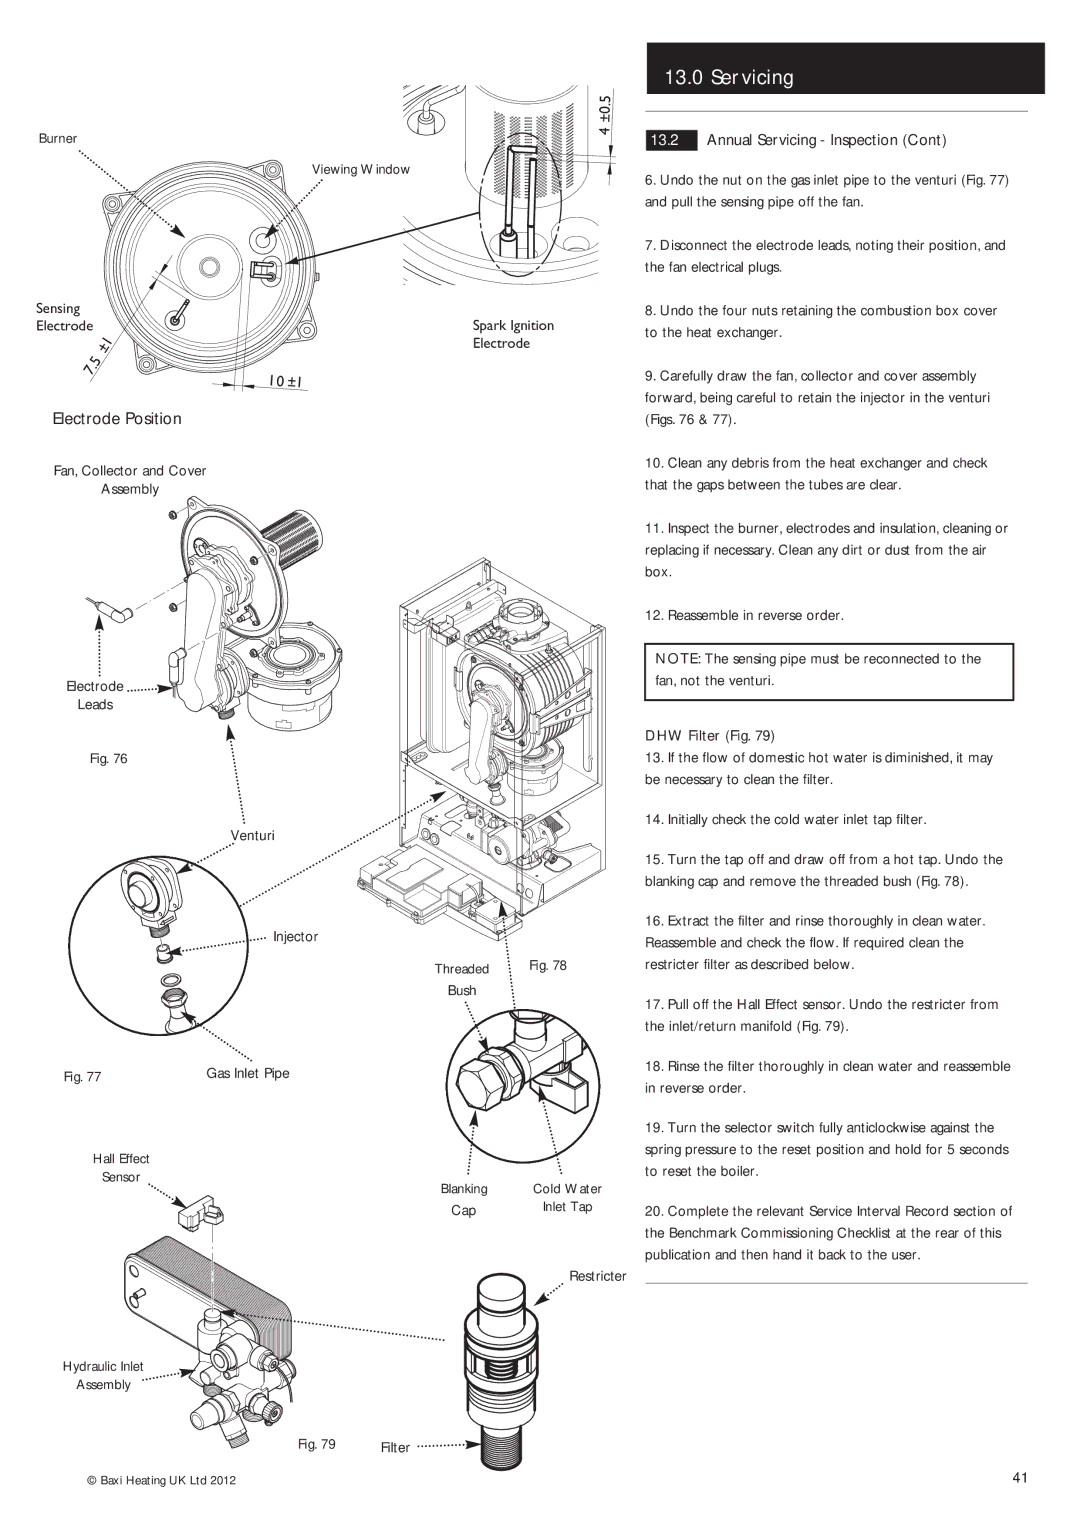
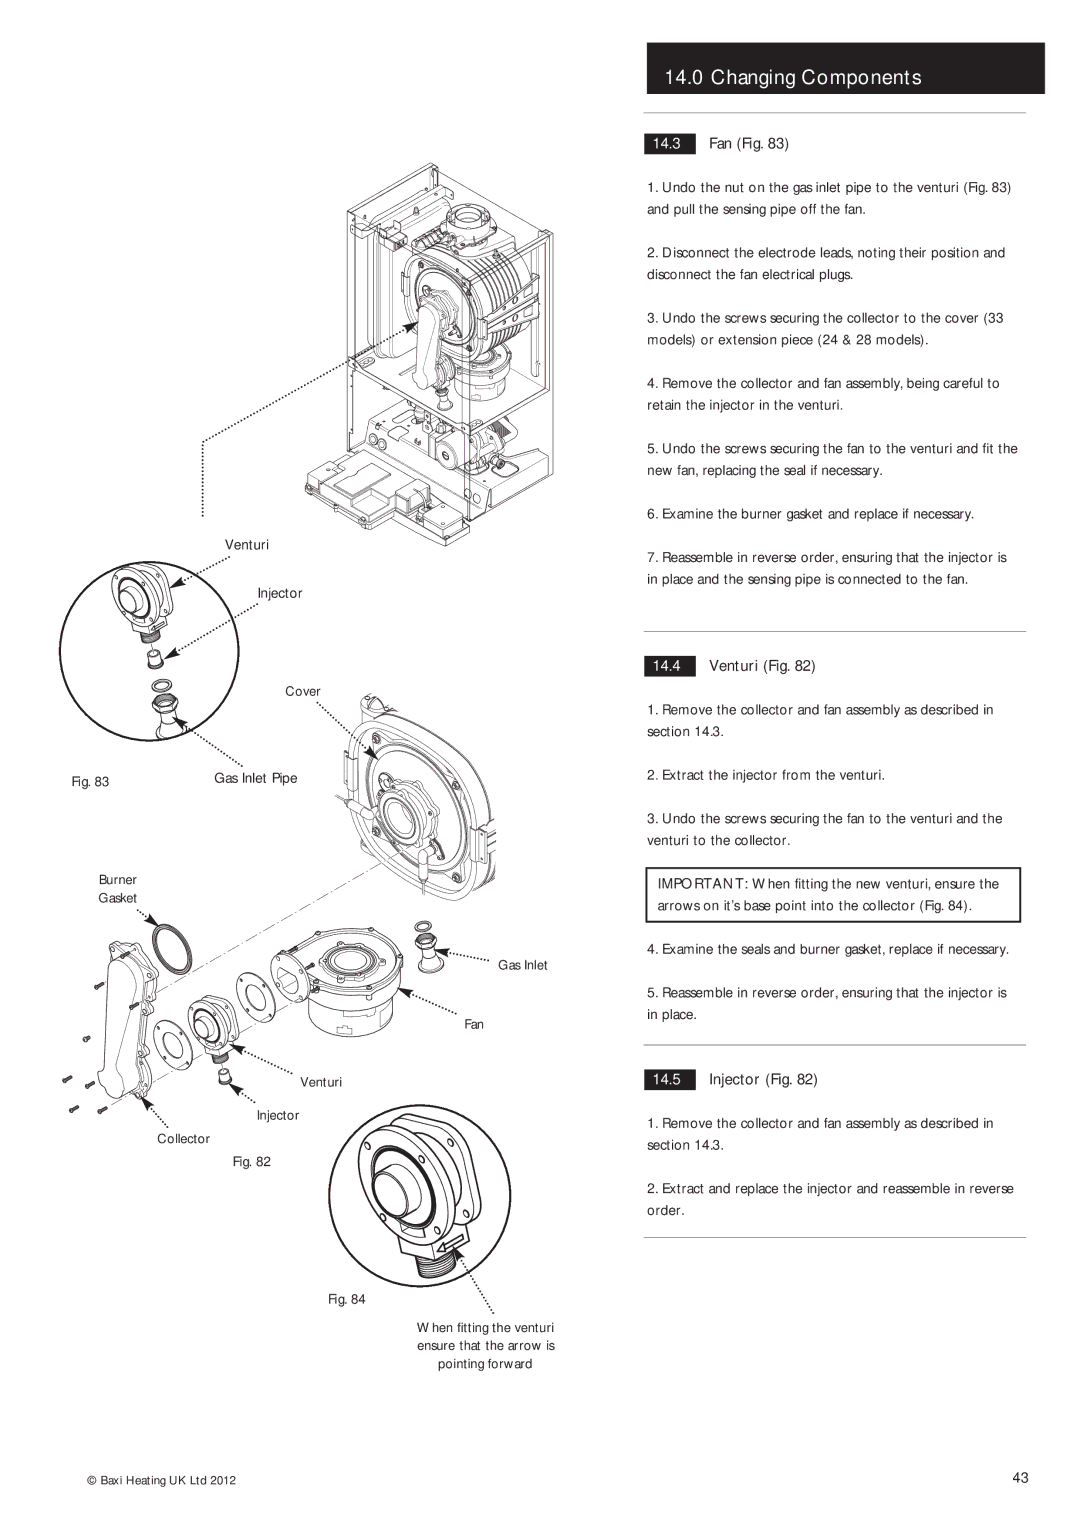
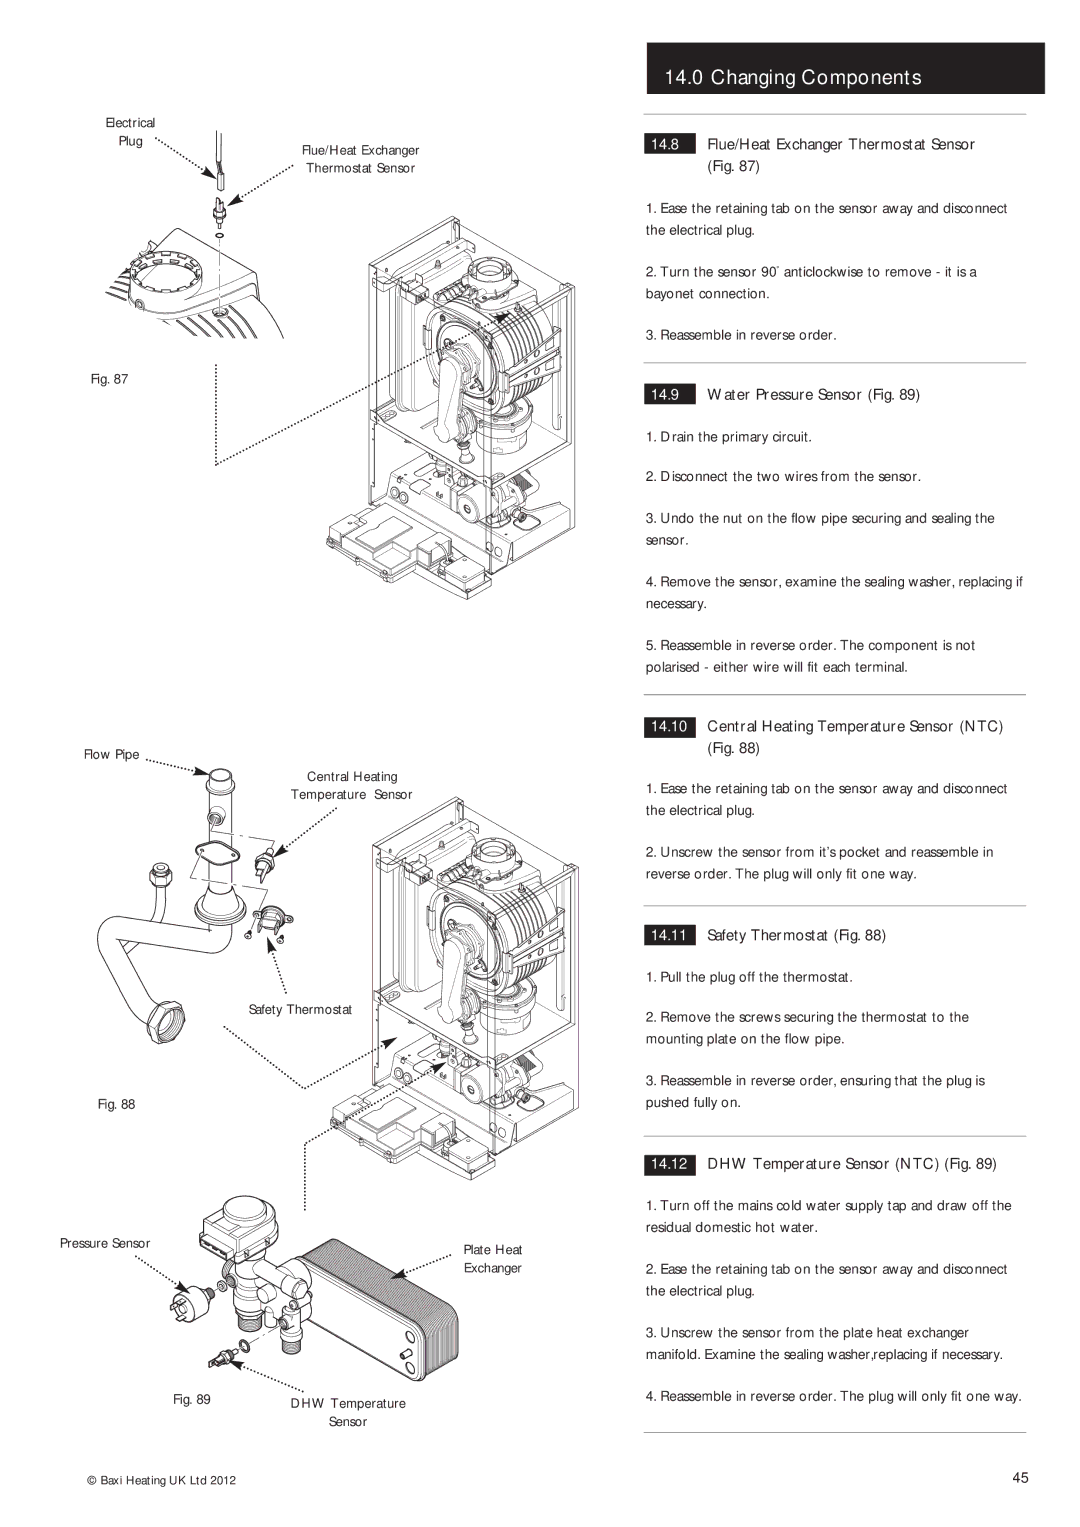
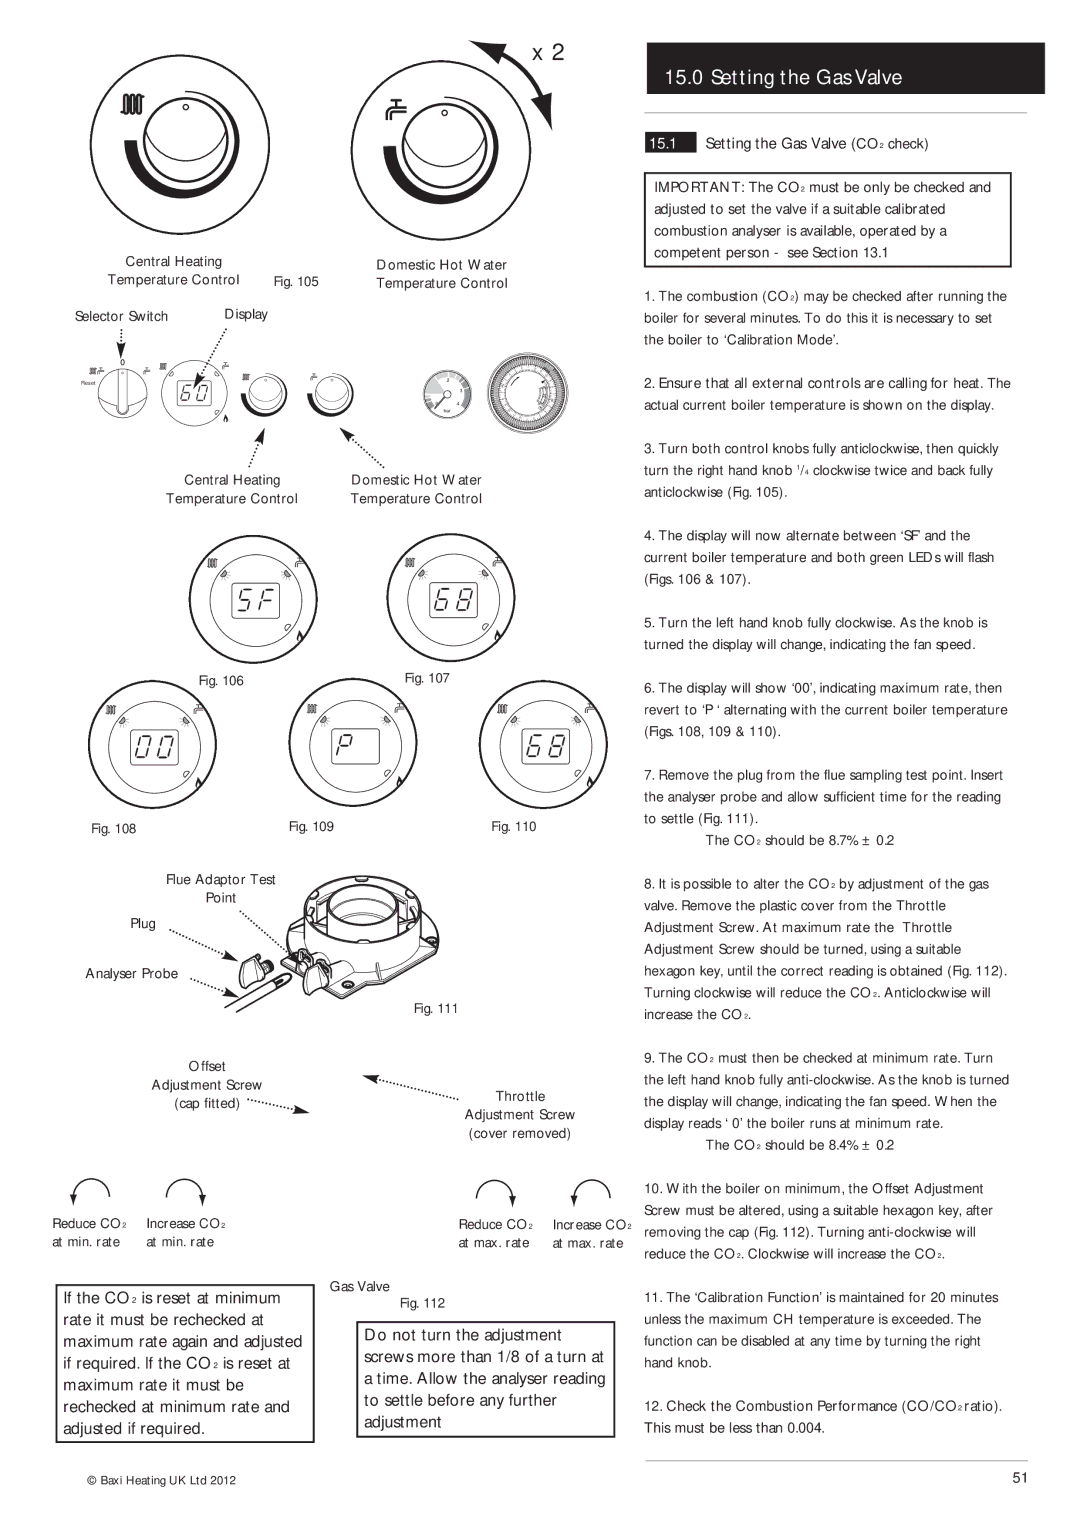
3.Turn both control knobs fully anticlockwise, then quickly turn the right hand knob 1/4 clockwise twice and back fully anticlockwise (Fig. 105).

4.The display will now alternate between ‘SF’ and the current boiler temperature and both green LEDs will flash (Figs. 106 & 107).

5.Turn the left hand knob fully clockwise. As the knob is turned the display will change, indicating the fan speed.

6.The display will show ‘00’, indicating maximum rate, then revert to ‘P ‘ alternating with the current boiler temperature (Figs. 108, 109 & 110).

7.Remove the plug from the flue sampling test point. Insert the analyser probe and allow sufficient time for the reading to settle (Fig. 111).

The CO2 should be 8.7% ± 0.2

8.It is possible to alter the CO2 by adjustment of the gas valve. Remove the plastic cover from the Throttle Adjustment Screw. At maximum rate the Throttle Adjustment Screw should be turned, using a suitable hexagon key, until the correct reading is obtained (Fig. 112). Turning clockwise will reduce the CO2. Anticlockwise will increase the CO2.

9.The CO2 must then be checked at minimum rate. Turn the left hand knob fully anti-clockwise. As the knob is turned the display will change, indicating the fan speed. When the display reads ‘ 0’ the boiler runs at minimum rate.

The CO2 should be 8.4% ± 0.2

Reduce CO2

Increase CO2

at min. rate

at min. rate


10. With the boiler on minimum, the Offset Adjustment

Reduce CO2

Increase CO2

Screw must be altered, using a suitable hexagon key, after

removing the cap (Fig. 112). Turning anti-clockwise will

at max. rate

at max. rate

reduce the CO2. Clockwise will increase the CO2.


If the CO2 is reset at minimum rate it must be rechecked at maximum rate again and adjusted if required. If the CO2 is reset at maximum rate it must be rechecked at minimum rate and adjusted if required.

Gas Valve

Fig. 112

Do not turn the adjustment screws more than 1/8 of a turn at a time. Allow the analyser reading to settle before any further adjustment

11.The ‘Calibration Function’ is maintained for 20 minutes unless the maximum CH temperature is exceeded. The function can be disabled at any time by turning the right hand knob.

12.Check the Combustion Performance (CO/CO2 ratio). This must be less than 0.004.

© Baxi Heating UK Ltd 2012

51

Image 51
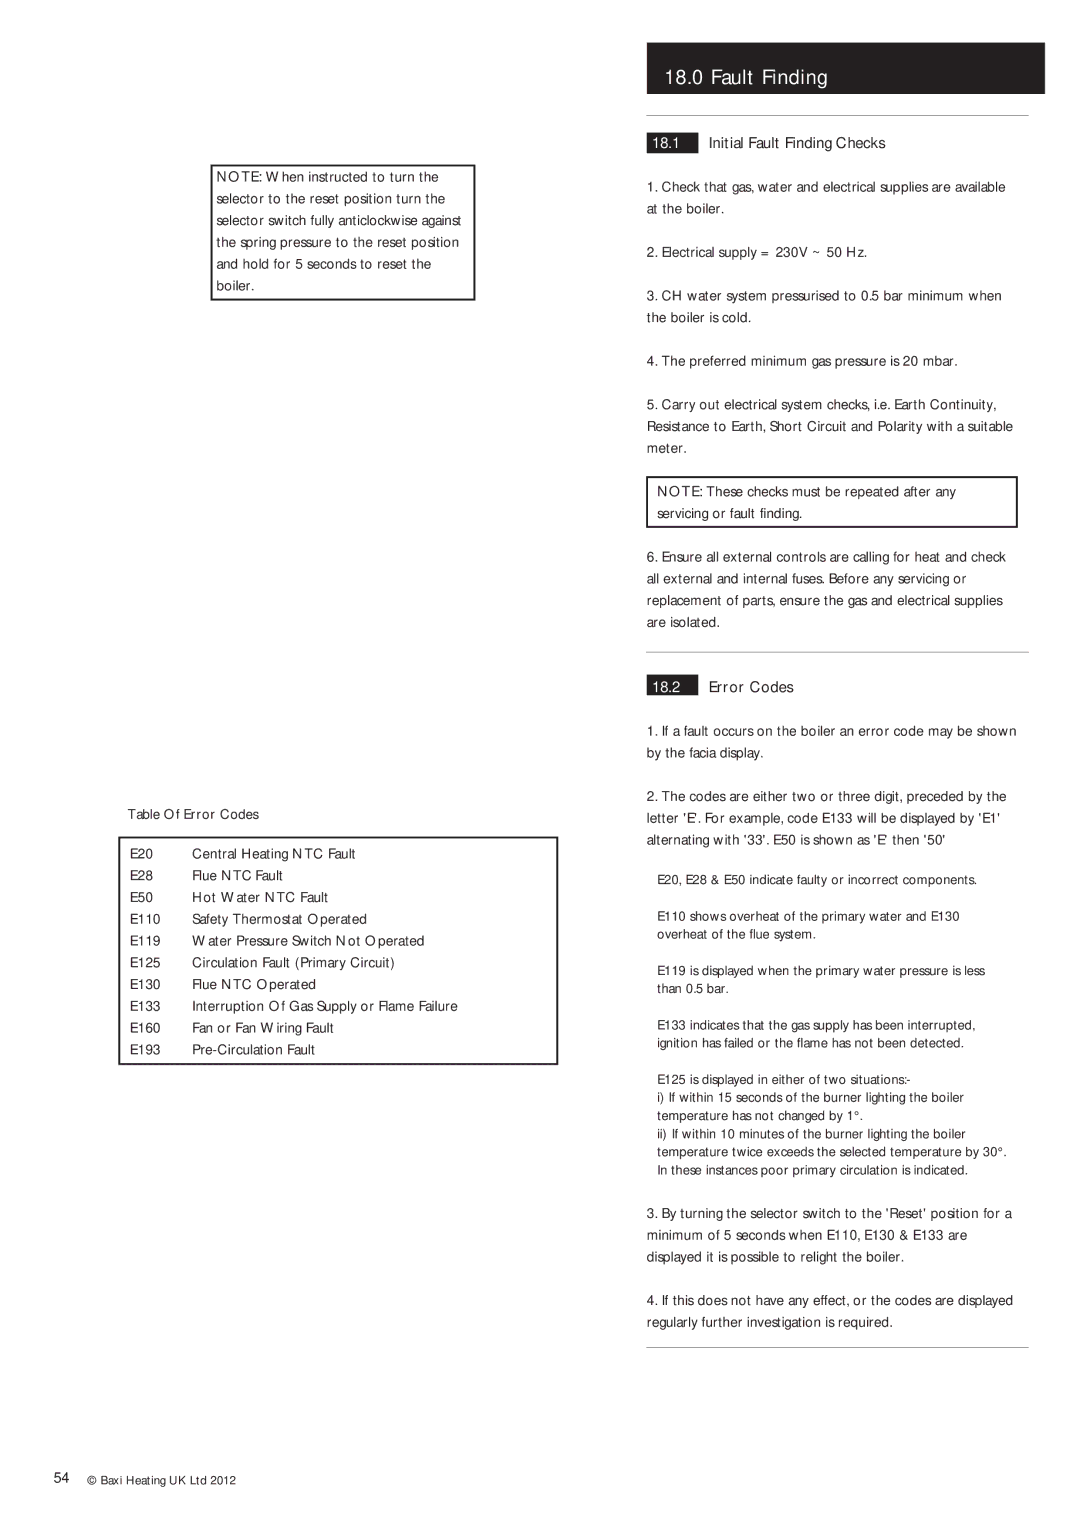
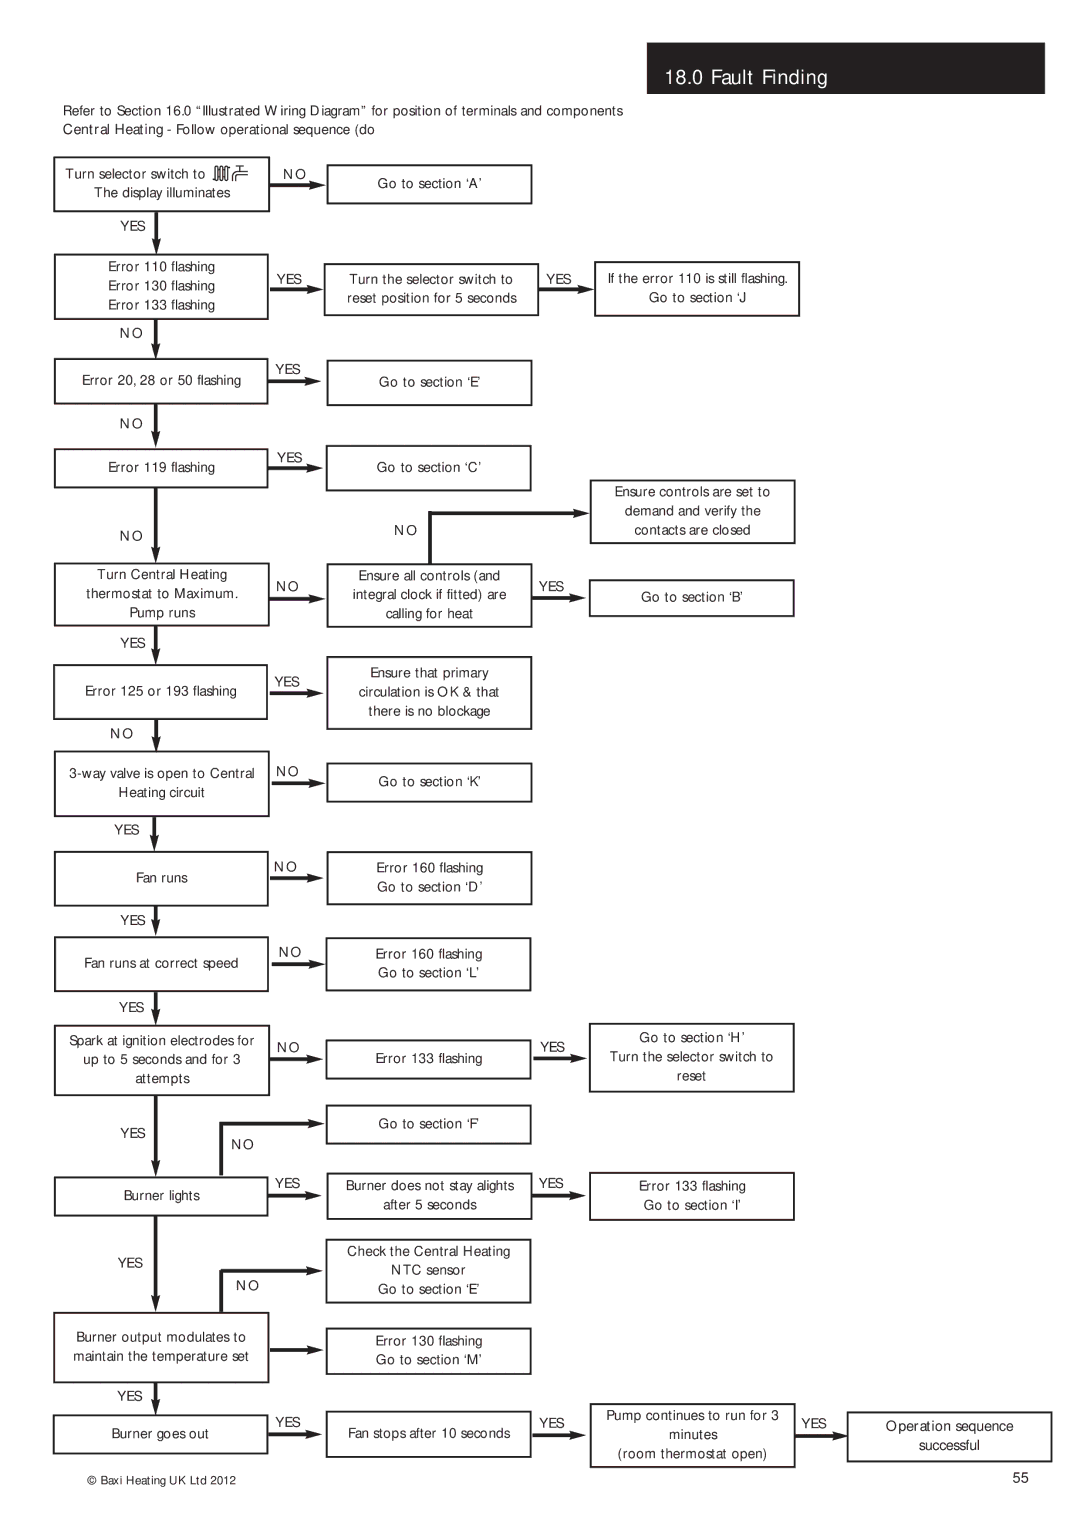
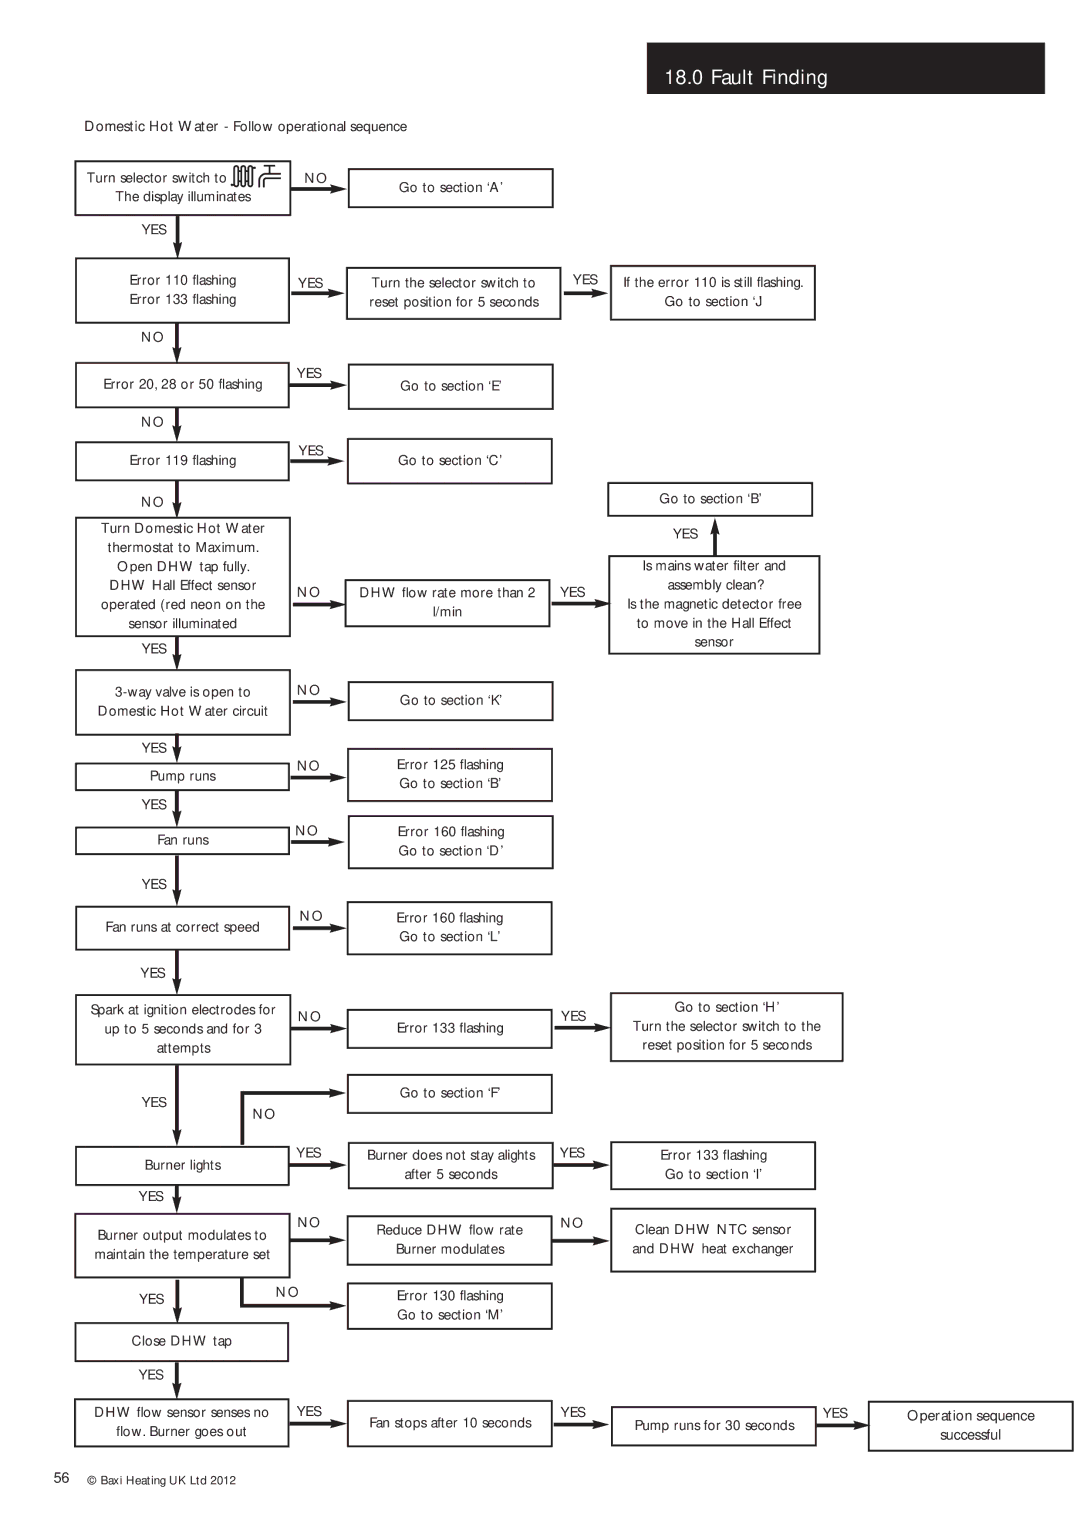
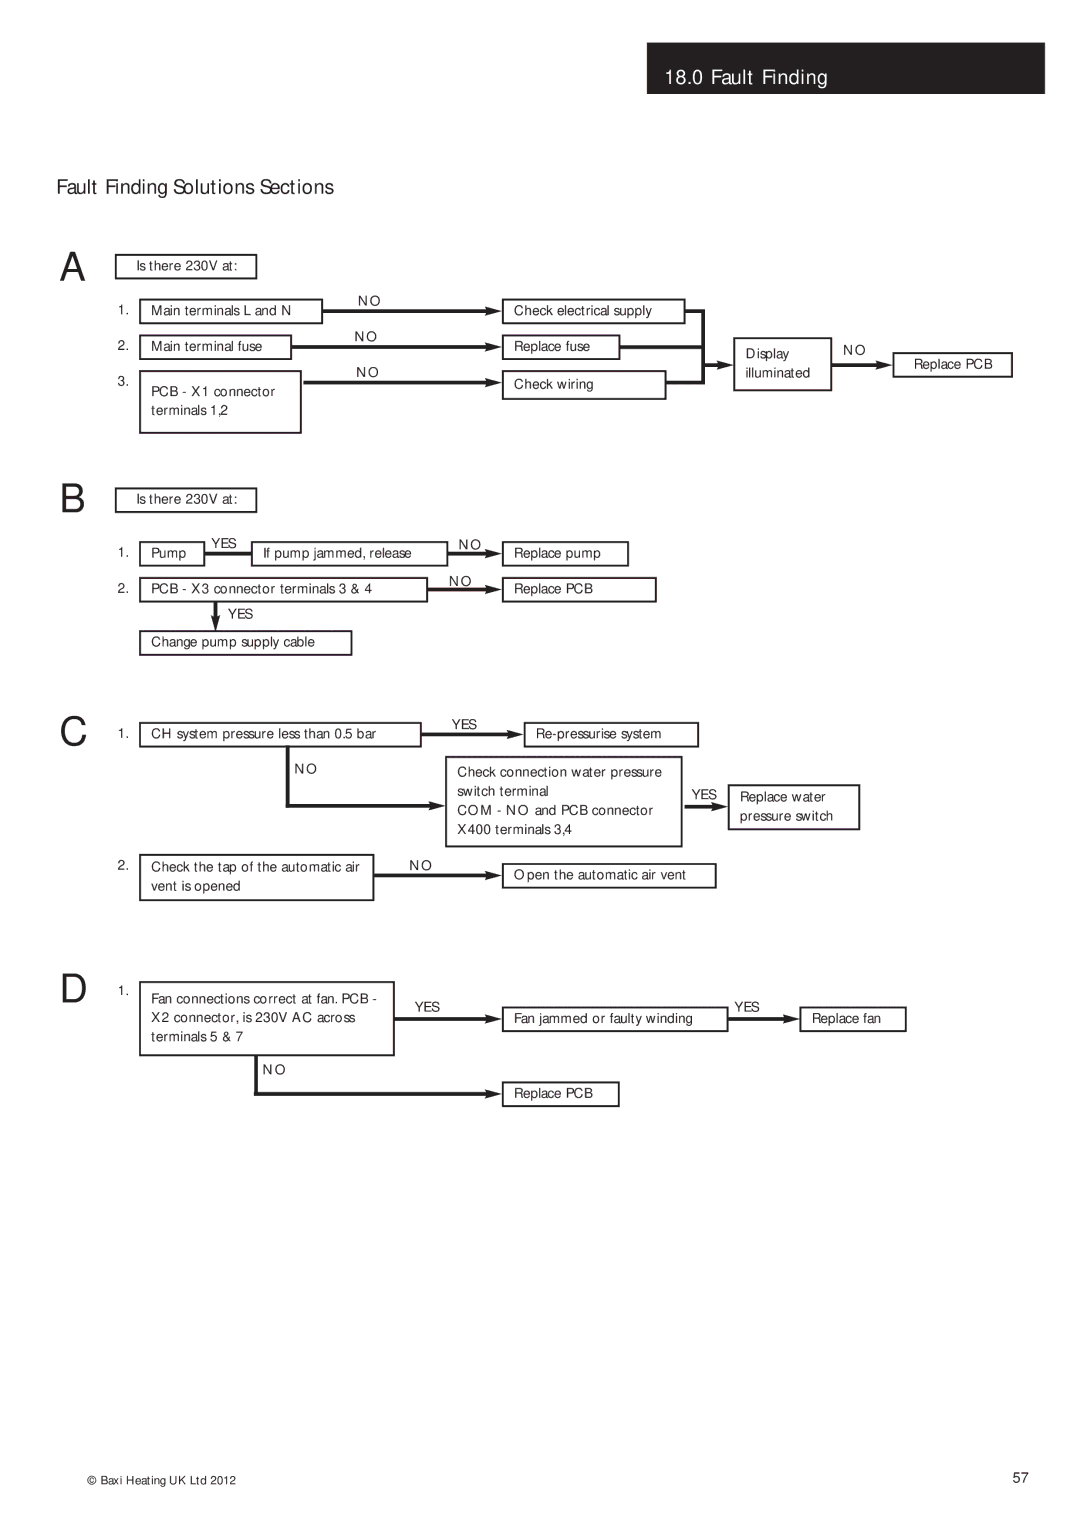
Contents Installation & Service Instructions Benchmark Scheme Natural GasScheme Members only Installer Notification GuidelinesImportant Installation, Commissioning, Service & Repair LegislationCodes of Practice refer to the most recent version Technique Safe Manual HandlingGeneral PreparationContents Contents of Pack IntroductionDescription Circulation Pump Drain Off Point General LayoutLayout Expansion Vessel Automatic Air VentAppliance Operation Central Heating Mode FigDomestic Hot Water Mode Fig Frost Protection ModeGold Combi 24, 28 & 33 HE a Technical DataDimensions and Fixings Bypass System DetailsInformation Central Heating CircuitSafety Pressure Relief Valve Fig System Filling and Pressurising FigExpansion Vessel Central Heating only Domestic Hot Water Circuit Fig ShowersHard Water Areas At least Site RequirementsLocation Clearances FigsElectrical Supply Site RequirementVentilation of Compartments Gas SupplyRun PerPipe run Minimum Fall Per MetreMinimum Fall 50mm per500mm min Minimum fall RunLikely flue positions requiring a flue terminal guard Plume Displacement KitFlue Below windows or openings on pitched roofs 2000Total equivalent length = +B+C+2x90Bends Flue OptionsTotal Equivalent Length = +B+C+1x90Bend Flue Accessories Key Accessory Size Code NoTelescopic Flue inc. elbow Twin Flue Duct Adaptor Twin Flue ConnectionAir Duct Connection Flue Duct Connection Boiler Adaptor Terminal Guard Fig Flue DimensionsFor Roof Terminals Flue TrimPlume Displacement Kit Fig Plume DisplacementElbow 28/33Determining Permissible Lengths Example50mm General Fitting Notes30mm Extension and outlet. Secure using two of the screws Elbow to allow the flue to be installed as shown60Ø extension piece. It must be secured using two Using a suitable bit e.g mm, drill throughAfter considering the site requirements InstallationUnpacking & Initial Preparation FlushingFitting the Filling Loop Kit Tighten all the connections Fitting the Safety Pressure Relief Discharge Pipe FigFitting The Boiler Condensate Drain see sectionWall Thickness Waste Flue Fitting The FlueWall Thickness Flue Elbow Ensure Elbow is fully engaged into Boiler AdaptorInner Flue Support Bracket 25mm Extension Cut EndEnsure Extension is fully engaged into Boiler Adaptor Making The Electrical Connections Preliminary Electrical ChecksTerminal Block Cover Cable Clamp Screw Pump Automatic Air Vent Selector Switch DisplayCommissioning Commissioning the BoilerIt is necessary to set the boiler to ‘Calibration Mode’ Temperature Control Selector Switch DisplayTemperature Control Gas Pressure Test Point Gas Valve Check the Operational Working Gas Inlet PressureSetting the Timer Completion CompletionCase Front Panel Facia Panel Servicing 13 .1 Annual ServicingAnnual Servicing Inspection 10 ±1 Electrode PositionChanging Components Igniter FigSpark and Sensing Electrodes Fig Gasket Venturi Injector Cover Gas Inlet Pipe Fan Collector Fan FigVenturi Fig Injector FigBurner Fig Insulation FigExtension Piece Flue/Heat Exchanger Thermostat Sensor Fig Central Heating Temperature Sensor NTC FigSafety Thermostat Fig DHW Temperature Sensor NTC FigPump Head Only Fig Pump Complete FigAutomatic Air Vent Fig Pressure Gauge Figs Hall Effect Sensor FigPressure Relief Valve Fig Plate Heat Exchanger Fig Diverter Valve Motor Unit & Assembly Fig14.22 P.C.B. Fig Selector Switch FigExpansion Vessel Fig Gas Valve FigCO2 should be 8.4% ± Reduce CO2 Setting the Gas ValveSetting the Gas Valve CO2 check Flue Adaptor Test Point Plug Analyser ProbeElectrical Illustrated Wiring Diagram315316 311 404419 422 400 415 Short Parts ListShort Parts List 426Fault Finding Initial Fault Finding ChecksError Codes Pump runs Error 133 flashingGo to section ‘A’ Turn the selector switch to Reset position for 5 secondsClose DHW tap Error 133 flashing Go to section ‘I’Turn Domestic Hot Water Open DHW tap fullyReplace water PCB X3 connector terminals 3Switch terminal Fan jammed or faulty winding Replace PCBReplace gas valve Check wiring Viewing WindowReplace sensor or PCB E28 Gas at burnerReplace safety thermostat Replace PCB Is there 230V atReplace sensor Pages for Notes Pages for Notes GAS Boiler System Commissioning Checklist Service Record Potterton