Contents
Stru cti on Ma nu al
Предостережение
Kabelanschlüsse
Vorsicht
Во время грозы
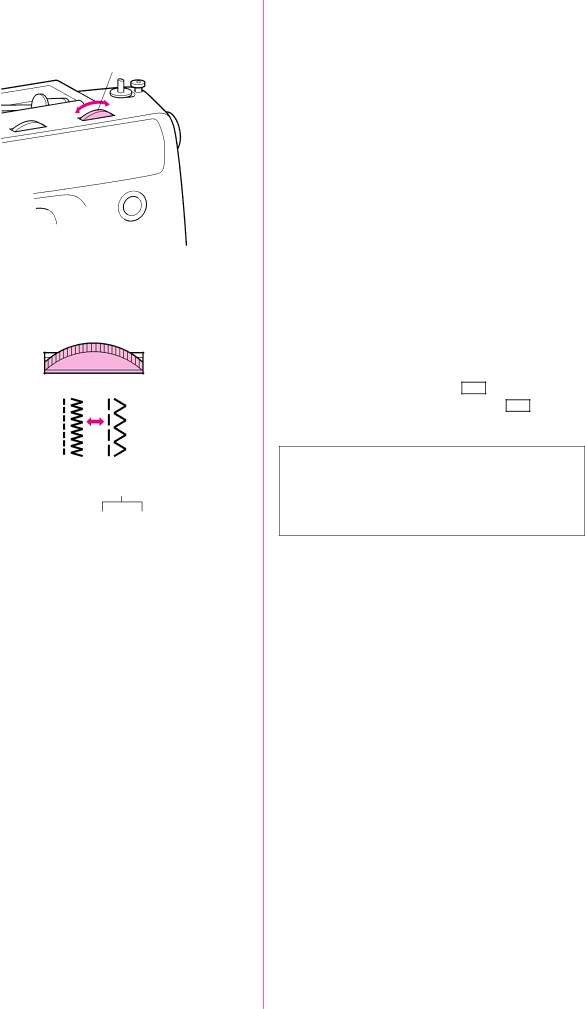
Главный выключатель питания Освещения зоны строчки
Main Power/Sewing Light Switch
Netz- und Nählichtschalter
Ножной контроллер
Fußanlasser
Foot Controller
Ножной контроллер
Checking the Needle
Replacing the Needle
Проверка иглы
Nadel prüfen
Nadel austauschen
Замена нажимной лапки
Changing the Presser Foot
Nähfuß wechseln
SNAP-ON Type
Платформа-приставка
Anschiebetisch mit Zubehörfach
Flat Bed Attachment
Various Controls
Pattern Selection Dial
Notizen
Stichmuster-Einstellrad
Ручка выбора типа стежка
Ручка регулирования длины стежка
Pattern Stitch Name Recommended Width Instruction
Manual
Double Action Stitch Briding Stitch
Important Safety Instructions
Achtung
«УКАЗАНИЯ ПО Технике БЕЗОПАСНОСТИ»
Connecting Plugs and Main Power / Sewing Light Switch
Model PS-57, PS-55, STAR-50, RSR-55, XRX-55, PS-53
Please Read Before Using this Machine
Bitte VOR Benutzung Dieser Maschine Lesen
ПОЖАЛУЙСТА, Прочитайте Перед Началом Эксплуатации Машины
Table of Contents
Inhalt
Оглавление
Не входящие в пуговичный зажим
Principal Parts
Balance Wheel
Маховик
Модели Star 240E, Star 230E Механизм Намотки Шпульки Стр
Ручка Регулирования Длины Стежка Стр
Гнездо Подключения Ножного Контроллера Стр
3 2
Transporteurhebel Seite Stichmusteranzeige Seite
Optional Accessories
Model PS-57,PS-55, STAR-50, RSR-55, XRX-55,PS-53
Модели Star 240E, Star 230E
Optionales Zubehör
Дополнительные принадлежности
Примечание Только для США
Connecting Plugs
Operatingyour Sewing Machine
Double Action Stitch
Empfohlene Stichlängen UND Stichbreiten
Anleitung
Fixiert 3/32
STRETCH-GERADSTICH
Номер Страницы
Модели Star 240E, PS-57
Строчка Наименование Стежка Заданная Ширина
Руководства
Модели Star 230E, PS-55, STAR-50, RSR-55, XRX-55
Модели PS-53
Stitch Length Dial
Higher the NUMBER, the Longer the Stitch
Ручка регулирования длины стежка Длина Частые → SS Редкие
Stichlängen-Einstellrad
Ручка регулирования длины стежка
Поверните ручку влево за0на позицию SS SS Фиксированная 2,5
Ручка регулирования Ширины стежка
Stitch Width Dial
Stichbreiten-Einstellrad
Ручка регулирования ширины стежка
Рычаг реверсирования строчки
Reverse Sewing Lever
Rückwärtstaste
Feed Dog Position Switch
Transporteurhebel
Кнопка пуска/остановки Машины
Start-/Stopp-Taste
Start/Stop Button
Модель Star 240E
Контроллер скорости шитья
Hebel für den Geschwindigkeitsbereich
Umbau auf Freiarm
Переключение на режим Free-arm
Threading Machine
Winding the Bobbin
На катушечном стержне
Aufspulen
Прорези на торце катушки
На машине
Mode PS-57, PS-55, STAR-50, RSR-55, XRX-55, PS-53
Машины
Lower Threading
Обязательно выключите электропитание. При
Unterfadenführung
Заправка нижней нитки
Сдвиньте кнопку и откройте крышку Скользящая кнопка Крышка
Upper Threading
Помощью рычага нажимной лапки поднимите нажимную лапку
Oberfadenführung
Заправка верхней нитки
Рычаг нажимной лапки
Using Needle Threader
Нитенаправитель Держатель крючка
Bedienung der Fadeneinfädelung
Иглу убедитесь в том, что иглодержатель находится в
Крючок Нить
Вытягивание нижней нитки Вручную
Manually Drawing Up Lower Thread
Manuelles Heraufholen des Unterfadens
Двухигольная строчка
Nähen mit Doppelnadel
Twin Needle Sewing
Inserting the Twin Needle
Установкадополнительноговставногокатушечногостержня
Placing the Extra Spool PIN
Twin Needle Threading
Заправка Ниток В Двойную Иглу
Натяжение ниток
Thread Tension
Fadenspannung
Слишком слабое натяжение верхней нитки.Рис.B
FABRIC/THREAD/NEEDLE Combinations
Тяжелые ткани
75/11 90/14
65/9 75/11
90/14 100/16
Please Read Before Sewing
Changing Sewing Direction
Straight Stitching
Starting Sewing
Finishing Sewing
Начало строчки
Geradstich
Прямой стежок
Изменение Направления Строчки
Снятие Прошитой Ткани С Машины
Removing the Material from the Machine
TOP Stitching and Stretch Materials
Модели Pstar 240E, Star 230E
Зигзагообразный стежок
Zigzag Stitching
Zickzackstich
Zigzag Stitch
Потайной подрубочный шов
Blind Hem Stitching
Blindsaumstich
Выполните строчку, как показано на рис. С
Подшивочная строчка
Biesenstich
Shell Tuck Stitching
Эластичная строчка
Elastikstich
Elastic Stitching
Стежок с двойным эффектом
Elastische Schrittnaht
Double Action Stitching
Стежок Длина стежка Ширина стежка
Строчка-елочка
Bogennaht
Scallop Stitching
Декоративный стежок
Dekorstiche
Decorative Stitching
Лоскутное шитье
Patchwork
Patchwork
Позиция формирования первого стежка
Обметочный стежок
Ketteln & Versäubern
Overedge Stitching
Строчка «Гребешок»
Перистый стежок
Feather Stitching
Triple Zigzag Stretch Stitching
Тройная трикотажная строчка «зигзаг»
Making a Buttonhole For 1-step BH Type
Making a Buttonhole
Knopfloch Nähen
Knopfloch nähen Für 1-Stufen-Knopfloch BH-Typ
Обметывание петель
Обработка Петли
Knöpfe die nicht in den Halter passen
Например
Обметывание петли простая операция, обеспечивающая
Making a Buttonhole For 4-step BH Type
Knopfloch nähen Für 4-Stufen-Knopfloch BH-Typ
Петли Чего поднимите ее над тканью Шаг
Обметывание петель Шаг
Тип стежка Последовательность операций
Сделайте 5-6 стежков
Закрепление ШВА И Прорезка Петли
Stiche Sichern UND Knopfloch Aufschneiden
Securing the Stitching and Cutting the BUTTON- Hole
Используя нож для распарывания швов с целью
Buttonhole Fine Adjustment
Knopfloch-Feineinstellung
Тонкая настройка для обметывания петель
Methode 2 siehe Abb. B
Пришивание пуговиц
Knöpfe annähen
Button Sewing
Лапка Зигзагообразный
Zipper Insertion
Gathering
Обработка сборок
Einnähen eines Reißverschlusses
Raffen
Cтежок
Штопка
Stopfen
Darning
Аппликации
Appliqués
Applizieren
Стежок Длина стежка
Monogramming
Monogramming Embroidering
Preparing for Monogramming and Embroidering
Embroidering
Вышивание
Monogramme und Stickarbeiten
Изготовление Монограмм
Using the Walking Foot
Optional Accessories
Optionales Zubehör
Einsatz des Obertransporteurs
Optional Accessories
Using the Spring-action Quilting Foot
Стеганый узор Линия
Einsatz des Stopffußes
Материале
Using the 1/4-Inch Quilting Foot
Einsatz des Patchworkfuß
Использование направляющей Лапки 1/4 дюйма 6,5 мм
Changing the Light Bulb
Отвинтите винт крепления крышки с обратной стороны
Nählichtlampe auswechseln
Замена лампочки освещения
Cleaning
Поверните маховик на себя, чтобы паз челнока был на
Reinigung
Чистка машины
Performance Check List
Обслуживание
Checkliste
Lassen
Nein
Нижней нитки
Чрезмерное
Установка
Нитки
Стр.12 Нет Спутывание нитки Стр.48
Стр.27 Нет Стр.12
Игла Нет Стр.48 Стр.12
Стр.34
Переупаковка машины
Repacking the Machine
Maschine verpacken
Inch Quilting Foot
Nadel
Главный выключатель питания
English Deutsch