Introduction
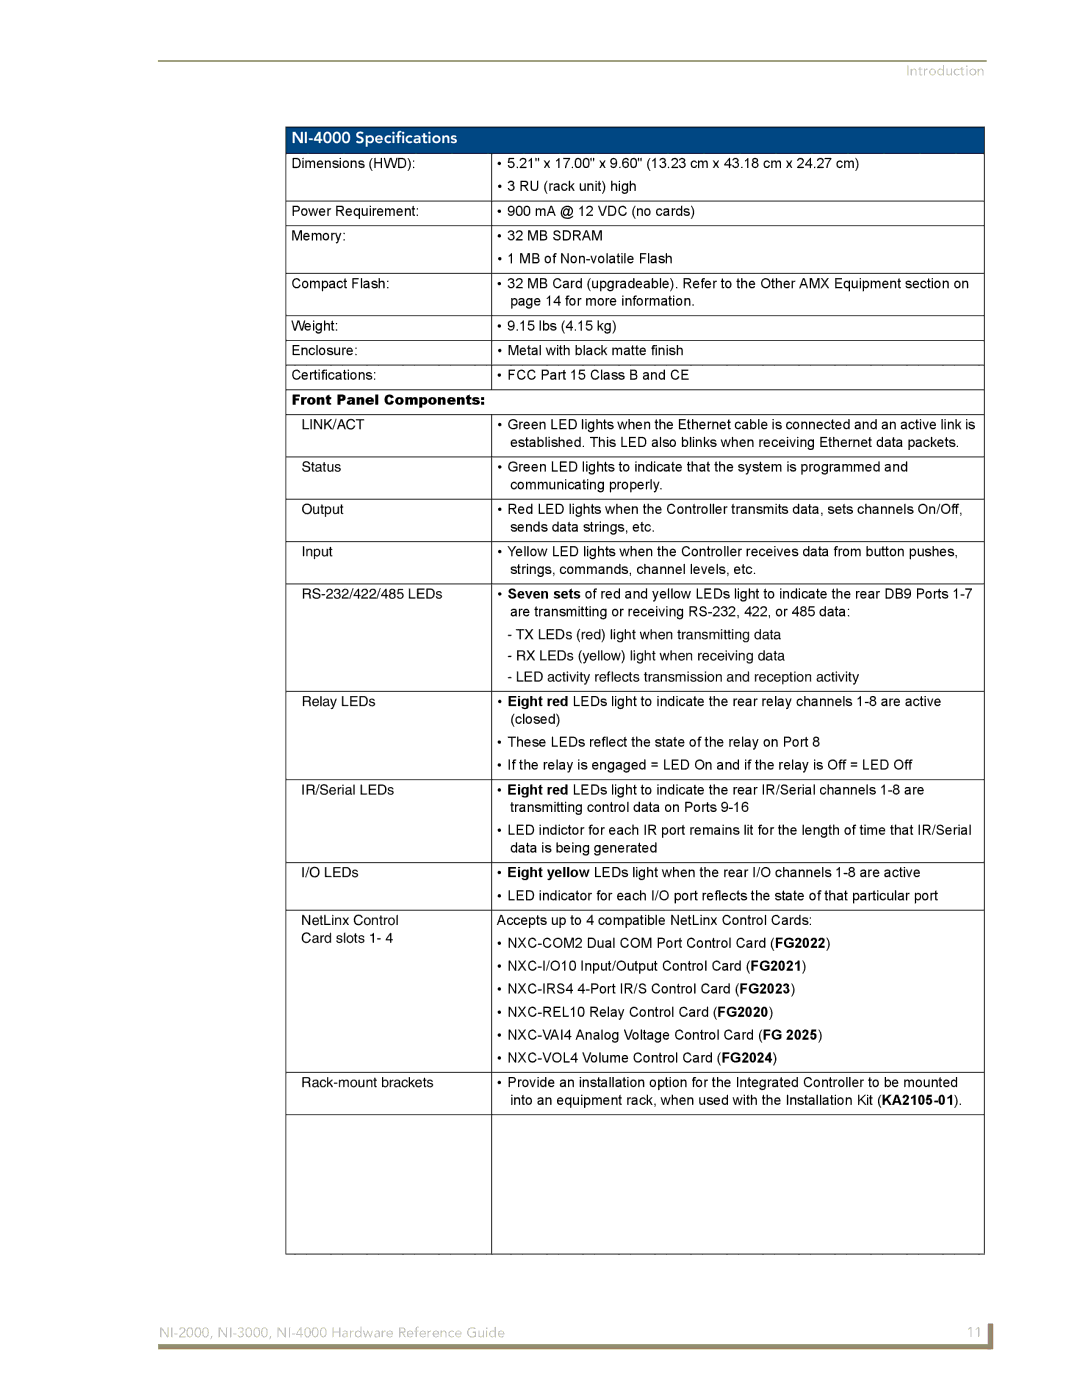
NI-4000 Specifications
Dimensions (HWD): | • 5.21" x 17.00" x 9.60" (13.23 cm x 43.18 cm x 24.27 cm) |
| • 3 RU (rack unit) high |
|
|
Power Requirement: | • 900 mA @ 12 VDC (no cards) |
|
|
Memory: | • 32 MB SDRAM |
| • 1 MB of |
|
|
Compact Flash: | • 32 MB Card (upgradeable). Refer to the Other AMX Equipment section on |
| page 14 for more information. |
|
|
Weight: | • 9.15 lbs (4.15 kg) |
|
|
Enclosure: | • Metal with black matte finish |
|
|
Certifications: | • FCC Part 15 Class B and CE |
|
|
Front Panel Components: |
|
|
|
LINK/ACT | • Green LED lights when the Ethernet cable is connected and an active link is |
| established. This LED also blinks when receiving Ethernet data packets. |
|
|
Status | • Green LED lights to indicate that the system is programmed and |
| communicating properly. |
|
|
Output | • Red LED lights when the Controller transmits data, sets channels On/Off, |
| sends data strings, etc. |
|
|
Input | • Yellow LED lights when the Controller receives data from button pushes, |
| strings, commands, channel levels, etc. |
|
|
• Seven sets of red and yellow LEDs light to indicate the rear DB9 Ports | |
| are transmitting or receiving |
| - TX LEDs (red) light when transmitting data |
| - RX LEDs (yellow) light when receiving data |
| - LED activity reflects transmission and reception activity |
|
|
Relay LEDs | • Eight red LEDs light to indicate the rear relay channels |
| (closed) |
| • These LEDs reflect the state of the relay on Port 8 |
| • If the relay is engaged = LED On and if the relay is Off = LED Off |
|
|
IR/Serial LEDs | • Eight red LEDs light to indicate the rear IR/Serial channels |
| transmitting control data on Ports |
| • LED indictor for each IR port remains lit for the length of time that IR/Serial |
| data is being generated |
|
|
I/O LEDs | • Eight yellow LEDs light when the rear I/O channels |
| • LED indicator for each I/O port reflects the state of that particular port |
|
|
NetLinx Control | Accepts up to 4 compatible NetLinx Control Cards: |
Card slots 1- 4 | • |
| |
| • |
| • |
| • |
| • |
| • |
|
|
• Provide an installation option for the Integrated Controller to be mounted | |
| into an equipment rack, when used with the Installation Kit |
|
|
|
|
11 | |
|
|
