Inserting Racks

9CAUTION

To avoid burns, place oven racks in desired positions before turning oven on. Always use oven mitts when the oven is warm. If a rack must be moved while the oven is hot, do not let oven mitts contact hot heating elements.

Use caution when removing an oven rack from the lowest rack position to avoid contact with the hot oven door.

To avoid possible injury or damage to the appliance, ensure racks are installed exactly per installation instructions and not backwards or upside down.

Flat Rack

The rack is designed with a stop so it will stop before coming completely out of the oven and not tilt.

To insert the flat rack into the oven:

1.Grasp rack firmly on both sides.

2.Insert rack (see picture).

3.Tilt rack up (A) to allow the upwardly sloped rear of the rack to slide under the stop molded into the front portion of the rack guide above.

4.When the back of the rack is past this stop, lower the front of the rack to a horizontal position (B) and push it the rest of the way in.

The rack should be straight and flat, not crooked.

To remove the flat rack from the oven:

1.Grasp rack firmly on both sides and pull rack toward you.

2.When the stop is reached, tilt rack up so that the upwardly sloped back of the rack can pass under the stop. Pull the rack the rest of the way out.

Telescopic Rack (some models)

To insert the telescopic rack into the oven:

1.Slide the rack in evenly until the rear of the rack is about 2 inches from the back of the oven.

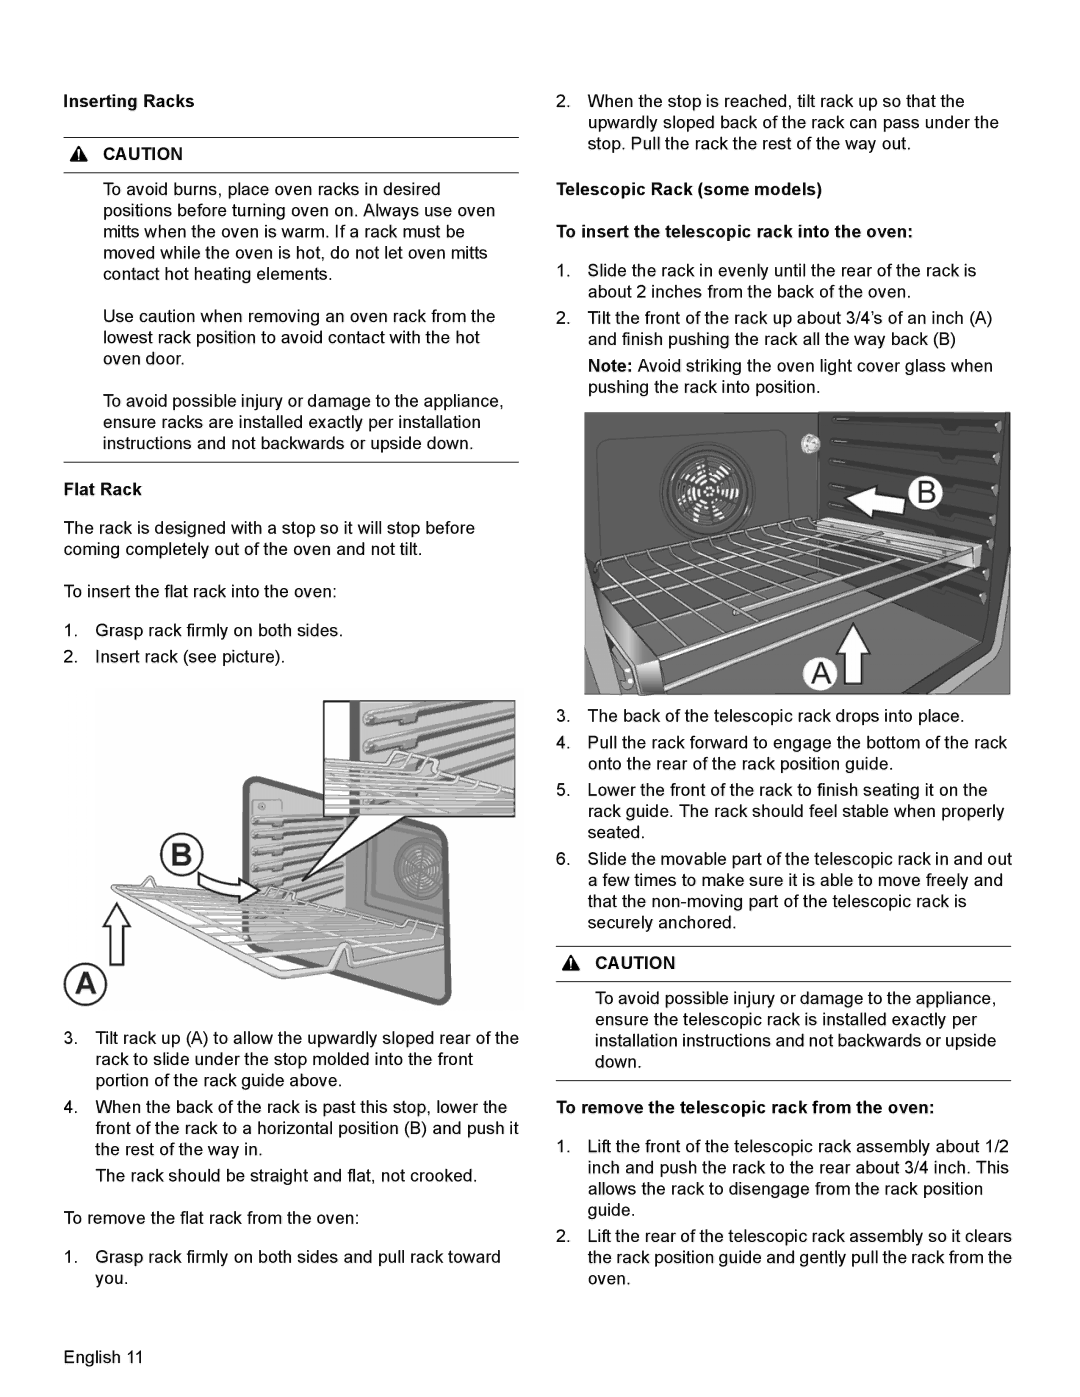
2.Tilt the front of the rack up about 3/4’s of an inch (A) and finish pushing the rack all the way back (B)

Note: Avoid striking the oven light cover glass when pushing the rack into position.

3.The back of the telescopic rack drops into place.

4.Pull the rack forward to engage the bottom of the rack onto the rear of the rack position guide.

5.Lower the front of the rack to finish seating it on the rack guide. The rack should feel stable when properly seated.

6.Slide the movable part of the telescopic rack in and out a few times to make sure it is able to move freely and that the non-moving part of the telescopic rack is securely anchored.

9CAUTION

To avoid possible injury or damage to the appliance, ensure the telescopic rack is installed exactly per installation instructions and not backwards or upside down.

To remove the telescopic rack from the oven:

1.Lift the front of the telescopic rack assembly about 1/2 inch and push the rack to the rear about 3/4 inch. This allows the rack to disengage from the rack position guide.

2.Lift the rear of the telescopic rack assembly so it clears the rack position guide and gently pull the rack from the oven.

English 11

Page 14
Image 14
Bosch Appliances HDI8054U manual Inserting Racks, To remove the telescopic rack from the oven

HDI8054U specifications

Bosch Appliances has long been recognized for its commitment to quality and innovation in the kitchen appliance industry. One of its standout products is the Bosch HDI8054U, a remarkable 800 Series integrated dishwasher that has captured the attention of homeowners and designers alike.

The Bosch HDI8054U features a sleek, European-inspired design, making it a perfect fit for modern kitchens. Its fully integrated style ensures that the appliance blends effortlessly with cabinetry, preserving the aesthetic of the kitchen space. The stainless steel finish not only enhances the overall look but also offers durability and resistance to fingerprints, keeping the appliance looking newer for longer.

This advanced dishwasher boasts a spacious interior that accommodates up to 16 place settings, making it suitable for both small families and those who enjoy entertaining guests. The flexible rack system allows users to configure the interior to meet their specific needs, with adjustable tines and a fold-down third rack that can hold smaller items such as utensils and measuring cups, maximizing loading efficiency.

One of the standout technologies in the Bosch HDI8054U is the PrecisionWash system. This feature utilizes intelligent sensors that continually scan and check the load throughout the cycle. Powerful spray arms target every surface, ensuring that dishes come out impeccably clean every time. The AutoAir drying feature introduces fresh air into the dishwasher at the end of the cycle, promoting optimal drying without additional energy consumption.

Noise levels are another hallmark of the Bosch brand, and the HDI8054U comes in at an impressive 44 dBA. This quiet operation means that the dishwasher can run during family gatherings or late-night activities without being disruptive. The EcoSilence motor is designed for energy efficiency, promoting sustainability while providing powerful cleaning performance.

In terms of user-friendly features, the Bosch HDI8054U includes a touch control panel that is both intuitive and easy to use. The TimeLight feature projects the remaining cycle time onto the floor, providing a convenient way for users to track their dishwasher progress at a glance.

Overall, the Bosch HDI8054U combines elegance, efficiency, and advanced technology into a top-of-the-line dishwasher that meets the demands of today's modern kitchen. With its focus on performance and design, it stands out as a leading choice for those looking to invest in reliable, high-quality kitchen appliances.