Carrier 30RY/RYH, 30RA/RH manual menu

Models: 30RY/RYH 30RA/RH

1 36
Download 36 pages 61.05 Kb
Page 25
Image 25
menu

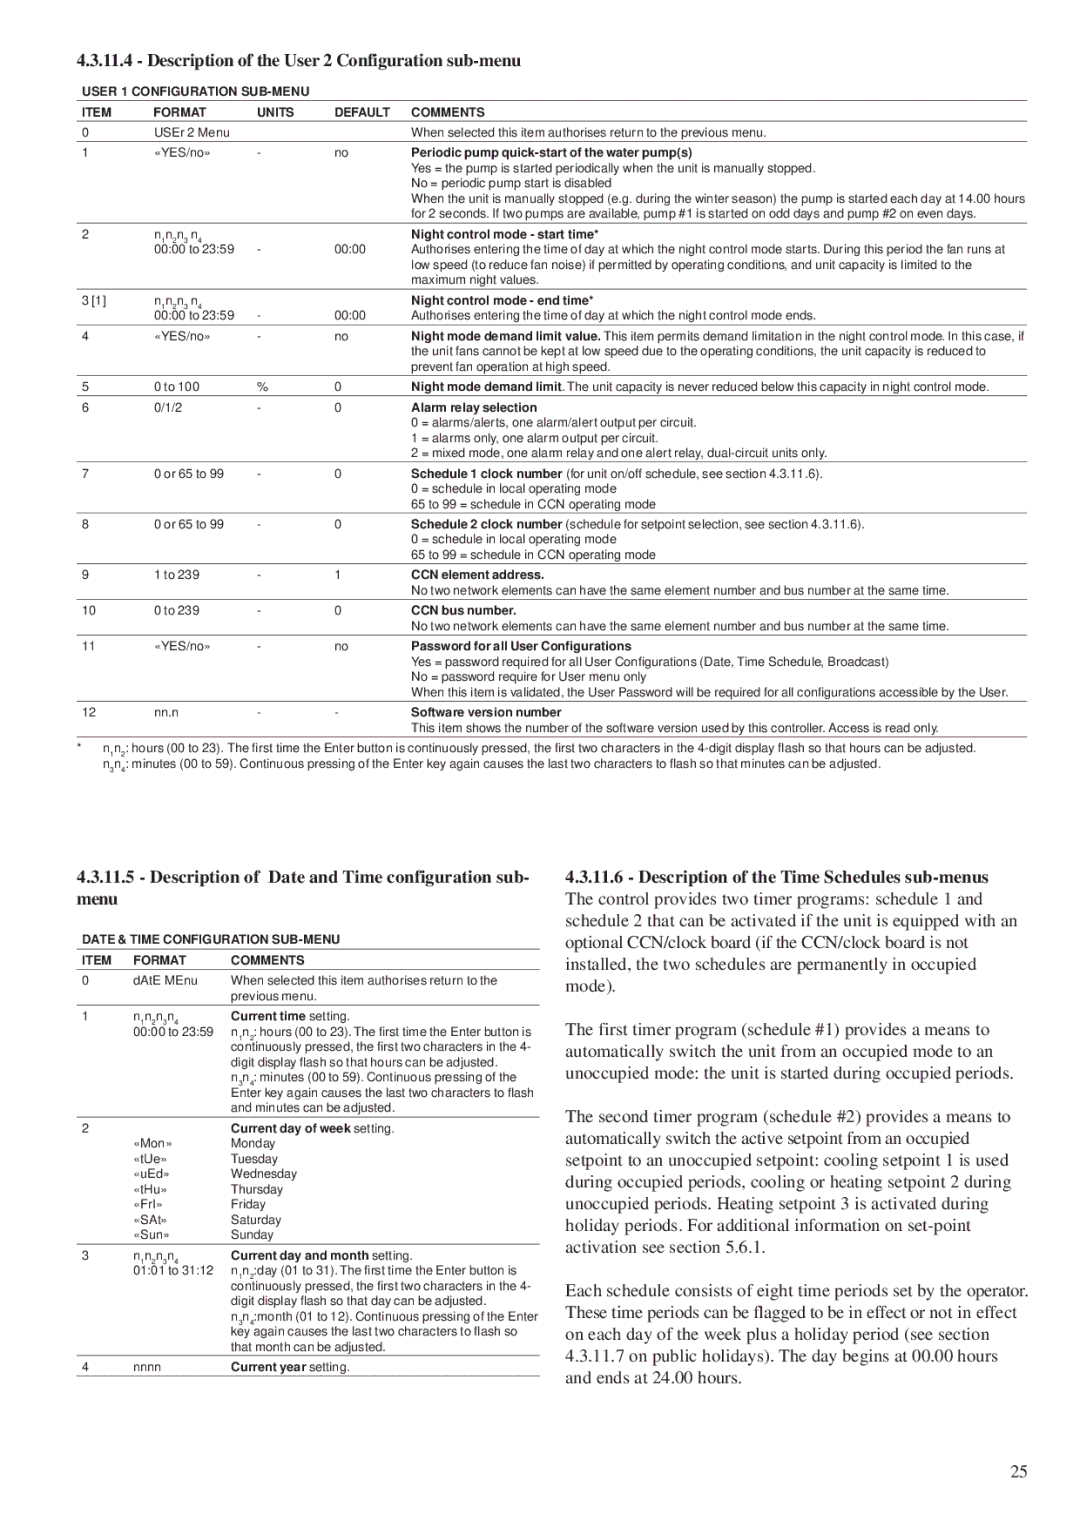
4.3.11.4 - Description of the User 2 Configuration sub-menu

USER 1 CONFIGURATION SUB-MENU

ITEM

FORMAT

UNITS

DEFAULT

COMMENTS

0

USEr 2 Menu


When selected this item authorises return to the previous menu.

1

«YES/no»

-

no

Periodic pump quick-start of the water pump(s)


Yes = the pump is started periodically when the unit is manually stopped.


No = periodic pump start is disabled


When the unit is manually stopped (e.g. during the winter season) the pump is started each day at 14.00 hours


for 2 seconds. If two pumps are available, pump #1 is started on odd days and pump #2 on even days.

2

n1n2n3 n4

-

00:00

Night control mode - start time*


00:00 to 23:59

Authorises entering the time of day at which the night control mode starts. During this period the fan runs at


low speed (to reduce fan noise) if permitted by operating conditions, and unit capacity is limited to the


maximum night values.


3 [1]

n1n2n3 n4

-

00:00

Night control mode - end time*


00:00 to 23:59

Authorises entering the time of day at which the night control mode ends.

4

«YES/no»

-

no

Night mode demand limit value. This item permits demand limitation in the night control mode. In this case, if


the unit fans cannot be kept at low speed due to the operating conditions, the unit capacity is reduced to


prevent fan operation at high speed.


5

0 to 100

%

0

Night mode demand limit. The unit capacity is never reduced below this capacity in night control mode.

6

0/1/2

-

0

Alarm relay selection


0 = alarms/alerts, one alarm/alert output per circuit.


1 = alarms only, one alarm output per circuit.


2 = mixed mode, one alarm relay and one alert relay, dual-circuit units only.

7

0 or 65 to 99

-

0

Schedule 1 clock number (for unit on/off schedule, see section 4.3.11.6).


0 = schedule in local operating mode


65 to 99 = schedule in CCN operating mode

8

0 or 65 to 99

-

0

Schedule 2 clock number (schedule for setpoint selection, see section 4.3.11.6).


0 = schedule in local operating mode


65 to 99 = schedule in CCN operating mode


9

1 to 239

-

1

CCN element address.


No two network elements can have the same element number and bus number at the same time.

10

0 to 239

-

0

CCN bus number.


No two network elements can have the same element number and bus number at the same time.

11

«YES/no»

-

no

Password for all User Configurations


Yes = password required for all User Configurations (Date, Time Schedule, Broadcast)


No = password require for User menu only


When this item is validated, the User Password will be required for all configurations accessible by the User.


12

nn.n

-

-

Software version number


This item shows the number of the software version used by this controller. Access is read only.

*n1n2: hours (00 to 23). The first time the Enter button is continuously pressed, the first two characters in the 4-digit display flash so that hours can be adjusted.

n3n4: minutes (00 to 59). Continuous pressing of the Enter key again causes the last two characters to flash so that minutes can be adjusted.

4.3.11.5- Description of Date and Time configuration sub-

menu

DATE & TIME CONFIGURATION SUB-MENU

ITEM

FORMAT

COMMENTS

0

dAtE MEnu

When selected this item authorises return to the


previous menu.

1

n1n2n3n4

Current time setting.


00:00 to 23:59

n1n2: hours (00 to 23). The first time the Enter button is


continuously pressed, the first two characters in the 4-


digit display flash so that hours can be adjusted.


n3n4: minutes (00 to 59). Continuous pressing of the


Enter key again causes the last two characters to flash


and minutes can be adjusted.


2


Current day of week setting.


«Mon»

Monday


«tUe»

Tuesday


«uEd»

Wednesday


«tHu»

Thursday


«FrI»

Friday


«SAt»

Saturday


«Sun»

Sunday


3

n1n2n3n4

Current day and month setting.


01:01 to 31:12

n1n2:day (01 to 31). The first time the Enter button is


continuously pressed, the first two characters in the 4-


digit display flash so that day can be adjusted.


n3n4:month (01 to 12). Continuous pressing of the Enter


key again causes the last two characters to flash so


that month can be adjusted.

4

nnnn

Current year setting.

4.3.11.6- Description of the Time Schedules sub-menus The control provides two timer programs: schedule 1 and schedule 2 that can be activated if the unit is equipped with an optional CCN/clock board (if the CCN/clock board is not installed, the two schedules are permanently in occupied mode).

The first timer program (schedule #1) provides a means to automatically switch the unit from an occupied mode to an unoccupied mode: the unit is started during occupied periods.

The second timer program (schedule #2) provides a means to automatically switch the active setpoint from an occupied setpoint to an unoccupied setpoint: cooling setpoint 1 is used during occupied periods, cooling or heating setpoint 2 during unoccupied periods. Heating setpoint 3 is activated during holiday periods. For additional information on set-point activation see section 5.6.1.

Each schedule consists of eight time periods set by the operator. These time periods can be flagged to be in effect or not in effect on each day of the week plus a holiday period (see section

4.3.11.7on public holidays). The day begins at 00.00 hours and ends at 24.00 hours.

25

Page 25
Image 25
Carrier 30RY/RYH, 30RA/RH manual menu