For Unified Contact Center Express
Page
Contents
Installation process
About partitions Installing business partitions
104
Preface
Document conventions
About this guide
Document set
Other learning resources
Online help
Planning
Configuration options
Additional partitions
Pre-installation Tasks
Verifying system requirements
To set up the required software environment
Bandwidth and hardware requirements
Software requirements
Verifying SQL Server authentication settings
Configuring environment variables
To verify the authentication mode of SQL Server
Collecting required information
Setting up user accounts and permissions
Verifying state of Microsoft Search service
To verify the state of the Microsoft Search service
To set up user accounts and permissions
To verify directory names
Verifying directory names
Creating WebLogic domains
Choose configuration template
Create administrative user
Creating WebLogic domains for secondary application servers
Choose custom configuration
Configure the administration server
Database Jdbc Options window, select No
Configure Windows Options window, select No for both options
Configure server start mode and Java SDK
Verifying Network Configuration
Configuring virus scanner
Verifying Unified CCX installation
Verifying WebLogic domains
Installation Process
To install a single-server or collocated configuration
Installing a single-server or collocated configuration
Installation process
Type the path or browse to the JDK home directory
BEAHome\userprojects\domains\DomainName
Provide WebLogic server and RMI parameters
Dont provide the host name, the installation will fail
Provide master database parameters
Provide partition database parameters
Welcome window, read the introduction and click Next
To install the web server
Additional steps for collocated configurations
To install a split-server or collocated configuration
Installing a split-server or collocated configuration
Installing a distributed-server configuration
To install the database
Installing the database
Create the first system administrator user account
Dont provide the host name, the installation will fail
To install the primary application server and file server
Installing the primary application server and file server
File Server Application Server
Type the path to or browse to the JDK home directory
Provide the names of the web server and services server
Dont provide the host name, the installation will fail
Provide partition database parameters
Welcome window, read the introduction and click Next
To install a secondary application server
Installing secondary application servers
Installing the web server
Provide file server parameters
To install the services server
Installing the services server
Type the name of the file server
Post-installation Tasks
Applying updates
Setting up archives for partition databases
Changing web server settings
Configuring Internet Information Services
Shutdown worker process after being idle for
To configure pool thread limit
Configuring pool thread limit
Regedit
Configuring content expiration settings
To remove extension mapping
To configure content expiration
Removing extension mapping
To change authentication settings for the web site
Changing authentication settings for web site
Click the Edit button
Changing security credentials for network directory
To change the network directory security settings
To change the logon parameters
Changing logon parameters for Cisco service
Configuring a web site for the messaging applet
Configuring permissions for installation directory
To configure permissions
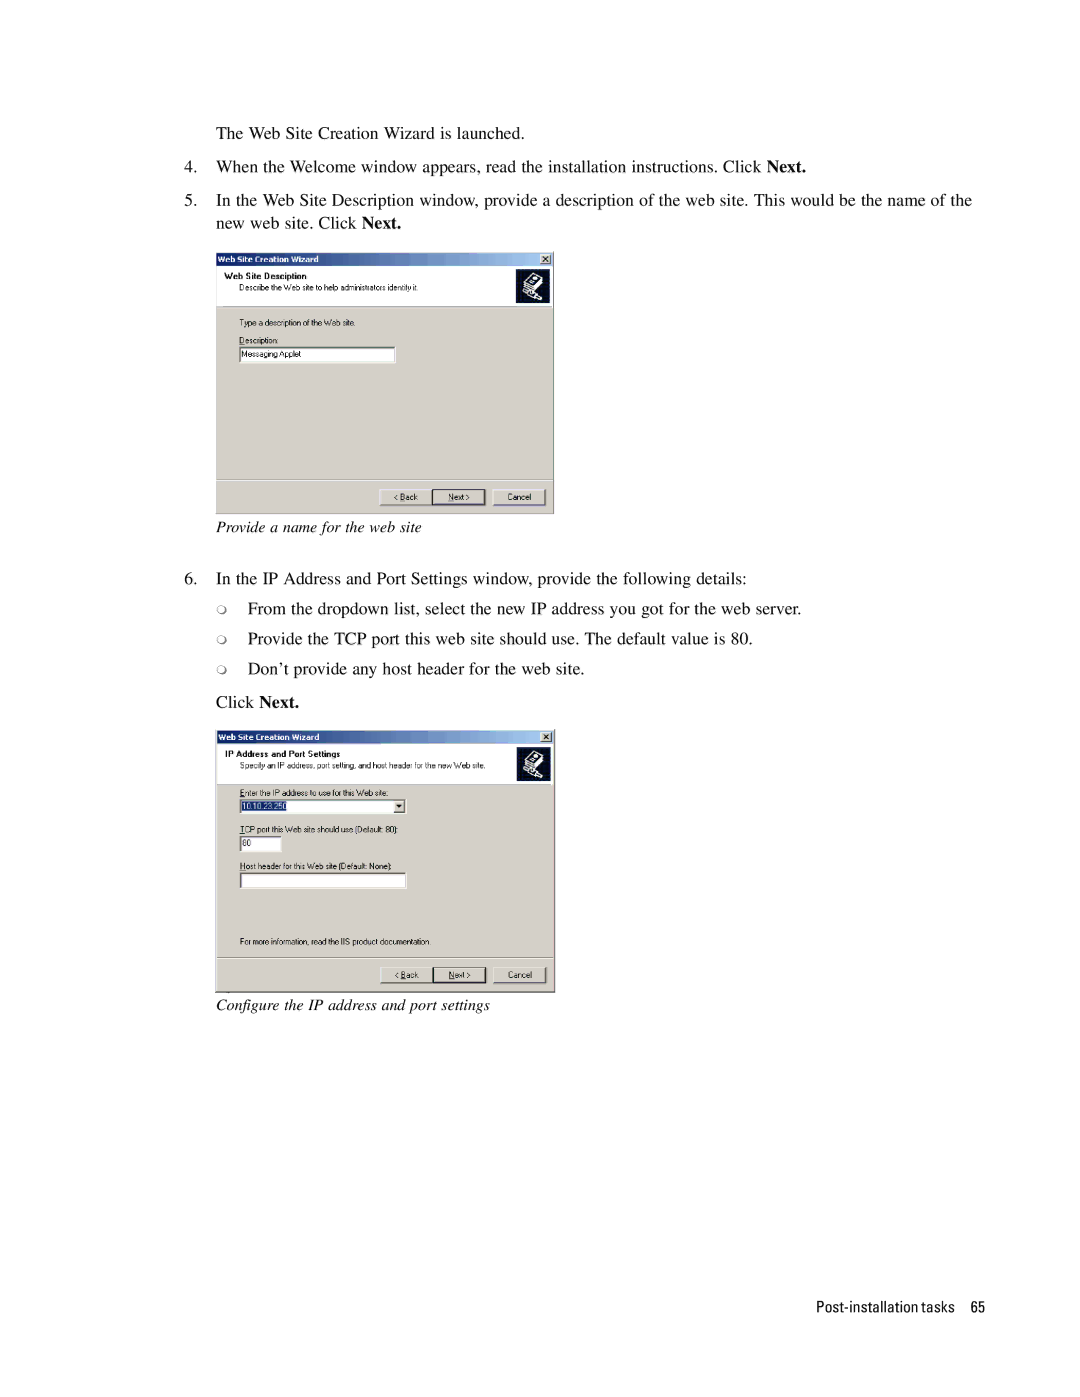
To configure a new web site
Provide a name for the web site
To verify the messaging applet web site
Verifying messaging applet web site
To configure the properties
Configuring web site properties
To create a virtual directory
Creating virtual directories
\\FileServerName\CiscoHome\eService. Click Next
To configure the Applet host setting
Configuring the Applet host setting
Separating the web server from the application server
Setting up secure socket layer
Starting and stopping Cisco Interaction Manager
To separate the web server from the application server
Logging in from Internet Explorer
Logging in to the business partition
Logging in from Cisco Agent Desktop Embedded Browser
To stop Cisco Interaction Manager
Mandatory settings
Configuring some important settings
At the partition level
At the department level
To uninstall Cisco Interaction Manager
Uninstalling Cisco Interaction Manager
Optional settings
Click the Uninstall button
Additional partitions
To create a new business partition
Installing business partitions
About partitions
Installation Options window, select the Partition option
Provide web server parameters
Dont provide the host name, the installation will fail
Archives
Enabling network DTC access
Setting up the archive for a partition
To enable network DTC access
About archives
To set up the archive
Setting up the archive
Installation Options window, select the Archive option
Provide partition parameters
Provide archive database parameters
SSL for secure Connections
To generate a certificate request
Installing a security certificate
Generating a security certificate request
Select the Create a new certificate option
Provide information about your organization
Submitting the certificate request
To install the certificate on the web server
Installing the certificate on the web server
SSL Port window, specify the SSL port for the web site
To configure SSL access
Configuring SSL access
Testing SSL access
Configuring the viewing of attachments
To enable users to view attachments
To test SSL access to Unified WIM and Unified EIM
Https//WebServer/Partition
Configuration type and option
Configuration details
File server details
Database details
Master database parameters
Application server details
Unified CCX Data Integration Wizard details
Archive details
Services server details
Web server details
Additional partition details
Make sure you provide the DNS host
Appendix B Path to Maintenance Release
Appendix B Path to Maintenance Release 4.25