Administration Guide
Cisco Systems, Inc. All rights reserved OL-22605-02
Getting Started with the RVS4000 Router
Setting Up and Configuring the Router
Introduction Networking and Security Basics
Planning Your Virtual Private Network VPN
VPN
Appendix a Troubleshooting 116
Using the VPN Setup Wizard
Windows 2000 or Windows XP RVS4000
Appendix E Cisco ProtectLink Web Service 182
Appendix F Specifications 190
Appendix D Gateway-to-Gateway VPN Tunnel 166
Appendix G Where to Go From Here 194
Introduction
An Introduction to LANs
Networking and Security Basics
Networking and Security Basics
Configuring the Router
Use of IP Addresses
Intrusion Prevention System IPS
IPS Scenarios
Why do I need a VPN?, What is a VPN?,
Why do I need a VPN?
Planning Your Virtual Private Network VPN
MAC Address Spoofing
Data Sniffing
Man in the middle attacks
What is a VPN?
VPN Router to VPN Router
VPN Router to VPN Router
Computer to VPN Router Tunnel
Front Panel
Front Panel
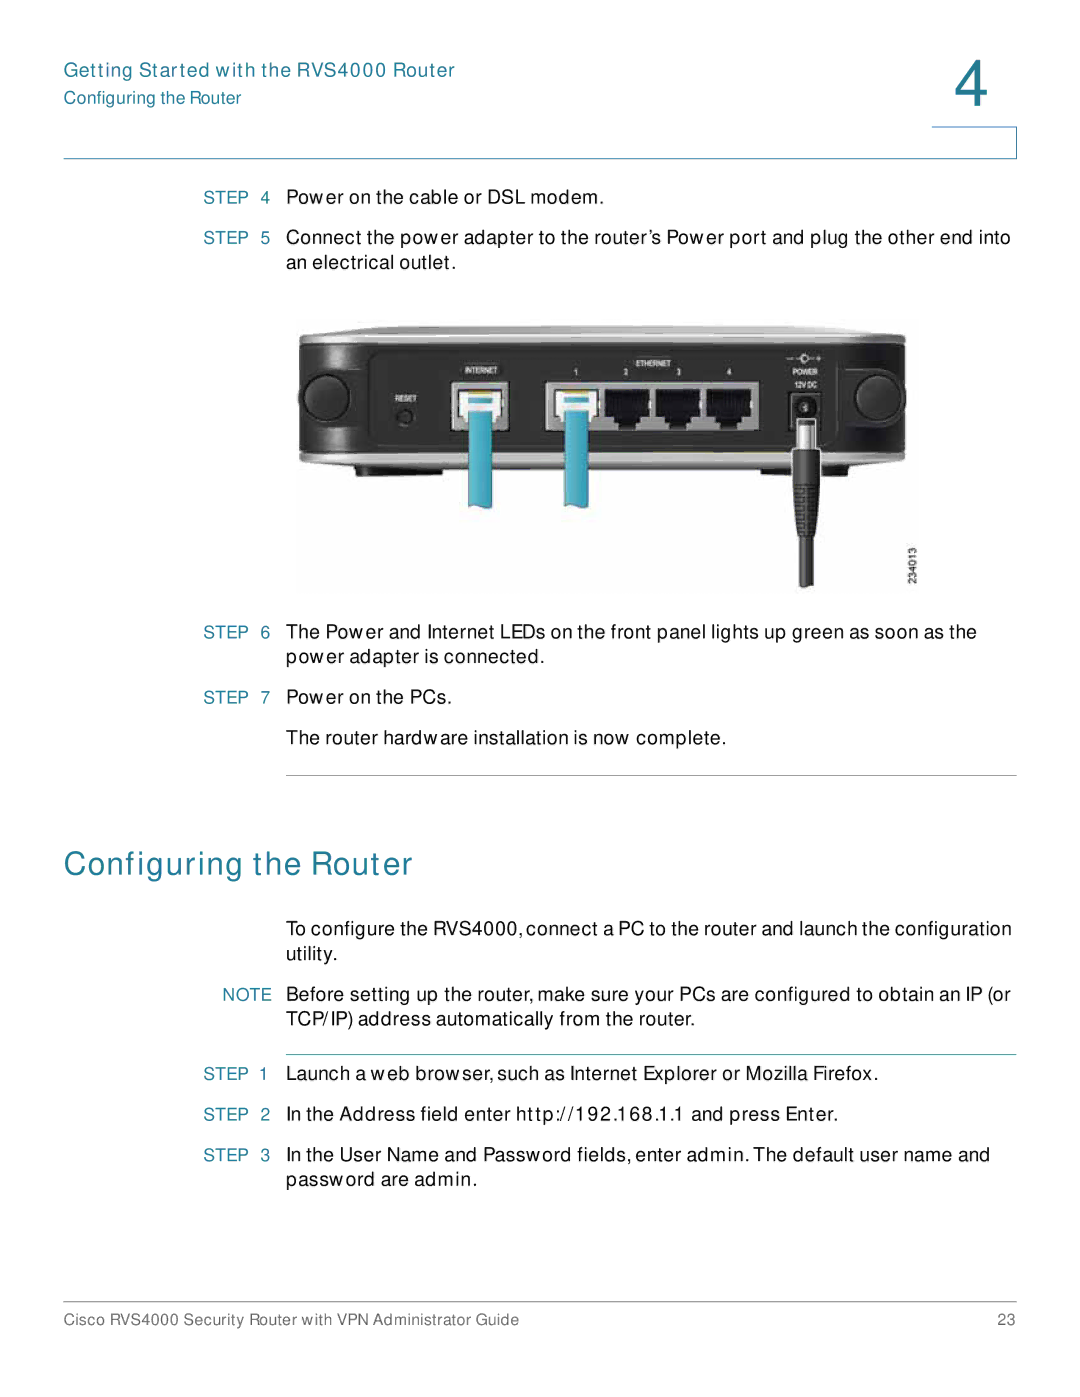
Back Panel
Back Panel
Getting Started with the RVS4000 Router
Stand Option
Placement Options
Desktop Option
Wall Option
Installing the Router
Configuring the Router
Setting Up and Configuring the Router
Setting Up and Configuring the Router
Login Window
Setup
Setup Summary
Port Statistics
Setup Summary
System Information
Log Setting Status
Network Setting Status
Firewall Setting Status
IPSec VPN Setting Status
Internet Connection Type
Setup WAN
Automatic Configuration Dhcp
Static IP
Static IP
PPPoE
PPPoE
Pptp
Heart Beat Signal
Heart Beat Signal
L2TP
Setting Up and Configuring the Router
Optional Settings
Optional Settings Required by some ISPs
Click Save
Setup LAN
Setup LAN
IPv4
Server Settings Dhcp
DHCPv6
Setup DMZ
Static IP Mapping
IPv6
Setup MAC Address Clone
Setup MAC Address Clone
Setup DMZ
Dynamic Routing
Setup Advanced Routing
Operating Mode
Setup Advanced Routing
Inter-VLAN Routing
Static Routing
Enable option
Setup Time
Setup Time
Setup IP Mode
Setup IP Mode
Firewall
Firewall Basic Settings
Firewall Basic Settings
Setting Up and Configuring the Router
Firewall IP Based ACL
Firewall IP Based ACL
Editing IP ACL Rules
Editing IP ACL Rules
Setting Up and Configuring the Router
Firewall Internet Access Policy
Firewall Internet Access Policy
Internet Policy Summary List of PCs
Setting Up and Configuring the Router
Firewall Single Port Forwarding
Firewall Single Port Forwarding
Firewall Port Range Forwarding
Firewall Port Range Forwarding
Firewall Port Range Triggering
Firewall Port Range Triggering
ProtectLink ProtectLink Purchase
ProtectLink
ProtectLink ProtectLink Purchase
VPN Summary
VPN Summary
Tunnel Status
VPN Clients Status
VPN IPSec VPN
VPN IPSec VPN
Name Fqdn Authentication
Local Group Setup
Remote Group Setup
Phase
IPSec Setup
Status
VPN VPN Client Accounts
VPN VPN Client Accounts
Certificate Management
VPN Client List Table
VPN VPN Passthrough
VPN VPN Passthrough
QoS Bandwidth Management Rate Control
QoS
QoS Bandwidth Management
Rate Control
Bandwidth
Bandwidth Management Type
QoS Bandwidth Management Priority
Priority
QoS QoS Setup
QoS QoS Setup
CoS Setup
QoS Dscp Setup
QoS Dscp Setup
Administration Management
Administration
Administration Management
Router Access
UPnP
Log Levels Severity Name Description
Administration Log
Log Setting
Administration Log
Email Alerts
Local Log
Administration Diagnostics
Administration Diagnostics
Syslog
Traceroute Test Parameters
Cable Diagnostics
Ping Test Parameters
Administration Backup & Restore
Administration Backup & Restore
Restore Configuration
Administration Factory Default
Administration Factory Default
Administration Firmware Upgrade
Administration Reboot
Administration Firmware Upgrade
Administration Reboot
Click the Small Business Router Firmware link
Click Start to Upgrade
Anomaly Detection
IPS Configuration
IPS Configuration
Peer To Peer
Peer to Peer
Instant Messenger
Attack Category
IPS Report
Attacker
IPS Report
IPS Information
L2 Switch
L2 Switch Create Vlan
IPS Information
Delete Selected Vlan
L2 Switch Create Vlan
L2 Switch Vlan Port Setting
L2 Switch Vlan Port Setting
L2 Switch Vlan Membership
L2 Switch Vlan Membership
L2 Switch Radius
L2 Switch Radius
L2 Switch Port Setting
L2 Switch Port Setting
Statistics Overview
L2 Switch Statistics
L2 Switch Statistics
L2 Switch Port Mirroring
L2 Switch Port Mirroring
L2 Switch Rstp
L2 Switch Rstp
Status Gateway
Status
Status Gateway
Internet Connection
Status Gateway IP Conntrack
IP Conntrack
Status Local Network
Status Local Network
Before You Begin
VPN Setup Wizard
\VPN Setup Wizard.exe
Running the VPN Setup Wizard
Using the VPN Setup Wizard
Click Firewall Basic Settings
Welcome Window
Informational Window
Build VPN Connection Remotely
Configure VPN Tunnel
Check Router Configuration
Vpnc Summary Window
Summary Window
Configure the Router
Test the Connection
Test Results
Exit the Wizard
Building Your VPN Connection Remotely
Configure VPN Tunnel Window
Check Router Configuration
Summary Window
Configure the Router
Test the Connection
View Test Results
Need to set a static IP address on a PC
Troubleshooting
Windows XP
Troubleshooting
Windows XP
Want to test my Internet connection
Troubleshooting
Troubleshooting
Application Start and End Protocol IP Address Enable
Need to set up a server behind my router
Configure as many entries as you like
Can’t get an Internet game, server, or application to work
Go to Setup DMZ
Follow the instructions in Administration Firmware Upgrade,
To start over, I need to set the router to factory default
Need to upgrade the firmware
Firmware upgrade failed
Click the Router Firmware Rescue Utility link
My DSL service’s PPPoE is always disconnecting
Need to use port triggering
Troubleshooting
Does the router support IPX or AppleTalk?
Frequently Asked Questions
Where is the router installed on the network?
Is IPSec Passthrough supported by the router?
Does the router support ICQ send file?
What is Network Address Translation and what is it used for?
How can I block corrupted FTP downloads?
If all else fails in the installation, what can I do?
How can I be notified of new router firmware upgrades?
How many ports can be simultaneously forwarded?
What is DMZ Hosting?
Will the router function in a Macintosh environment?
Is the router cross-platform compatible?
How do I get mIRC to work with the router?
Which modems are compatible with the router?
How can I check whether I have static or Dhcp IP addresses?
Click the VPN VPN Client Accounts
Overview
VPN Client Accounts Window
Using Cisco QuickVPN for Windows 2000, XP, or Vista
Click Add/Save
License Agreement
Installing the Cisco QuickVPN Software
Installing from the CD-ROM
Copying Files Finished Installing Files
Downloading and Installing from the Internet
Using the Cisco QuickVPN Software
QuickVPN Login
QuickVPN Status
Select VPN VPN Client Accounts
Distributing Certificates to QuickVPN Users
Connect Virtual Private Connection
\Program Files\Cisco\QuickVPN Client\
Introduction
Configuring IPSec with a Windows 2000 or XP Computer
Windows 2000 or Windows XP
How to Establish a Secure IPSec Tunnel
Configuring IPSec with a Windows 2000 or XP Computer
Environment
Establishing a Secure IPSec Tunnel
Local Security Settings
Rules Tab
Filter List 1 win router
IP Filter List
IP Filter List Tab
Filters Properties
New Rules Properties
Filter List 2 router win
Configuring IPSec with a Windows 2000 or XP Computer
New Rule Properties
Tunnel 1 win-Router
Filter Action Tab
Security Methods Tab
Preshared Key
Authentication Methods Tab
New Preshared Key
Tunnel Setting Tab
Connection Type Tab
Tunnel 2 Router-win
Properties Window
Filter Action Tab
Preshared Key
New Preshared Key
Connection Type Tab
Local Computer
Click VPN IPSec VPN
VPN IPSec VPN
Configuring IPSec with a Windows 2000 or XP Computer
Gateway-to-Gateway VPN Tunnel
Gateway-to-Gateway VPN Tunnel
RVS4000 IPSec VPN Settings
Click the Gateway to Gateway tab
RVS4000 IPSec Setup Settings
RV082 VPN Settings
RV082 IPSec Setup Settings
Click VPN IPSec VPN
RVS4000 IPSec VPN Settings
RVS4000 IPSec Setup Settings
RV082 VPN Settings
RV082 IPSec Setup Settings
Configuration When Both Gateways Use Dynamic IP Addresses
RVS4000 IPSec VPN Settings
RVS4000 IPSec Setup Settings
RV082 VPN Settings
RV082 IPSec Setup Settings
How to Access the Configuration Utility
Cisco ProtectLink Web Service
ProtectLink
How to Purchase, Register, or Activate the Service
Cisco ProtectLink Web Service
ProtectLink Inactive
ProtectLink Active
How to Use the Service
ProtectLink Web Protection
ProtectLink Web Protection
Fri
Web Protection
Approved URLs
ProtectLink License
ProtectLink License
License
Performance
Specifications
Setup/Config
QoS
Security Features
Specifications
Management
Layer
Network
Routing
Environmental
Cisco Small Business
Product Resources
Support
Product Documentation
Related Documentation
Where to Go From Here