Manuals
/
Datamax
/
Computer Equipment
/
Printer
Datamax
Allegro 2
manual
Rear View
Models:
Allegro 2
1
11
115
115
Download
115 pages
57.4 Kb
8
9
10
11
12
13
14
15
Troubleshooting
Specifications
Install
Error codes
Ascii Control Code Chart
Signal Pin
Function Default Settings
Connecting to a CRT
Warranty
Maintenance
Page 11
Image 11
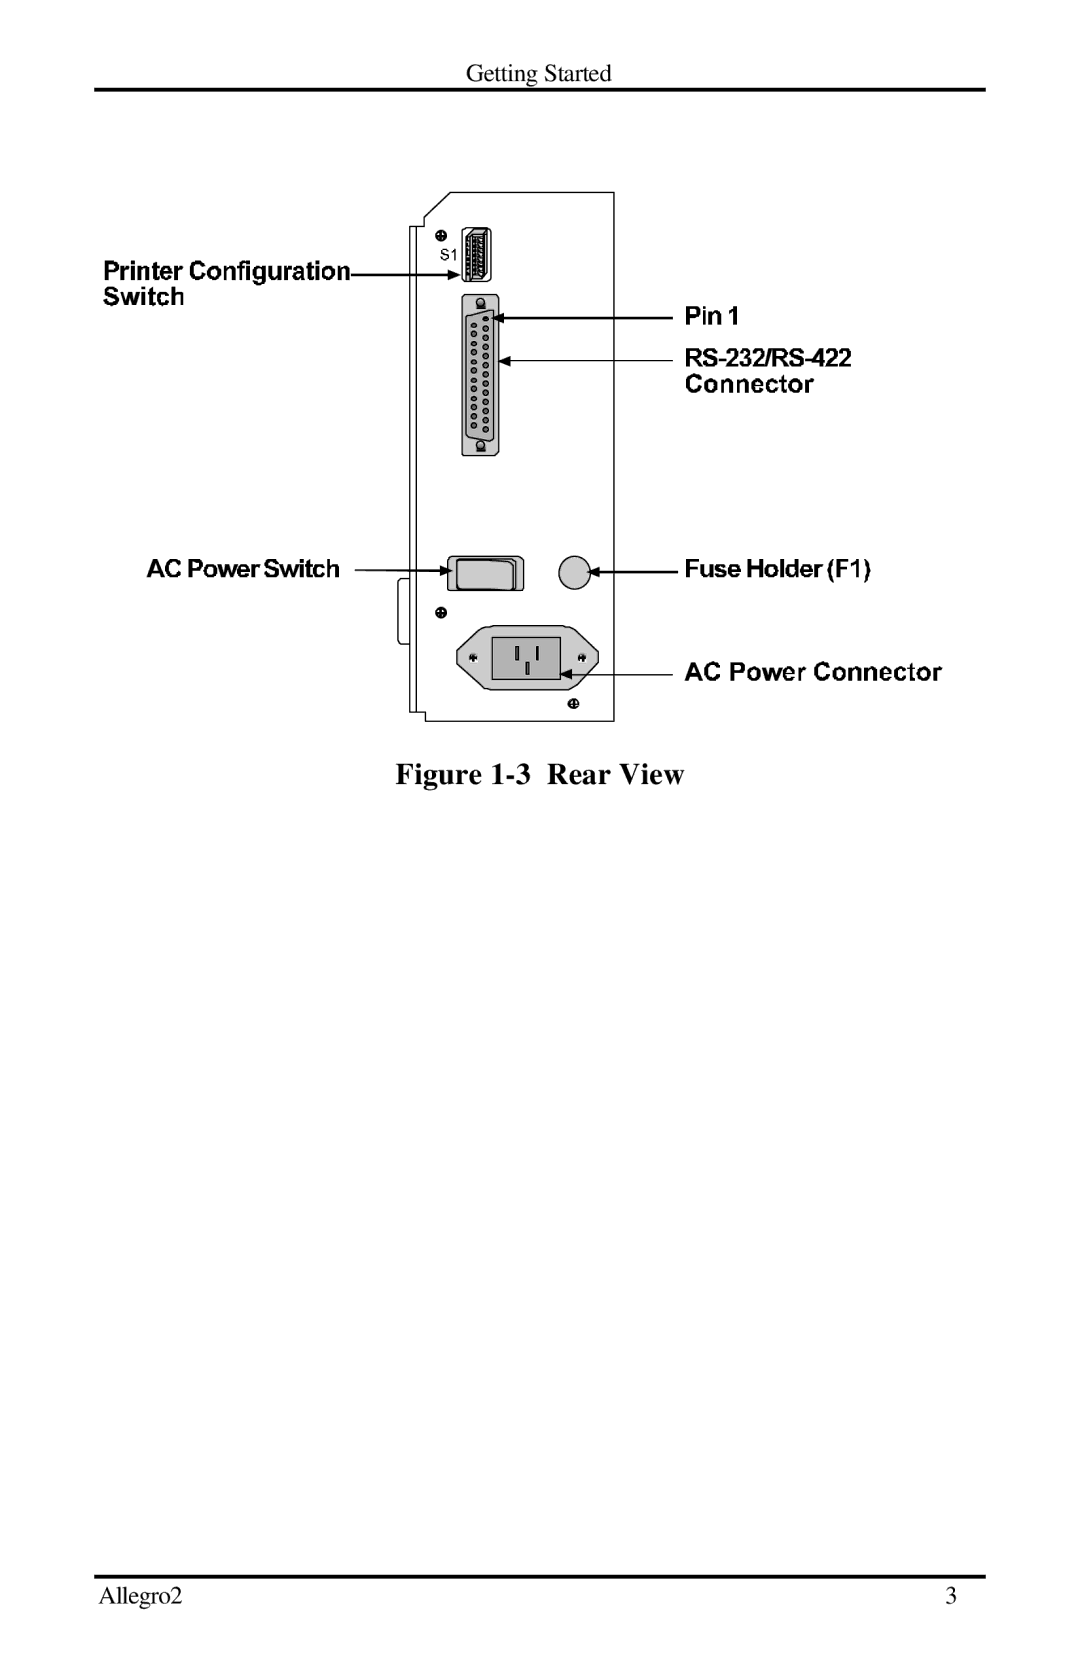
Getting Started
Figure
1-3
Rear View
Allegro2
3
Page 10
Page 12
Page 11
Image 11
Page 10
Page 12
Contents
Allegro2 Operator’s Manual
Part Number Revision A3
Agency Compliance and Approvals
Page
Important Safety Instructions
Page
Contents
Maintenance
Unpacking and Inspection
Getting Started
Introduction
Mechanism Detail
Location of Parts on Your Printer
Rear View
Tear Bar Assembly Installation
Tear- off Assembly Installation
Buttons, Lights and Switches
Using the Printer Control Panel
Getting Started
Ribbon
Switch
Paper/Ribbon
Light
Labels
Media Installation
Installation
Label Loading Instructions
Ribbon Loading
Ribbon Loading Instructions
Available Modules
Using the Printer Options
To install a Memory Module
256K and 512K RAM Modules
Options
Cutter
Font ROM Modules
Media Rewinder
Peel and Present
Present Sensor
Getting Started Allegro2
Checking Voltage Selection
Setting Up Your Printer
Power Up Self-Test
Test Label
Interface Cables
Interfacing to the Printer
Part Number Description
Connecting to a PC
Sample Installations
Connecting to a CRT
Connecting to Your Non-ASCII Device
Connecting to Your Minicomputer
Switch Settings
Switch Settings
Word Length
Setting the Baud Rate
Baud 9600 4800 2400 1200 300 Test
Baud Rate
Switch Settings and Functions
Other Switches
Immediate Commands
Programming Commands
Char Description Format
System-Level Commands
Batch, 1-Cutter Enable
Description Format
Label-Formatting Commands
Special Label-Formatting Commands
Programming Examples
10 Font-Loading Commands
Example line
Setting Up Your Printer Allegro2
Creating Labels Using Internal Batch Software
Connect Cables
Check Link CRT Settings
Printer Used With a Link CRT
Batch System Initialization
Function Default Settings
Verify Setup, Power Up, and Load Media
Function Keys
Formatting and Printing Labels
Available Fonts and Barcodes
Menu Screens
Label Name NEW Label Name
ALT-P Screen
Print Parameters
Description Default Range
Other Important Keys
Print Label Screen Header
Create/Modify Label Screen
Creating Labels Using Internal Batch Software
Sample Label Format
Creating Labels Using Internal Batch Software
Invalid Font Type
Smooth Font Information
Smooth Font Valid BH Ranges
Number OUT of Range
Creating Labels Using Internal Batch Software
Not Enough Room for Field Data
Lines Lhhhvvv
Creating Labels Using Internal Batch Software
= Day number 1 = Monday
Time and Date Information Format
Prints
Sample
Print Label Screen
Print Label Screen
Creating Labels Using Internal Batch Software
System Maintenance Menu
System Maintenance Screen
Print Test Label
Reset Printer
Copy Module
Metric
Quick Reference Listing
Create/Modify Label Commands
Command Valid Inputs
Key Function
Print Parameters ALT-P
Special Keys
Troubleshooting
Controlling Print Quality
Tag Stock or Stiff Media
Mechanical Adjustments
Aligning the Printhead
Direct-Thermal Stock
Printhead Alignment
Ribbon Feed and Tracking Adjustments
Printhead Alignment Procedure
Label Stock Tracking Adjustment
Fine Printhead Alignment
Troubleshooting Allegro2
Printhead Mount Assembly
Adjusting Printhead Pressure and Support
Printer Does Not Print, or Prints Several Labels at once
Troubleshooting
Unacceptable Print Quality
Unable to print in rotation
Erratic Printing
Ribbon Does Not Advance
Skips Every Other Label
Printer fails to turn on
Prints Light on the Right Side of the Label
Drive Roller
Maintenance
Interior and Exterior
Area Method Interval
Cleaning Schedule
Cleaning the Printhead
Cleaning the Printhead
Maintenance Allegro2
Page
Appendix a
Ascii Control Code Chart
Maintenance Allegro2
Char Hex Dec
Page
Table B-3 Options
Appendix B Switch Settings and Cable Interfacing
Table B-1 Baud Rate
Table B-2 Word Length
Table B-2 Printer Default Communication Parameters
Signal Pin
Table B-1 I/O Port Wiring
Paramete Default Value
Table C-1 Valid Human-Readable Font Ascii Characters
Appendix C
Available Fonts and Barcodes
Fonts
Table C-2 Font Sizes
Font 6 62-character alphanumeric, uppercase
Available Fonts and Barcodes
Barcodes
Table C-3 Barcode Characteristics
Hbic
Barcode I Codabar
Kmart NON EDI
Uppercase T
Error Codes
Lowercase
Uppercase R
Allegro2
Table E-2 Printer Pin Connections
Appendix E
Table E-1 Printer Interface Cables
Pin Description
Straight Cable MXM
PC DB25P to Printer
Figure E-5 Centronics Parallel Interface Converter
∙ Parallel to Serial Adapter Part Number
Printing
Appendix F
Barcodes
Fonts
Label Material
Media
Table F-1 Media Dimensions
Label/Tag Media Specifications
Electrical
Lights, Buttons, Switch and POT
Lists of Approved Media
Communications Interfacing
Options
Environmental
Physical
256K Flash Eeprom
Specifications Allegro2
Printer
Appendix G
Thermal Printhead
Warranty Service Procedures
Limitation of Liability
General Warranty Provisions
Top
Page
Image
Contents