Advanced Configuration menu
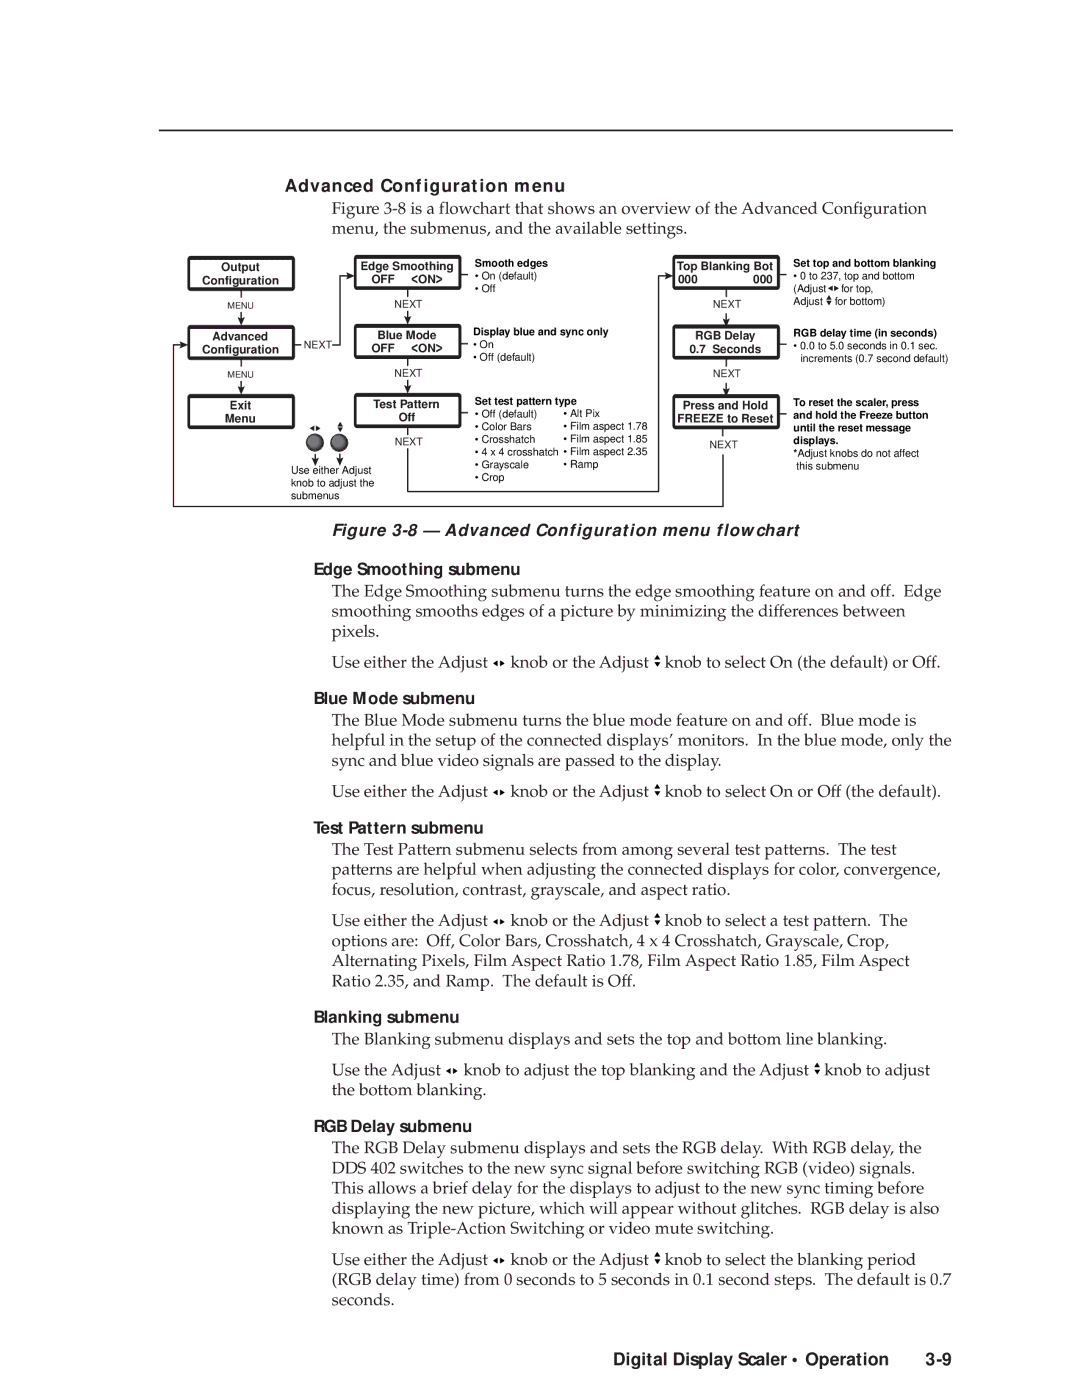
Figure 3-8 is a flowchart that shows an overview of the Advanced Configuration menu, the submenus, and the available settings.
Output |
| Edge Smoothing |
| Smooth edges |
| Top Blanking Bot | |||
Configuration |
| OFF <ON> |
| • On (default) |
| 000 | 000 | ||
|
|
| |||||||
|
|
|
|
|
| • Off |
|
|
|
|
|
|
|
|
|
|
| ||
MENU |
| NEXT |
|
| NEXT | |
Advanced |
| Blue Mode | Display blue and sync only | RGB Delay | ||
Configuration | NEXT | OFF | <ON> | • On |
| 0.7 Seconds |
|
|
|
| • Off (default) |
|
|
MENU |
| NEXT |
|
| NEXT | |
Exit |
| Test Pattern | Set test pattern type | Press and Hold | ||
Menu |
|
| Off | • Off (default) | • Alt Pix | FREEZE to Reset |
|
|
|
| • Color Bars | • Film aspect 1.78 |
|
|
| NEXT | • Crosshatch | • Film aspect 1.85 | NEXT | |
|
|
|
| • 4 x 4 crosshatch • Film aspect 2.35 | ||
|
|
|
|
| ||
| Use either Adjust |
|
| • Grayscale | • Ramp |
|
|
|
| • Crop |
|
| |
| knob to adjust the |
|
|
| ||
|
|
|
|
| ||
| submenus |
|
|
|
|
|
Set top and bottom blanking
•0 to 237, top and bottom
(Adjust ![]()
![]() for top, Adjust
for top, Adjust ![]() for bottom)
for bottom)
RGB delay time (in seconds)
•0.0 to 5.0 seconds in 0.1 sec. increments (0.7 second default)
To reset the scaler, press and hold the Freeze button until the reset message displays.
*Adjust knobs do not affect this submenu
Figure 3-8 — Advanced Configuration menu flowchart
Edge Smoothing submenu
The Edge Smoothing submenu turns the edge smoothing feature on and off. Edge smoothing smooths edges of a picture by minimizing the differences between pixels.
Use either the Adjust ![]()
![]() knob or the Adjust
knob or the Adjust ![]() knob to select On (the default) or Off.
knob to select On (the default) or Off.
Blue Mode submenu
The Blue Mode submenu turns the blue mode feature on and off. Blue mode is helpful in the setup of the connected displays’ monitors. In the blue mode, only the sync and blue video signals are passed to the display.
Use either the Adjust ![]()
![]() knob or the Adjust
knob or the Adjust ![]() knob to select On or Off (the default).
knob to select On or Off (the default).
Test Pattern submenu
The Test Pattern submenu selects from among several test patterns. The test patterns are helpful when adjusting the connected displays for color, convergence, focus, resolution, contrast, grayscale, and aspect ratio.
Use either the Adjust ![]()
![]() knob or the Adjust
knob or the Adjust ![]() knob to select a test pattern. The options are: Off, Color Bars, Crosshatch, 4 x 4 Crosshatch, Grayscale, Crop, Alternating Pixels, Film Aspect Ratio 1.78, Film Aspect Ratio 1.85, Film Aspect Ratio 2.35, and Ramp. The default is Off.
knob to select a test pattern. The options are: Off, Color Bars, Crosshatch, 4 x 4 Crosshatch, Grayscale, Crop, Alternating Pixels, Film Aspect Ratio 1.78, Film Aspect Ratio 1.85, Film Aspect Ratio 2.35, and Ramp. The default is Off.
Blanking submenu
The Blanking submenu displays and sets the top and bottom line blanking.
Use the Adjust ![]()
![]() knob to adjust the top blanking and the Adjust
knob to adjust the top blanking and the Adjust ![]() knob to adjust the bottom blanking.
knob to adjust the bottom blanking.
RGB Delay submenu
The RGB Delay submenu displays and sets the RGB delay. With RGB delay, the DDS 402 switches to the new sync signal before switching RGB (video) signals. This allows a brief delay for the displays to adjust to the new sync timing before displaying the new picture, which will appear without glitches. RGB delay is also known as
Use either the Adjust ![]()
![]() knob or the Adjust
knob or the Adjust ![]() knob to select the blanking period (RGB delay time) from 0 seconds to 5 seconds in 0.1 second steps. The default is 0.7 seconds.
knob to select the blanking period (RGB delay time) from 0 seconds to 5 seconds in 0.1 second steps. The default is 0.7 seconds.
Digital Display Scaler • Operation |