LCD TV Myrica VQ40-1
Herausgegeben von/Published by
Bestell-Nr./Order No. A26361-K1088-Z120-1-M119
A26361-K1088-Z120-1-M119
Vorbereitungen
Wichtige Hinweise
Übersicht
Bedienung
Wichtige Hinweise
Sicherheitshinweise
Wichtige Grundregeln zum Gebrauch
Konformität
Entsorgung und Recycling
Reinigung
Bei Störungen
Übersicht
Lieferumfang
Ausstattung
Anschlüsse
Fernbedienung
Bedienelemente am Gerät
Aufstellungsort
Vorbereitungen
Blickrichtung
Aufstellen
Bohrschablone
Plasma TV Myrica PQ50-1
Plasma TV Myrica PQ42-1
Verwenden der Fernbedienung
Anschliessen einer Antenne
Einlegen der Batterien in die Fernbedienung
Anschliessen des Netzkabels
Erstinstalltion
Sprache einstellen
Landesauswahl für Sortierreihenfolge
Kanalwechsel Programmwechsel
Bedienung
Ein- / Ausschalten
Lautstärke- und Toneinstellungen
Gebrauch der Bild-im-Bild Funktion
Info zu Hauptbild
Sleep Timer
Kombinationsmöglichkeiten Quelle mit PIP Quelle
Standbild
OSD-Menü Steuerung
Grundeinstellungen
Automatische Sendersuche
Manuelle Sendersuche
Ändern von Kanalnamen
Decoder einstellen
Programmübersicht bearbeiten
Decoder TV-Kanal
OSD-Einstellungen
Bildeinstellungen
Für AV-QuellenTV, CVBS, YC, YUV, SCART1, SCART2, Hdmi
Für PC-Quellen RGB, DVI
Bildformate für AV-Quellen
Erweiterte Toneinstellungen
Bildformate für PC-Quellen
One to One
Einstellung Benutzer-Equalizer
Videotext
Anschluss externer Geräte
Anschluss an SCART1 / SCART2
Formaterkennung
Anschluss an die Component-Eingänge YUV
Anschluss an den S-Video-Eingang
Einstellungen für PC RGB
Anschluss an den HDMI-Eingang
Anschluss an den PC DVI-I Eingang
Für den Anschluss eines PCs benutzen Sie den Ein
Eingänge auswählen
Einstellungen für PC DVI
Eingang auswählen Y / B und dann die rote Taste drücken
Sonderfunktionen
Bildschirmschoner Nur Plasma-TV
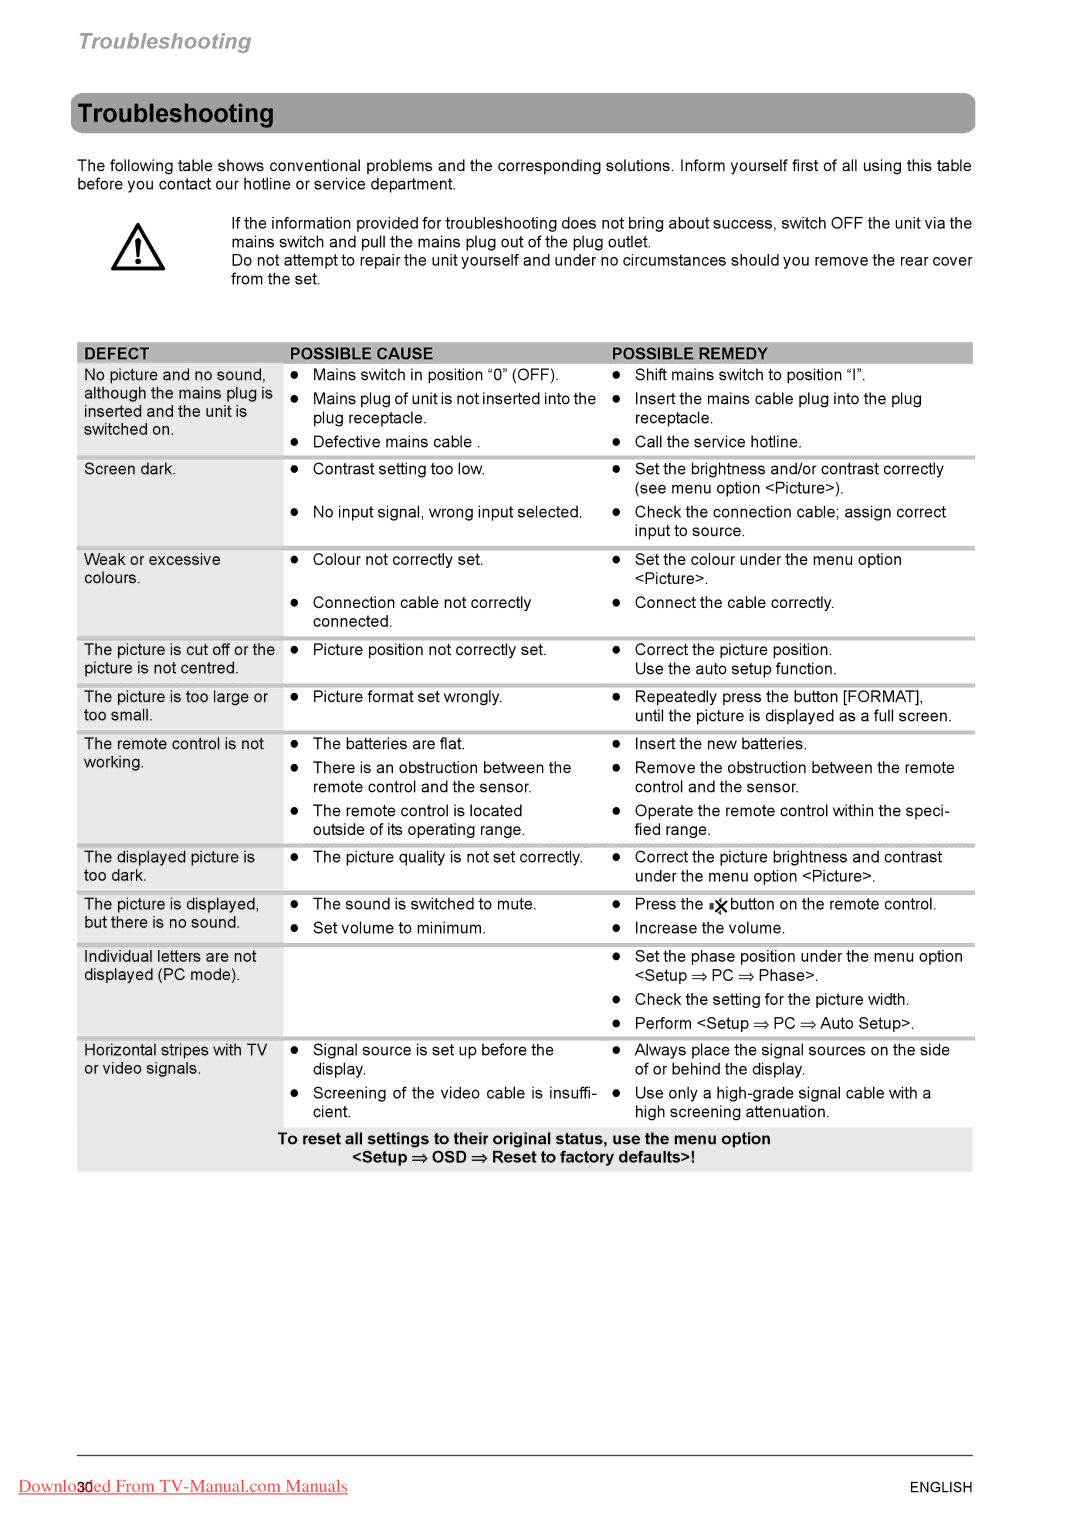
Fehlerbehebung
Fehler Mögliche Ursache Mögliche Behebung
Sensor befindet sich ein Hindernis
Technische Daten Myrica VQ40-1
Technische Daten Myrica PQ42-1
Technische Daten Myrica PQ50-1
Page
Table of contents
Safety directions
Important information
Important basic principles for use
Disposal and recycling
Cleaning
Event of any faults
Conformity
Scope of supply
AAA batteries Remote control
Overview
Equipment
Aerial PC DVI-I Hdcp
Mains switch
Connection sockets
Mains input jack
Remote control
11 VOL+
Sound
Control elements on the unit
Viewing direction
Installation
Preparations
Location
Drilling template
Connecting the mains cable
Insertion of the batteries into the remote control
Using the remote control
Connection of an aerial
Initial installation
Setting the language
Selection of country for the sorting sequence
Operator control
Switching on / off
Volume and sound settings
Channel change programme change
TV 24 N24
Use of the picture-in-picture function
TV 24 N24 Mute On Mute Off
TV 28 NTV
Possibilities of combining the source with a Secondary input
Still picture
Basic settings
OSD menu control
Automatic channel search
Manual station search
Changing channel names
Decoder TV channel
Setting the decoder
Editing the channel overview
Sound Picture Normal
OSD settings
To close the menu press the red button M
Picture settings
Picture adjust Select Picture adjust Y / B
For PC sources RGB, DVI
Color Balance Select Color Balance Y / B
Picture formats for AV sources
TV 24 N24 Fill all Picture format
Vertical directions so that a full screen display is al
Extended sound settings
Picture formats for PC sources
User equalizer setting
Video text
Connection of external devices
Connection to SCART1 / SCART2
Connection to the component inputs YUV
Connection to the S-video input
Connection to the PC DVI-I input
Settings for PC RGB
Connection to the Hdmi input
For the connection of a PC use the input PC DVI-I
Settings for PC DVI
Select inputs
Special functions
Screen saver, plasma TV only
Troubleshooting
Defect Possible Cause Possible Remedy
Connected
PC Frequency Range
Dimensions and Weight
Display
Inputs / Connections / Synchronization
Technical specifications Myrica PQ42-1
Technical specifications Myrica PQ50-1
Page
Aperçu
Mode d’utilisation
Remarques importantes
Préparations
Remarques importantes
Remarques de sécurité
Règles d’utilisation importantes
Conformité
Recyclage et élimination
Nettoyage
En cas de défaillances
Eléments livrés
Piles AAA Télécommande Selon l’équipement
Aperçu
Equipement
Ligne Entree YUV Cvbs
Raccordements
Antenne PC DVI-I Hdcp
Fiche entrée secteur
Télécommande
Marche
Hold / Freeze fige l’image actuelle
Eléments de commande sur l’appareil
Positionnement
Préparations
Angle de vision
Montage
Gabarit de perçage
Branchement d’une antenne
Introduire des piles dans la télécommande
Utilisation de la télécommande
Branchement du câble de secteur
Première installation
Régler la langue
Sélection du pays pour l’ordre de classement
Mettre en marche / arrêter
Mode d’utilisation
Réglages du volume et du son
Changement de chaîne changement de programme
Ecran Principal Secondaire
Fonction Image dans image PIP
Image
Informations sur
Combinaisons possibles source et source PIP
Image figée
Programme sommeil
Commande du menu OSD
Réglages de base
Recherche automatique des chaînes
Recherche de chaînes manuelle
Modifier le nom du canal
Régler le décodeur
Editer la liste des chaînes
Décodeur Canal TV
Réglages OSD
Réglages de l’image
Pour les sources AV TV, CVBS, YC, YUV, SCART1, SCART2, Hdmi
Pour sources PC RGB, DVI
Formats d’image pour sources AV
Ce réglage de format permet d’obtenir toujours une
Réglages du son avancés
Formats d’image pour sources PC
Réglage Egaliseur Utilisateur
Télétexte
Raccordement à des périphériques externes
Raccordement à SCART1 / SCART2
Raccordement aux entrées YUV de composant
Connexion à l’entrée S-vidéo
Connexion à l’entrée PC DVI-I
Configurations du PC RVB
Connexion à l’entrée Hdmi
De l’entrée
Configurations du PC DVI
Sélectionner les entrées
Fonctions spéciales
Ecran de veille uniquement sur le téléviseur plasma
Remédier aux défaillances
Defaillance Cause Eventuelle Remede Possible
Données techniques Myrica VQ40-1
Données techniques Myrica PQ42-1
Données techniques Myrica PQ50-1
Page
Preparación
Advertencias importantes
Resumen
Manejo
Advertencias importantes
Indicaciones de seguridad
Reglas básicas importantes para el uso
Conformidad
Eliminación de residuos y reciclaje
Limpieza
En caso de anomalías
Equipamiento
Volumen de suministro
Resumen
Entrada/salida digital de audio
Conexiones
Toma de entrada de red
Interruptor de alimentación
Mando a distancia
POS Sin función Size Sin función Source / F4
Elementos de mando del aparato
Lugar de instalación
Preparación
Dirección de visión
Instalación
Plantilla de taladrar
Aberturas para los ganchos de fijación
Utilización del mando a distancia
Conexión de una antena
Instalación de las pilas en el mando a distancia
Conexión del cable de alimentación
Selección de país para secuencia clasificada
Primera instalación
Selección de idioma
Con la tecla Y o B seleccione su idioma Pulse la tecla Menu
Encendido/apagado
Ajuste del volumen y del sonido
Manejo
Cambio de canal cambio de programa
Imagen Principal Secundaria Información
Uso de la función imagen sobre imagen
Imagen PIP
Imagen principal
Temporizador de desconexión automática Sleep Timer
Imagen congelada
Búsqueda automática de cadenas
Control del menú OSD
Ajustes básicos
Seleccione Efectuar búsqueda Y / B y pulse la tecla
Búsqueda manual de cadenas
Modificación del nombre del canal
Ajuste del descodificador
Editar la lista de canales
Descodificador Canal de TV
Ajustes OSD
Ajustes de imagen
Adaptación de imagen Seleccione Adaptación imagen Y / B
Para fuentes de PC RGB, DVI
En este ajuste de formato, la imagen se ajusta
Formatos de imagen para fuentes de AV
Formato de imagen
Horizontal y verticalmente a la pantalla, de forma que
Ajustes avanzados de sonido
Formatos de imagen para fuentes de PC
Ajustes usuario-ecualizador
Teletexto
De TV
Selección de páginas
Siempre reproducción solamente de la señal
Conexión de aparatos externos
Conexión a SCART1/SCART2
Sin utilizar reproducción solamente de la señal
Conexión a las entradas de componentes YUV
Conexión a la entrada de S-Video
Ajustes del PC RGB
Conexión a la entrada Hdmi
Conexión a la entrada PC DVI-I
Para conectar un PC utilice la entrada PC DVI-I
Seleccione entradas
Ajustes del PC DVI
Funciones especiales
Salvapantallas solamente para la TV de plasma
Solución de problemas
Fallo Causa Posible Solución Posible
Ciente Dad con una alta atenuación del apantalla Miento
Datos técnicos Myrica VQ40-1
Datos técnicos Myrica PQ42-1
Datos técnicos Myrica PQ50-1
Page
Preparações
Indicações importantes
Visão geral
Comando
Indicações importantes
Indicações de segurança
Reduza tanto quanto possível o brilho e o contraste
Conformidade
Remoção e reciclagem
Limpeza
Em caso de perturbações
Visão geral
Âmbito de fornecimento
Equipamento
Tomada de alimentação
Ligações
Line OUT L/R saída áudio
Interruptor de rede
Telecomando
POS Sem função Size Sem função Source / F4
Elementos de comando no aparelho
Local de colocação
Preparações
Direcção do olhar
Colocação
Molde de furar
Utilização do telecomando
Conectar uma antena
Inserir as pilhas no telecomando
Conexão do cabo de alimentação
Configurar a língua
Primeira instalação
Selecção de país para sequência de selecção
Ligar / Desligar
Ajustes de volume e de som
Comando
Mudança de canal mudança de programa
Utilização da função imagem-na-imagem
Opção de menu PIP pos. vert
Imagem parada
Temporizador auto
Configurações básicas
Menu OSD Comando
Busca automática de estações
Busca manual de estações
Modificar nome de canal
Ajustar descodificador
Editar Estação lista
Configurações OSD
Ajustes de imagem
Para fontes de sinal de PC RGB, DVI
Formatos de imagem para fontes de sinal AV
No sentido horizontal e vertical, de modo a que seja
Ajustes de som alargados
Formatos de imagem para fontes de sinal PC
Ajuste do equalizador do utilizador
Teletexto
Conexão de equipamentos externos
Conexão ao SCART1 / SCART2
Conexão às entradas Componente YUV
Conexão à entrada S-Video
Sinal
Conexão à entrada Hdmi
Conexão à entrada PC DVI-I
Ajustes para PC RGB
Seleccionar entradas
Ajustes para PC DVI
Funções especiais
Protector de ecrã, apenas TV plasma
Resolução de defeitos
Defeito Causa Possível Resolução Possível
Dados técnicos Myrica VQ40-1
Dados técnicos Myrica PQ42-1
Dados técnicos Myrica PQ50-1
Page
Avvertenze importanti
Panoramica
Operazioni preliminari
Regole fondamentali per l’utilizzo
Avvertenze importanti
Norme di sicurezza
Diminuire per quanto possibile contrasto e luminosità
Conformità
Smaltimento e riciclaggio
Pulizia
Caso di malfunzionamenti
Dotazione
Panoramica
Dotazione
Libretto di garanzia
Collegamenti
Presa d’ingresso rete
Interruttore di rete
Tasti numerici
Rosso / verde / giallo / blu rosso uscire dal menu
Elementi di comando sull’apparecchio
Operazioni preliminari
Luogo di installazione
Installazione
Direzione di osservazione
Sagome per foratura
Plasma TV Myrica PQ50-1 Plasma TV Myrica PQ42-1
Utilizzo del telecomando
Collegamento di un’antenna
Inserimento delle batterie nel telecomando
Collegamento del cavo di rete
Prima installazione
Impostazione della lingua
Selezione del paese per l’ordine di ricerca
Impostazione del volume e del suono
Accensione/spegnimento
Cambio di canali cambio programma
Utilizzo della funzione Immagine nell’immagine
Fermo immagine
Comando a menu OSD
Impostazioni base
Ricerca automatica delle emittenti
Ricerca manuale delle emittenti
Modificare il nome del canale
Decoder Canale TV
Impostazione del decoder
Gestione sommario programmi
Audio Immagine Normale
Impostazioni OSD
Per chiudere il menu premere il tasto rosso M
Impostazioni dell’immagine
Per le fonti AV TV, CVBS, YC, YUV, SCART1, SCART2, Hdmi
Per fonti PC RGB, DVI
Formati immagine per fonti AV
Formato immagine
Schermo intero
Impostazioni del suono avanzate
Formati immagine per fonti PC
Equalizzatore utente
Televideo
Collegamento apparecchi esterni
Collegamento a SCART1 / SCART2
Collegamento agli ingressi component YUV
Collegamento all’ingresso video S
Il voltaggio alla voce di menu Rilevazione formato
Collegamento all’ingresso Hdmi
Collegamento all’ingresso DVI-I del PC
Impostazioni per il PC RGB
Selezionare ingressi
Impostazioni per il Pcdvi
Funzioni speciali
Screensaver Solo televisore al plasma
Eliminazione degli errori
Errore Possibile Causa Possibile Rimedio
Dati tecnici Myrica VQ40-1
Dati tecnici Myrica PQ42-1
Range Frequenza PC
Dati tecnici Myrica PQ50-1