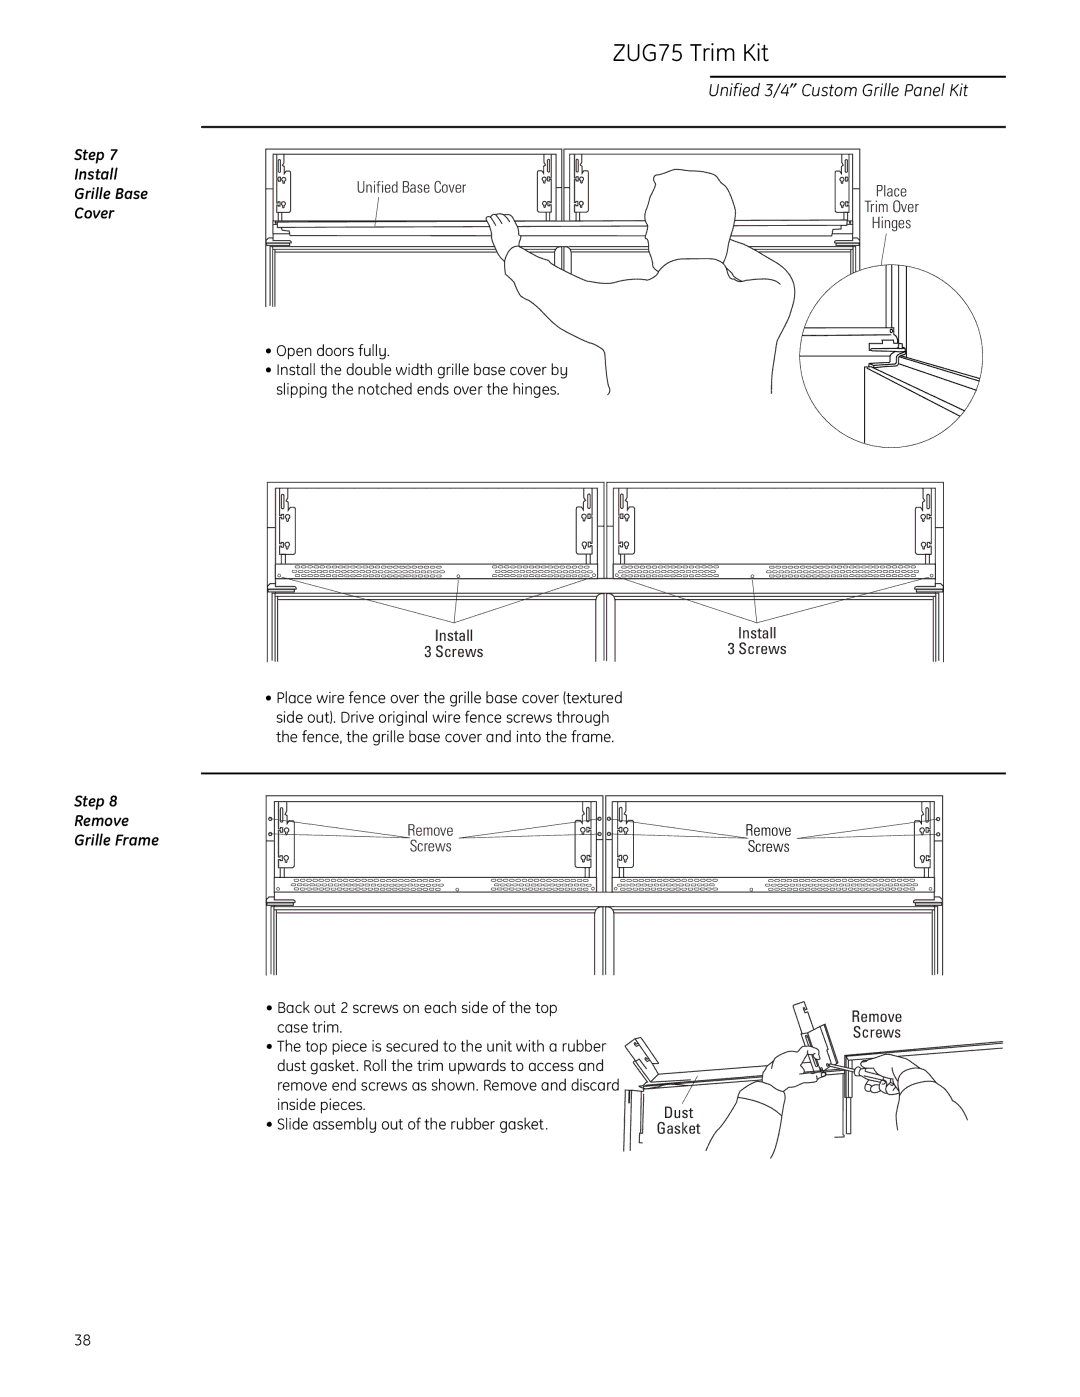
ZIR36N RH - All Refrigerator
36″ Refrigerators and 36″ Freezers
ZIR36N LH – All Refrigerator
ZIF36N LH - All Freezer ZIF36N RH - All Freezer
PRUDENCE
WARN
03/4
Design Information
36″ Refrigerators, Freezers
And Refrigerator
When Installed into a corner
Side By Side Installation Of Freezer
Design Information
Installation Between Base and Wall Cabinets
Installation At End-of-Run
36″ Refrigerators, Freezers
Models
Design Information
36″ Refrigerators, Freezers
ZIR36N RH, Refrigerator ZIF36N RH, Freezer
36″ Refrigerators, Freezers
Custom Panel Dimensions
Additional Specifications
ZIR36N Refrigerator ZIF36N Freezer
Panels secured to 1/4″ thick backing
Custom Panel Dimensions
1/4″ thick panels
36″ Refrigerators, Freezers
Custom Panel Dimensions
Custom Door Panel Dimensions
ZIR36N Refrigerator ZIF36N Freezer
Custom Panel Dimensions
36″ Refrigerators, Freezers
35 1/4 3/4 Thick Custom Panel With Custom Handle
36″ Refrigerators, Freezers
Custom Panel Dimensions
Side Panel or Filler Options
36″ Refrigerators, Freezers
Installation
PRUDENCE
IMPORTANT - Please read carefully
PRUDENCE
Installation
PRUDENCE
36″ Refrigerators, Freezers
Installation
Install
Step
Step 4 Install
Installation
Step Install Side Panels
ANTI-TIPPRECAUTIONS
36″ Refrigerators, Freezers
Installation
PRUDENCE
Copper Tubing
36″ Refrigerators, Freezers
Installation
installation height
To insert custom grille panel into the frame
36″ Refrigerators, Freezers
Installation
Door Hinge Case Hinge
ZGC2 Trim Kit
Grille Panel Frame Adjustment
ZKHR1 Trim Kit For 1/4″ Panels
Support for Custom Handles
Step 2 Locate handle position
ZKHR1 Trim Kit For 1/4″ Panels
Support for Custom Handles
Step 3 Assemble panel, extrusion and handle
ZKTR36LH/ZKTR36RH Trim Kit
3/4″ Custom Panels
Step
ZKTR36LH/ZKTR36RH Trim Kit
3/4″ Custom Panels
Step
ZKTR36LH/ZKTR36RH Trim Kit
3/4″ Custom Panels
ZKTR36LH/ZKTR36RH Trim Kit
3/4″ Custom Panels
Tools and materials required
ZKHTR1 Trim Kit For 3/4″ Panels
Support for Custom Handles
Part List
Step 1 Temporarily mount door panel
ZKHTR1 Trim Kit For 3/4″ Panels
Support for Custom Handles
Open door fully to stop
ZKHTR1 Trim Kit For 3/4″ Panels
Support for Custom Handles
Mount assembled panel
ZKHRSS1 Trim Kit For 1/4″ Panels
Tubular Stainless Steel Handles
ZKHRSS1 Trim Kit For 1/4″ Panels
FOR CUSTOM WOOD PANELS
FOR STAINLESS STEEL PANELS
ZKHRSS1 Trim Kit For 1/4″ Panels
Step Install standoffs onto handles
Step Install handles and panels
Tubular Stainless Steel Handles
FOR STAINLESS STEEL PANELS
Step 4A Install handles and panels
ZKHRSS1 Trim Kit For 1/4″ Panels
Tubular Stainless Steel Handles
ZKHTRSS1 For 3/4″ Panels
Contents
Before you
Tubular Stainless Steel Handles
Install screws at the top and hinge side
ZKHTRSS1 For 3/4″ Panels
It is best that 2 people perform this step
ZUG75 Trim Kit
Unified 3/4″ Custom Grille Panel Kit
ZUG75 Trim Kit
ANTI-TIPPRECAUTIONS
PRUDENCE
Unified 3/4″ Custom Grille Panel Kit
ZUG75 Trim Kit
Install Center
Step Remove Wire Fence and Switch Cover
Unified 3/4″ Custom Grille Panel Kit
Step Install Grille Base Cover Step Remove
ZUG75 Trim Kit
Grille Frame
Unified 3/4″ Custom Grille Panel Kit
Step Install Soffit Vent Top Step Secure
ZUG75 Trim Kit
Custom Panel To Support
Door Hinge Case Hinge
For Monogram local service in your area, call
ZUG75 Trim Kit
Unified 3/4″ Custom Grille Panel Kit