HP Part No. A4190-90023 Edition E0997
Model B132L/B132L+/B160L/B180L Owner’s Guide
Page
Contents
Contents
Using Your Digital Data Storage DDS Tape Drive
Using Your 3.5-Inch Floppy Disk Drive
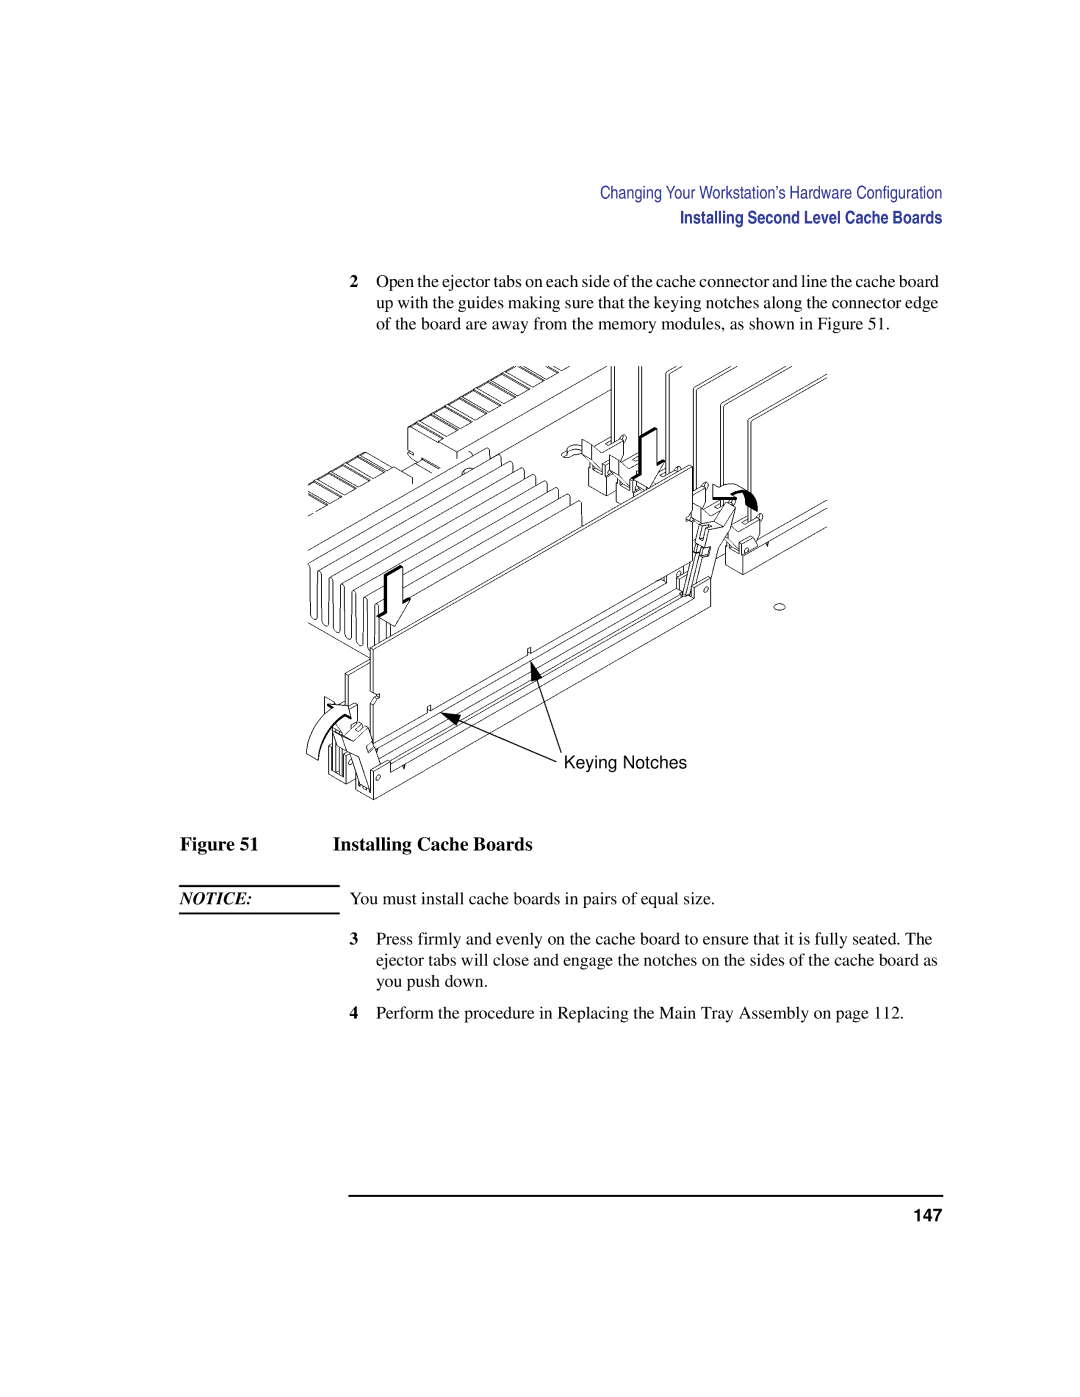
Changing Your Workstation’s Hardware Configuration
Viii
Boot Console Interface
Displaying the Current Memory Configuration 214
Figures
Xii
Xiii
Tables
Preface
Release Documents
Safety and Regulatory Statements
Audience
Revision History
Related Manuals
To order manuals, please contact your local sales office
A4190-90023 E0997 First printing
Literal values
Documentation Conventions
Problems, Questions, and Suggestions
Page
System Overview
System Overview
Product Description
B Class workstations have the following key features
Product Description
System Unit Front Panel Controls
System Unit Front Panel Controls and LEDs
Power LED
System Power Switch
Use the Power switch to power the system unit on and off
Power LED lights when the system unit power is on
Next to the system LEDs are the following audio controls
Audio Controls
Removable Storage Devices
System Unit Rear Panel Connectors
System Unit Rear Panel Connectors
Security Loop
Audio Connectors
Max Output Level/Impedance
Signal to Noise
Output Impedance
THD w nominal load
HP Parallel I/O Connector
Keyboard Connectors
Network Connectors
PS/2 Keyboard and Mouse Connectors
Serial I/O Pins Pin No Signal Description
Serial I/O Connectors
Scsi Connectors
TOC Button
Power Cord Connector
Pointing Devices
Monitors
Keyboard
Operating System Overview
Usr/sbin/lanscan
Important Information You Need to Record
You will see a table similar to Table
IP Address and Subnetwork Mask Information
Sample Lanscan Command Table
Networking Overview
Rlogin
Mail
Telnet
Ftp
Man rlogin
Rcp
Man ftp
Networking Overview
Using Your CD-ROM Drive
Using Your CD-ROM Drive
CD-ROM Drive
CD-ROM Drive and CD-ROM Media Descriptions
CD-ROM Drive Controls and Features
Controls and Features
Control/Feature Purpose
CD-ROM Drive Operating Controls and Features
Caring for CD-ROM Discs
CD-ROM Media
Loading and Unloading a CD-ROM in the Disc Tray
Operating the CD-ROM Drive
Disc Tray Description
CD-ROM Disc Tray
Placing a CD-ROM Disc in a Horizontally Mounted Drive
Loading a CD-ROM Disc in a Horizontally Mounted Drive
Removing a CD-ROM Disc From a Horizontally Mounted Drive
Unloading a CD-ROM Disc in a Horizontally Mounted Drive
Releasing the Disc Holder Retainers
To load a disc in the CD-ROM drive, follow these steps
Loading a CD-ROM Disc in a Vertically Mounted Drive
Placing a CD-ROM Disc in a Vertically Mounted Drive
Removing a CD-ROM Disc From a Vertically Mounted Drive
Unloading a CD-ROM Disc in a Vertically Mounted Drive
Usr/sbin/ioscan -d sdisk Return
If you receive this message, go to , Solving Problems
Verifying the CD-ROM Drive Operation
Mounting and Unmounting a CD-ROM Disc
Mounting a CD-ROM Disc Using SAM
Following screen messages appear
System Administration Manager window opens. Double-click on
Click on OK
Following screen message appears
Unmounting a CD-ROM Disc Using SAM
Disks and File Systems window opens. Double-click on CD-ROM
Window with the following message opens
Reading the Busy Light
Defective disc
Troubleshooting
Troubleshooting
Using Your Digital Data Storage DDS Tape Drive
Using Your Digital Data Storage DDS Tape Drive
DDS Drive
DDS Tape Drive and Data Cassette Descriptions
Storage Capacities
DDS-2
DDS-DC Early Model Drive Controls and Indicators
Controls and Indicators
DDS-DC Later Model Drive Controls and Indicators
DDS-2 Drive Controls and Indicators
DDS-DC Early Model Tape Drive LED Display Codes
LEDs
LED Warning Conditions
DDS-DC Later Model and DDS-2 Tape Drive LED Display Codes
Media Life
Data Cassettes
Media Restrictions
Cleaning the Tape Heads
Setting the Write-Protect Tab on a DDS Tape
Setting the Write-Protect Tab on a Data Cassette
Loading and Unloading a Data Cassette
Operating the DDS Tape Drive
Loading and Unloading a Data Cassette
Usr/sbin/ioscan -d stape
Verifying the DDS Tape Drive Operation
Using Device Files
Writing to a Data Cassette
Archiving Data
Tar -tvf /dev/rmt/devicefile
Restoring Files from a Data Cassette to Your System
Listing the Files on a Data Cassette
Man tar
Further Command Information
Ordering Information
Using Your 3.5-Inch Floppy Disk Drive
Using Your 3.5-Inch Floppy Disk Drive
Setting the Write-Protect Tab on a Floppy Diskette
Using the Floppy Diskette
Setting the Write-Protect Tab on a Diskette
Inserting and Removing a Floppy Diskette
Inserting and Removing a Diskette
Sbin/ioscan
Verifying the Floppy Drive Configuration
Operating the Floppy Drive
Disks and File Systems Disks and File Systems window opens
Mediainit -i 2 devicefile
Formatting a New Diskette
Restoring Files from a Floppy Diskette to Your System
Transferring Data To and From a Floppy Diskette
Saving Files to a Floppy Diskette
Tar -tvf devicefile
Listing the Files on a Floppy Diskette
For More Information
Configuring the Floppy Driver
Troubleshooting
Solving Problems
Solving Problems
Problems with Powering Up the System
Common Problems and Solutions
Power Up Problems
Problem Solution
Problems Loading and Booting the Operating System
Problems Loading and Booting the Operating System
Problems with the 802.3 Network
Problems with the 802.3 Network
Work and offers solutions
Problems Using a Hard Disk Drive
Problems Using a Hard Disk Drive
Describes a possible problem you may encounter when you use
Problems Using the CD-ROM Drive
CD-ROM drive and offers a solution
Problems Using the CD-ROM Drive
Problems Using the DDS Tape Drive
Problems Using the DDS Tape Drive
Problems Using the Floppy Disk Drive
Problems Using the Floppy Disk Drive
Disk drive and offers a solution
System Unit Front Panel LEDs
LED Error Codes
Likely cause SIMMs or processor board
LED Error Codes
Dealing with a Boot Failure
Man cstm Man mstm Man xstm
Running System Verification Tests
Cstm verify all
Cstm
Usr/sbin/ioscan -fun
Device Verification
Man ioscan
Usr/sbin/insf
Safety and Regulatory Statements
Safety and Regulatory Statements
Declaration of Conformity
Declaration of Conformity
For EN55022 or Cispr 22 Applications
Special Video Configuration Statements
Federal Communications Commission FCC
Emissions Regulations
Vcci Class 2 ITE
Emissions Regulations Compliance
Regulation On Noise Declaration For Machines -3. Gsgv
Acoustics
Electrostatic Discharge ESD Precautions
This equipment conforms to the following safety standards
Safety Statement
Visible LEDs
Laser Safety Statement U.S.A. Only
103
104
Changing Your Workstation’s Hardware Configuration
Also, read the ESD Precautions in Appendix a of this guide
Usr/sbin/ioscan -f
Checking the Scsi IDs
108
Preparing Your Workstation
Removing the Floor Stand
Removing Main Tray Assembly
Removing the Main Tray Assembly
Replacing the Main Tray Assembly
Replacing the Main Tray Assembly
113
Installing Storage Devices
Preparing to Install Your Storage Device
CD-ROM
Front
Removing the Memory Retainer
Removing the Storage Tray
Fwscsi
Disconnecting the Storage Tray Assembly
Removing the Storage Tray Assembly
Removing the Storage Tray Cover
Removing the Storage Tray Cover
Removing a Disk Filler Panel
Installing a CD-ROM or a DDS-Format Tape Drive
Installing a CD-ROM or DDS Tape
Removing the Floppy Filler Panel
Installing a Floppy Drive
Installing the Floppy Disk Drive
Connecting the Floppy Drive Data Cable
Disconnecting the Floppy Drive Cable
Installing a Hard Disk Drive in Position 2 Front Position
Removing the Floppy Disk Drive Assembly
Installing a Hard Disk Drive in Position 2 Front Position
Replacing the Floppy Drive and Carrier
130
Installing a Hard Disk Drive in Position 1 Rear Position
Installing a Hard Disk Drive in Position 1 Rear Position
Replacing the Storage Tray Cover
Replacing the Storage Tray Cover
Replacing the Storage Tray
Installing the Storage Tray Assembly
Connecting the Storage Tray Cables
Usr/sbin/sam
Configuring a Hard Disk Drive
136
Installing Additional memory
Memory Module Location
Removing Memory Modules
Perform the following steps to remove memory modules
139
Removing a Memory Module
Perform the following steps to install memory modules
Installing Memory Modules
142
Installing Memory Modules
Cache Boards Location
Removing Cache Boards
Removing a Cache Board
Installing Second Level Cache Boards
Installing Cache Boards
Option Slots from Outside the System Unit
Installing a PCI, EISA, or GSC Option Board
Graphics Adapter Considerations
Special Video Configuration Statements
Graphics Paths
Graphics Configuration Restrictions
Removing the Option Board Support Bracket and Blank Plate
Installing the Option Board
Installing a PCI, EISA, or GSC Option Board
Removing the PCI Adapter
Replacing the Option Board Support Bracket
Replacing the Battery
156
157
Removing the Battery
159
160
Installing the Optional Egram Module
Installing the Optional Egram Enhanced Graphics RAM Module
Perform the following procedure to install the Egram module
162
Installing the Optional FWD Scsi Controller
164
Removing the Blank Plate
Installing the FWD Scsi Cable
167
Changing Your Monitor Type
Setting the Monitor Type from the Boot Console Interface
Setting the Monitor Type at Power On
Changing the Console to External Terminal
170
Scsi Connections
172
Ultra, Wide-SE
Scsi Bus Differences
Fast, Wide
Priority Address Bus
Cables
Scsi Restrictions
176
Narrow-SE Scsi Bus Configuration Constraints
Connectors and Terminators
Scsi Configuration Constraints
Type
FWD Scsi devices do not work with NSE Scsi devices
Shows the configuration constraints for each FWD Scsi device
Ultra Wide Single-Ended Scsi Bus Configuration Constraints
Ultra, Wide Single-Ended Scsi Bus Configuration Constraints
Device type
NSE Scsi Bus Length
Determining Scsi Bus Length
Bus Length Worksheet for NSE Scsi Bus
FWD Scsi Bus Length
Bus Length Worksheet for FW Scsi Bus External
Ultra, Wide-SE Scsi Bus Length
Uwse Scsi
Bus Length Worksheet for UW Scsi Bus External
Assigning Scsi Device IDs
NSE Scsi Device IDs
External Device Drives
FWD Scsi IDs
Ultra, Wide-SE Scsi IDs
189
System contains three 3 external Scsi connectors
Connecting to the Scsi Ports
Rear Panel Scsi Connectors without Terminators
Scsi Port Connection
191
192
Boot Console Interface
194
Boot Console Interface Features
196
197
198
199
To access the boot console interface, follow these steps
Accessing the Boot Console Interface
Booting Your Workstation
ISL hpux /stand/vmunix.prev
Where devicetype is one of the following
Searching for Bootable Media
Resetting Your Workstation
Displaying and Setting Paths
Type Specification Format
Mnemonic Style Notation
207
Monitor Command
Displaying and Setting the Monitor Type
Correct usage for setting the graphics configuration is
Monitor
This places you in the Configuration Menu. From here, enter
Displaying the Current Monitor Configuration
Setting the Monitor Type
211
To restart the monitor selection process, press TAB
213
This places you in the Information Menu. From here type
Displaying the Current Memory Configuration
Memory Information Sample
Module Information Iodc Iodc
Displaying the Status of the System I/O
Where state is on or off
Setting the Auto Boot and Auto Search Flags
Autosearch searches for devices in the following order
To set the SECure flag on or off, enter one of the following
Displaying and Setting the Security Mode
Secure
Secure on Secure off
To enable fastboot, type the following at the prompt
Displaying and Setting the Fastboot Mode
To disable fastboot, type the following at the prompt
Address is for the system’s built-in LAN
Displaying the LAN Station Address
Configure and Display LAN Settings B132L+/B180L Only
223
Displaying System Information
Displaying PIM Information
226
Glossary
Bootstrap service See boot
Control key sequence a keystroke
Cluster. See also cluster, cluster client, cluster server
229
230
Pathname
Iconify See iconize
Workstation, diskless workstation, workstation
Option See command option
Mouse pointer See pointer
Scsi See Small Computer System In- terface
Root See superuser
235
Working directory See current work- ing directory
System name See internet protocol address
Utility See utility program
237
238
Index
Index
241
242