USER’S Guide
General Setup
Table of Contents
Getting Started
General Operation
Other Hearing Instrument Tests
Hearing Instrument Tests Setup
Ansi S3.22 Hearing Aid Tests
REM Manual Control
Speechmap Technical Details
Speechmap Fitting Procedures
Troubleshooting
Help is available on the following topics by pressing Help
About RM500SL
Section overview
FastFacts 1.3 Electronic users guide
FastFacts 1.4 Warranty, trademarks, acknowledgements
Warranty, Trademarks, Acknowledgements
Cispr
Electromagnetic Compatability EMC
FastFacts 2.2 Unpacking and connecting
FastFacts 2.1 Getting started Unpacking and connecting
Getting Started
Following topics are covered in this section
FastFacts 2.3 Microphone connection
Microphone connection
FastFacts 2.5 Battery pill use and care
FastFacts 2.4 Microphone care Battery pill use and care
Microphone care Coupler microphone
Probe microphone
FastFacts 2.6 Mouse, keyboard, barcode scanner
Mouse, keyboard, barcode scanner
External printer, auxiliary audio outputs
General Operation
FastFacts 2.7 External printer, auxiliary audio outputs
Section overview This section covers the following topics
FastFacts 3.2 Input device operation
Input device operation
Function Keypad
FastFacts 3.3 Barcode data input
Barcode data input
FastFacts 3.4 Keypad keys
Keypad keys Function Button
FastFacts 3.5 Menus, lists and buttons
Menus, lists and buttons Setup Box List Box
Screen messages
FastFacts 3.7 Program memory removal and replacement
FastFacts 4.1 General setup Date and time setup
General Setup
FastFacts 4.2 Date and time setup
Software updating
FastFacts 4.4 Saving test setup
Display settings
FastFacts 4.3 Display settings Saving test setup
FastFacts 5.2 Networking requirements
Networking
FastFacts 5.1 Networking Networking requirements
FastFacts 5.3 Networking setup
Networking setup
FastFacts 5.4 Single computer connection
Single computer connection
On the RM500SL, see
FastFacts 6.1 Printing and storing results
Printing and Storing Results
FastFacts 6.2 Internal printer paper loading
Internal printer paper loading
To load a new roll of paper
Barcodes, headers and comments on printouts
FastFacts 6.4 Local printer setup
FastFacts 6.5 Printing to a USB memory stick
Printing to a USB memory stick
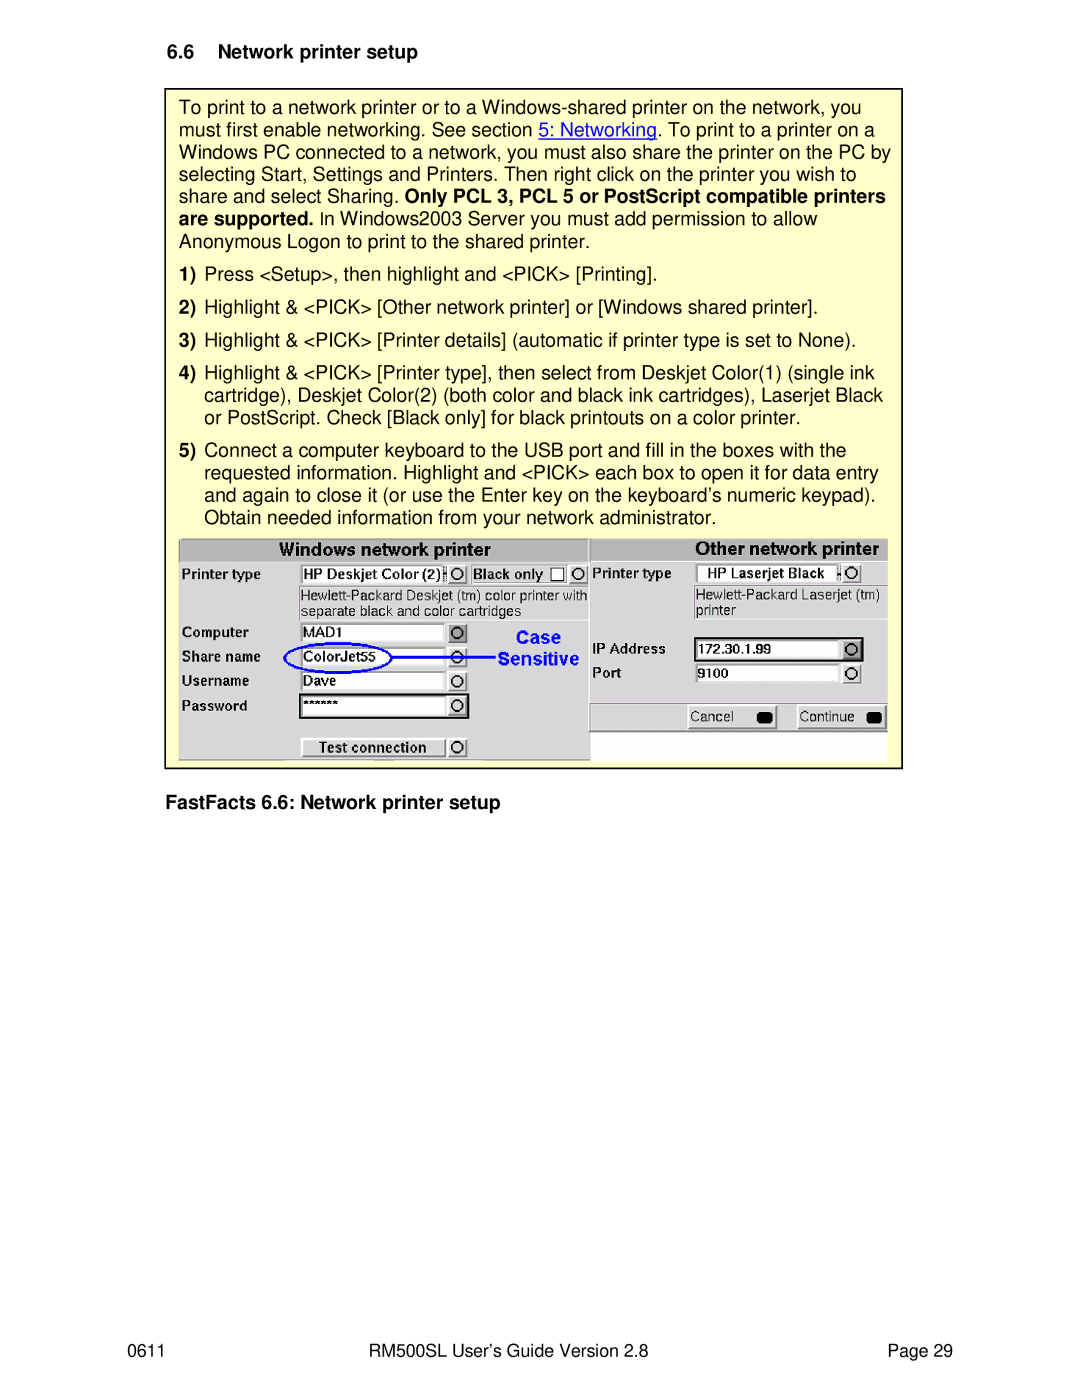
FastFacts 6.6 Network printer setup
Network printer setup
FastFacts 6.8 Data storage to a network file
Printing to a network file
FastFacts 7.2 HIT a or B display Graph or table format
Hearing Instrument Tests Setup
FastFacts 7.3 Graph or table format Output or gain scale
FastFacts 7.4 Output or gain scale
FastFacts 7.7 Ansi test frequencies
Hide or Show HIT curves
To change the averaging frequencies
FastFacts 7.8 HIT calibration facts
HIT calibration facts
FastFacts 7.9 Calibration of HIT reference microphone
FastFacts 7.10 Calibration check for coupler microphone
Calibration check for coupler microphone
Coupling the hearing instrument
FastFacts 7.12 Positioning the hearing instrument
Positioning the hearing instrument
FastFacts 8.2 Ansi S3.22-1996 facts
Ansi S3.22 Hearing Aid Tests
FastFacts 8.4 Ansi 1996 Linear and AGC tests
Ansi S3.22-2003 facts
Turn the instrument on
FastFacts 8.5 Ansi 2003 Linear and AGC tests
Ansi 2003 Linear and AGC tests
FastFacts 8.6 Ansi test results
Ansi test results
FastFacts 8.7 Ansi input-output curves
Ansi input-output curves
FastFacts 8.8 Ansi telecoil terminology
Ansi telecoil terminology
FastFacts 8.9 Ansi telephone simulator Tmfs test
Ansi telephone simulator Tmfs test
FastFacts 8.10 Telecoil test results
Telecoil test results
FastFacts 9.2 Harmonic distortion
Other Hearing Instrument Tests
Turn the hearing instrument on
FastFacts 9.4 Multicurve results
Multicurve procedure
FastFacts 9.3 Multicurve procedure Multicurve results
Spectral analysis in Multicurve
FastFacts 9.6 Battery drain test
FastFacts 9.8 Sound level meter using manual control
Manual control procedure
FastFacts 10.2 REM calibration facts
Real-Ear Measurement Setup
FastFacts 10.3 Calibration of REM probe microphone
Calibration of REM probe microphone
Calibration check for probe module
FastFacts 10.6 ABR nHL to eHL setup
Max TM SPL setup
FastFacts 10.5 Max TM SPL setup 10.6 ABR nHL to eHL setup
FastFacts 10.8 Positioning the probe tube
Positioning the client
FastFacts 11.3 Graph, table or 2cc target format
REM Screen Setup
SPL or HL scale
REM Manual Control
FastFacts 11.4 SPL or HL scale Hide or show REM curves
FastFacts 11.5 Hide or show REM curves
Manual control measurements
FastFacts 12.3 Sound level meter using REM probe
FastFacts 13.2 Sensory loss simulator operation
Sensory Loss Simulator
Sensory loss simulator description
Occlussion effect measurement
Occlusion Effect Test
Turn the hearing aid OFF
FastFacts 14.1 Occlusion effect measurement
FastFacts 15.2 Recd facts
Recd real-ear to coupler difference
FastFacts 15.3 Recd coupler response
Recd coupler response
FastFacts 15.4 Recd real-ear response
Recd real-ear response
Allow the foam tip to fully expand in the ear
FastFacts 15.5 Recd results
Recd results
FastFacts 16.2 Insertion gain in SPL
Insertion Gain
FastFacts 16.1 Insertion gain Insertion gain in SPL
FastFacts 16.3 Insertion gain in HL
Insertion gain in HL
To enter data from a barcode see 3.3 Barcode data input
Audiometric data entry
To enter assessment data and parameters manually
FastFacts 16.4 Audiometric data entry
FastFacts 16.5 Reur measurement procedure
Reur measurement procedure
FastFacts 16.6 Rear measurement procedure
Rear measurement procedure
FastFacts 16.7 SII calculation in Insertion gain
SII calculation in Insertion gain
FastFacts 17.2 Speechmap facts
Speechmap
FastFacts 17.1 Speechmap 17.2 Speechmap facts
FastFacts 17.3 DSL 5.0 in Speechmap
DSL 5.0 in Speechmap
FastFacts 17.5 NAL-NL1 in Speechmap
DSL 5.0 changes
FastFacts 17.4 DSL 5.0 changes NAL-NL1 in Speechmap
To enter audiometric data, see 18.2 Assessment data entry
Using Speechmap
FastFacts 17.6 Using Speechmap
0611 RM500SL User’s Guide Version
FastFacts 17.9 REM or S-REM mode
REM or S-REM mode
FastFacts 17.10 SII calculation in Speechmap
17.10SII calculation in Speechmap
FastFacts 18.2 Assessment data entry
Speechmap Fitting Procedures
To enter assessment data manually
FastFacts 18.3 Assessment data choices
Assessment data choices
FastFacts 18.4 Assessment data choices
From 18.3 Assessment data choices
FastFacts 18.5 Fitting to targets for soft speech
Fitting to targets for soft speech
FastFacts 18.6 Fitting to targets for loud sounds
Fitting to targets for loud sounds
FastFacts 18.8 Open fittings in Speechmap
Fitting to targets for mid-level speech
FastFacts 18.9 FM fitting and verification
FM fitting and verification
FastFacts 19.2 Speechmap stimuli
Speechmap Technical Details
FastFacts 19.3 Stimulus levels
Stimulus levels
FastFacts 19.4 Microphone location effects
Microphone location effects Microphone Location Effects
FastFacts 19.5 Speech signal analysis
Speech signal analysis
FastFacts 20.2 Self test failures
Troubleshooting
FastFacts 20.1 Troubleshooting Self test failures
FastFacts 20.4 HIT curves inconsistent
FastFacts 20.7 No HIT reference mic. detected
No HIT reference mic. detected
FastFacts 20.10 Invalid REM calibration
Invalid HIT calibration Invalid HIT Calibration
FastFacts 20.12 Barcode scanner malfunction
20.11REM speaker overdriven
Storage & Transportation
Technical Specifications
General
HIT Chamber
Glossary
Page
Page
Page
References
Page
Page
0611 RM500SL User’s Guide Version
Introduction
Verifit and RM500SL Test Signals and Analysis
Test signals
Broad-band signals
Loud Vocal Effort Effect re nominal band SPL
Pink noise signal analysis
Analysis of broad-band signals
Verifit / RM500SL Speechmap
07/05/06
Example of speech envelope and Ltass
07/05/06
Ltass for Speechmap speech signals at average vocal effort
Ltass
Dynamic