Lengüetas
Puerta
Delantera

PARRILLAS DEL

HORNO

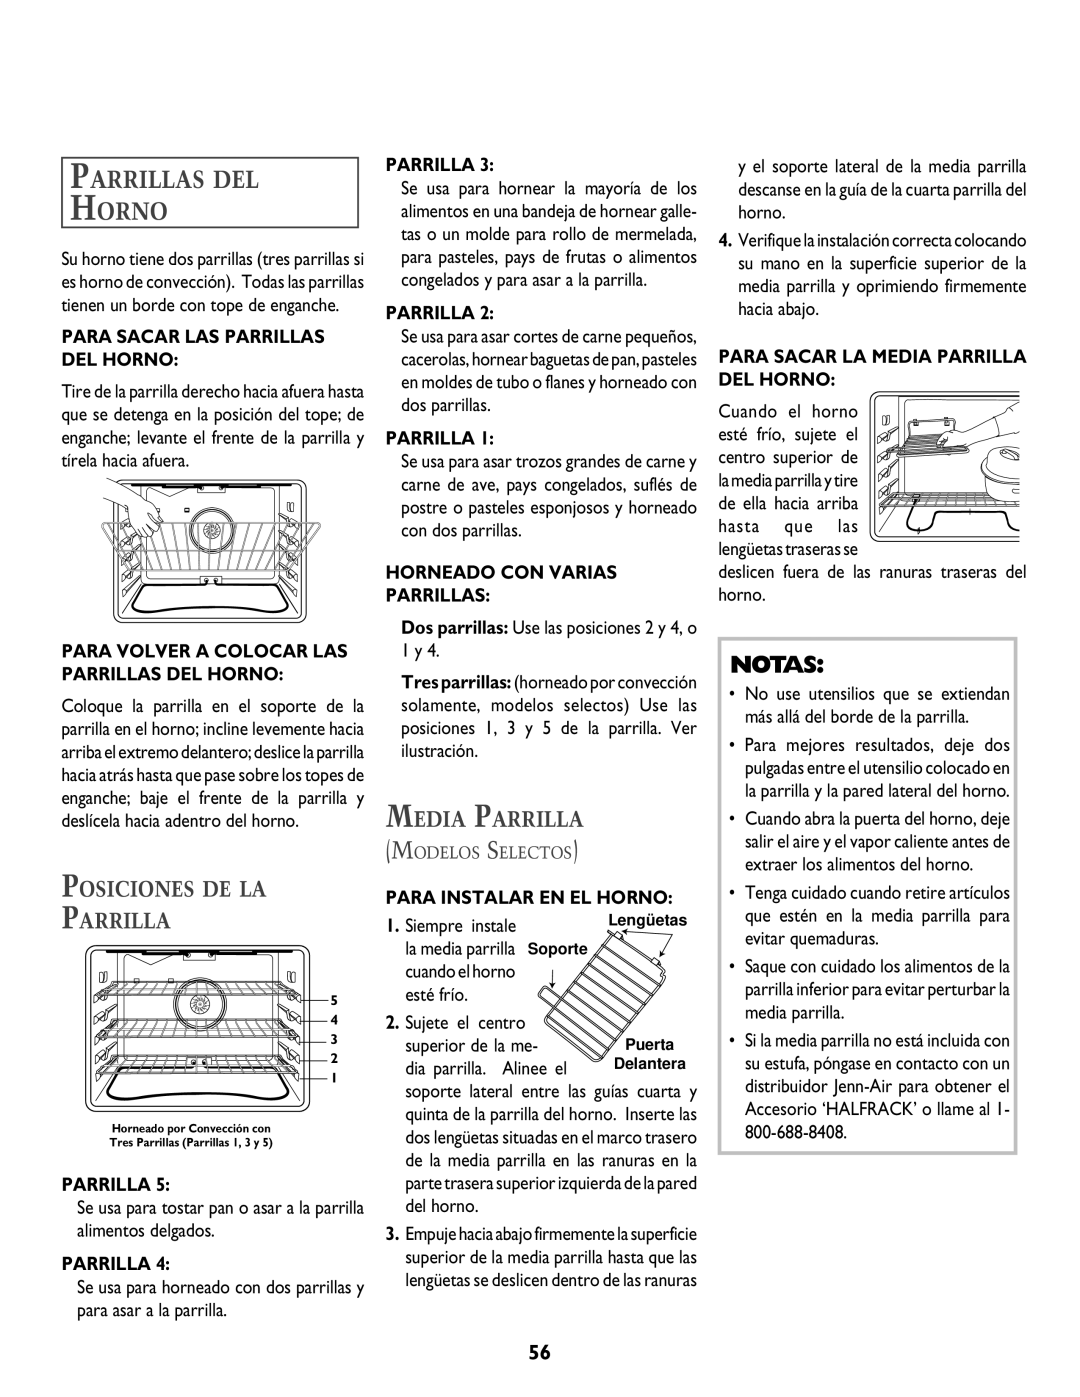
Su horno tiene dos parrillas (tres parrillas si es horno de convección). Todas las parrillas tienen un borde con tope de enganche.

PARA SACAR LAS PARRILLAS DEL HORNO:

Tire de la parrilla derecho hacia afuera hasta que se detenga en la posición del tope; de enganche; levante el frente de la parrilla y tírela hacia afuera.

PARA VOLVER A COLOCAR LAS PARRILLAS DEL HORNO:

Coloque la parrilla en el soporte de la parrilla en el horno; incline levemente hacia arriba el extremo delantero; deslice la parrilla hacia atrás hasta que pase sobre los topes de enganche; baje el frente de la parrilla y deslícela hacia adentro del horno.

POSICIONES DE LA

PARRILLA

5

4

3

2

1

Horneado por Convección con

Tres Parrillas (Parrillas 1, 3 y 5)

PARRILLA 5:

Se usa para tostar pan o asar a la parrilla alimentos delgados.

PARRILLA 4:

Se usa para horneado con dos parrillas y para asar a la parrilla.

PARRILLA 3:

Se usa para hornear la mayoría de los alimentos en una bandeja de hornear galle- tas o un molde para rollo de mermelada, para pasteles, pays de frutas o alimentos congelados y para asar a la parrilla.

PARRILLA 2:

Se usa para asar cortes de carne pequeños, cacerolas, hornear baguetas de pan, pasteles en moldes de tubo o flanes y horneado con dos parrillas.

PARRILLA 1:

Se usa para asar trozos grandes de carne y carne de ave, pays congelados, suflés de postre o pasteles esponjosos y horneado con dos parrillas.

HORNEADO CON VARIAS

PARRILLAS:

Dos parrillas: Use las posiciones 2 y 4, o 1 y 4.

Tres parrillas: (horneado por convección solamente, modelos selectos) Use las posiciones 1, 3 y 5 de la parrilla. Ver ilustración.

MEDIA PARRILLA

(MODELOS SELECTOS)

PARA INSTALAR EN EL HORNO:

1. Siempre instale

la media parrilla Soporte cuando el horno esté frío.

2.Sujete el centro

superior de la me-

dia parrilla. Alinee el

soporte lateral entre las guías cuarta y quinta de la parrilla del horno. Inserte las dos lengüetas situadas en el marco trasero de la media parrilla en las ranuras en la parte trasera superior izquierda de la pared del horno.

3.Empuje hacia abajo firmemente la superficie superior de la media parrilla hasta que las lengüetas se deslicen dentro de las ranuras

y el soporte lateral de la media parrilla descanse en la guía de la cuarta parrilla del horno.

4.Verifique la instalación correcta colocando su mano en la superficie superior de la media parrilla y oprimiendo firmemente hacia abajo.

PARA SACAR LA MEDIA PARRILLA DEL HORNO:

Cuando el horno

esté frío, sujete el centro superior de la media parrilla y tire

de ella hacia arriba hasta que las

lengüetas traseras se

deslicen fuera de las ranuras traseras del horno.

NOTAS:

No use utensilios que se extiendan más allá del borde de la parrilla.

Para mejores resultados, deje dos pulgadas entre el utensilio colocado en la parrilla y la pared lateral del horno.

Cuando abra la puerta del horno, deje salir el aire y el vapor caliente antes de extraer los alimentos del horno.

Tenga cuidado cuando retire artículos que estén en la media parrilla para evitar quemaduras.

Saque con cuidado los alimentos de la parrilla inferior para evitar perturbar la media parrilla.

Si la media parrilla no está incluida con su estufa, póngase en contacto con un distribuidor Jenn-Air para obtener el Accesorio ‘HALFRACK’ o llame al 1- 800-688-8408.

56

Page 57
Image 57
Jenn-Air DUAL-FUEL SLIDE-IN RANGE warranty Parrillas DEL Horno, Posiciones DE LA Parrilla, Media Parrilla

DUAL-FUEL SLIDE-IN RANGE specifications

The Jenn-Air DUAL-FUEL SLIDE-IN RANGE represents a pinnacle in cooking technology, combining the precision of gas cooking with the consistent heat of electric ovens. Designed for the modern culinary enthusiast, this range elevates kitchen aesthetics while delivering powerful performance.

One of the standout features of this range is its dual-fuel system, which utilizes a gas cooktop and an electric oven. This combination allows for superior control over cooking temperatures on the stovetop, ideal for techniques such as sautéing, simmering, and searing. The gas burners are designed with varying BTU outputs, providing flexibility that caters to every cooking style, from gentle delicate adjustments to rapidly boiling water.

The electric oven, on the other hand, ensures even baking and roasting, thanks to advanced technologies such as convection cooking. This feature circulates heated air throughout the oven, producing even results and significantly reducing cooking times. The oven also boasts a self-cleaning function, saving users from the tedious chore of manual cleaning.

Another key characteristic of the Jenn-Air DUAL-FUEL SLIDE-IN RANGE is its sleek, integrated design. With a seamless built-in appearance, it allows for a sophisticated look that enhances any kitchen decor. The control panel is equipped with intuitive touch controls and a digital display, making it easy to select cooking settings and monitor temperatures.

Moreover, this range offers advanced safety features, including a flame sensing technology that ensures burners are lit correctly, reducing the risk of gas leaks. Additionally, the oven comes with a locking safety feature, providing peace of mind when children are present.

In terms of customization, this Jenn-Air range offers various burner configurations and stovetop layouts, allowing users to tailor their cooking experience. The high-quality materials used in construction guarantee durability and ease of cleaning, with stainless steel finishes that resist stains and scratches, ensuring that the appliance looks as good as it performs.

In summary, the Jenn-Air DUAL-FUEL SLIDE-IN RANGE combines innovative technology, stylish design, and versatile cooking options, making it an exceptional choice for both amateur cooks and seasoned chefs alike. With its blend of gas and electric features, intuitive controls, and enhanced safety mechanisms, it is a perfect addition to any modern kitchen.