GR-DVL9600
Dear Customer
It is recommended that you
EN3
This unit is produced to comply with Standard IEC Publ
AC Power Adapter
Remote Control Unit RM-V711U Video Cable DC Cord
Cleaning Cloth
Charger AA-V68EA Min DVM-30
Luminance Signal Y Lens Colour Difference Signal R-Y/B-Y
Signal Compression
About DV
Analysis Mic Conversion
Power
Charging the Battery Pack
Using the Battery Pack
Using AC Power
Tilt Viewfinder Upward Attach Battery Pack
To Detach The Battery Pack
Battery
Date/Time Settings
Getting Started
Loading/Unloading a Cassette
Open Cassette Cover
INSERT/REMOVE Tape
Close Cassette Cover
Recording Mode Setting
SET Recording Mode
10 EN
Set depending on your preference
Grip Adjustment
Viewfinder Adjustment
Shoulder Strap Attachment
12 EN
Tripod Mounting
Operation Mode
14 EN
Recording Basic Recording
Load a Cassette
Start Shooting
Stop Recording
LCD Monitor/Viewfinder Indications
Press IND. ON/OFF Button
Shooting While Watching The LCD Monitor
16 EN
Before the following steps, perform pg
Interface Shooting
Journalistic Shooting
Brightness Control
18 EN
Basic Recording
Zoom
Zoom Out
When blank portion is recorded on a tape
After playing back the recorded tape, when you shoot again
Proper recording
Shooting
20 EN
Recording Advanced Features
Displaying The Date And Time During Recording
Engage 5S Mode
END 5S Mode
Set the Power Switch to the , , or OFF position
Dissolves during 5 second recording mode
Progressive Mode Recording
Start Progressive Mode Recording
22 EN
To End Progressive Video Recording
Description of Progressive Scan CCD
Regular shooting of moving images
Frame Scan a Scan B
Scan C
Advanced Features
24 EN
Recording
Pro Snapshot
Motor Drive Mode
Progressive Mode
Pin-Up mode √ Multi-Analyser
To Remove The Shutter Sound
If the Power Switch is set to
26 EN
Snapshot Flash Auto Flash
Engage RECORD-STANDBY
Access Flash Adjustment
Flash Brightness Adjustment
Press the Select Dial
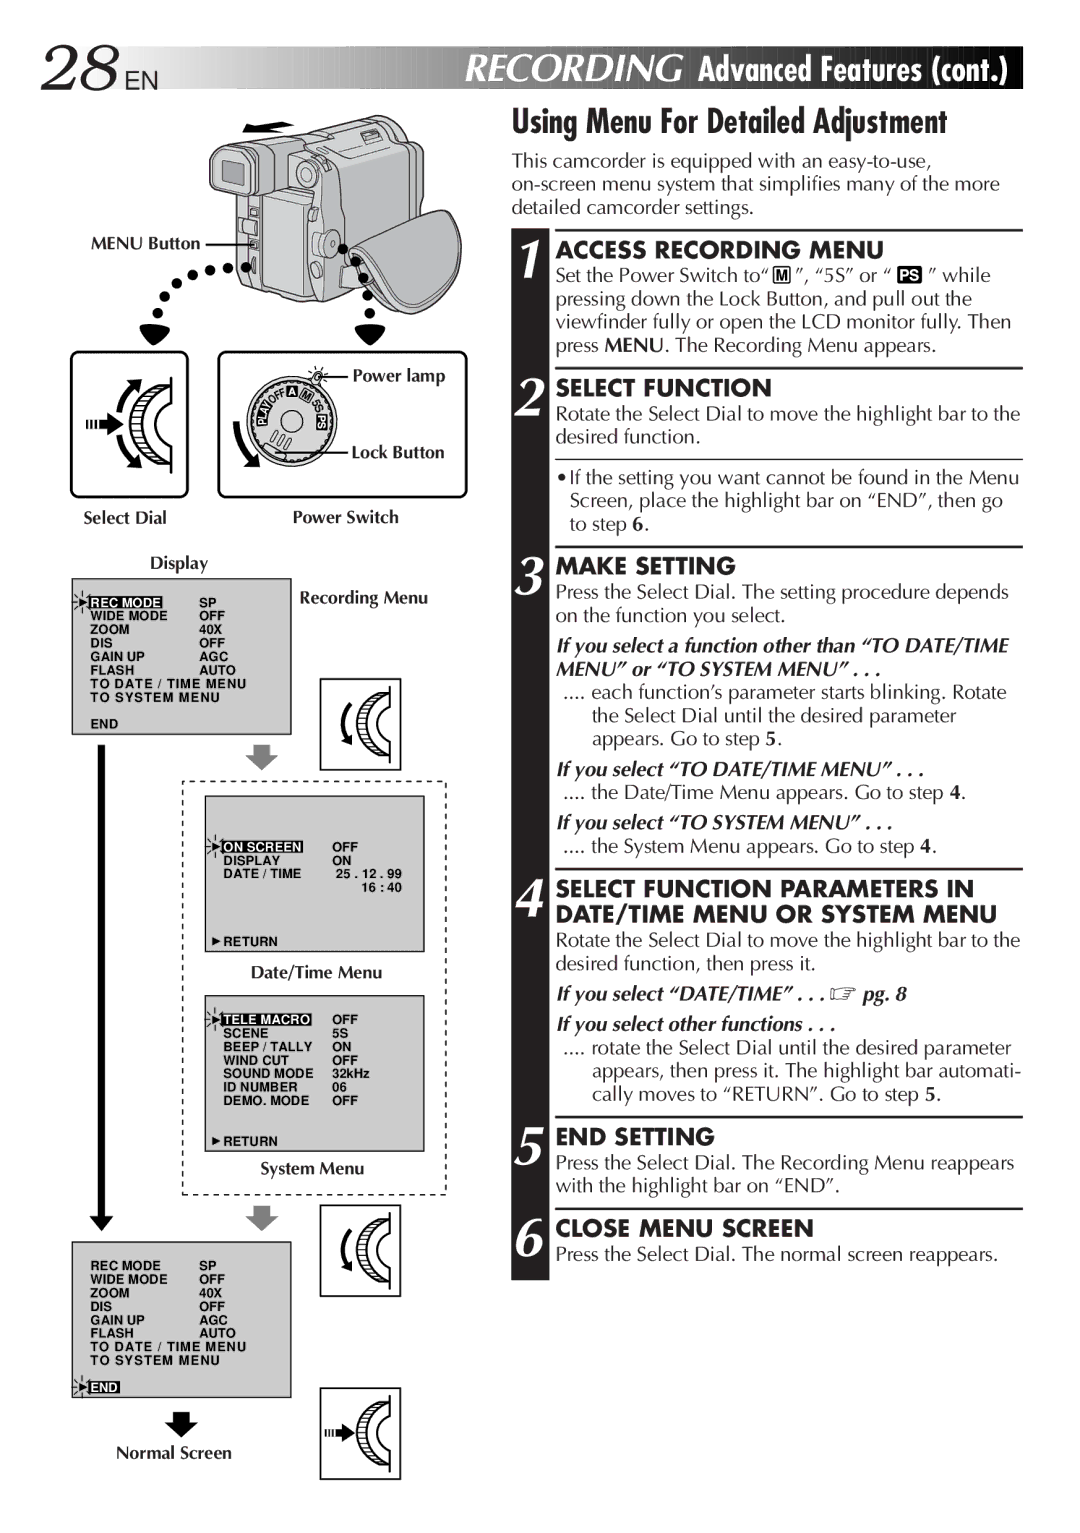
Using Menu For Detailed Adjustment
28 EN
Factory-preset
Recording Menu Explanations
Date/Time Menu Explanations
30 EN
System Menu Explanations
Fade/Wipe Effects
Effect Selection
FADE/WIPE Selection
Select Effect
32 EN
Picture Wipe or Dissolve Selection
Before the following steps, perform steps 1 through 4 on pg
If you select Picture Wipe/Dissolve during recording
Fader And Wipe Menu
Menu
Select Mode
Disable Mode
Manual Mode Item Menu AE/EFFECT Menu
34 EN
Shutter
Classic Film
Twilight
Sepia
Focusing
36 EN
Auto Focus
Patterns that are regularly repeated
Access Manual Focus
END Adjustment of Focus
Manual Focus
To nearer subject
Access Manual Mode Item Menu
Access Exposure Control
38 EN
Exposure Control
Iris Lock
Center SUBJECT, Lock Iris
Iris
To Return To Automatic Iris Control
White Balance Adjustment
Accessment White Balance Adjust
40 EN
To Return To Automatic White Balance
Enter Setting
Exit Manual White Balance Adjustment
Manual White Balance Operation
To Change The Tint For Recording
42 EN
High Speed Recording
Engage High Speed Recording Standby
END Recording
Adjust Volume
Playback Basic Playback
Rewind or Fast-forward the tape
Play Back
EN Playback
Basic Playback
Find Scene of Interest
Progressive Slow-Motion Playback
END Playback
46 EN
Playback
Playback Menu
Close Menu
Displaying The Time Code During Playback
Playback Sound
Recording sound Display Output sound
When connecting the cables, open this cover
48 EN
Basic Connections
Use the provided S-Video cable and Audio/Video cable
Connectvcr Camcorder to TV or
Connectinput VCR Output to TV Supply Power
Turn on the camcorder, the VCR and the TV
Turn on Power
50 EN
Playback Advanced Connections
Connection To a Personal Computer
Connection To a Video Unit Equipped With a DV Connector
Connect Printer to PC if Necessary
52 EN
Tape Dubbing
Digital Dubbing
Make Connections
Start Playback
Press Play 4 to play back the source tape
Installing The Battery
Pull OUT Battery Holder
Insert Battery in Holder
54EN
Functions Buttons
Switch set to the camera position
Infrared beam transmitting window
Using the Remote Control Unit
56 EN
Select Menu Remote sensor
Play 4 Button
Effect
58 EN
Random Assemble Editing R.A.Edit
SET REMOTE/VCR Code
SET Remote to Operate VCR
Make Connections
Select Scenes
EN Using the Remote Control Unit
Select Scenes
SET EDIT-IN Point
SET EDIT-OUT Point
Automatic Editing to VCR
Prepare Source Tape
Stop Editing
RM-V711U Provided T W
For More Accurate Editing
62 EN
Diagnosing VCR’S Against Camcorder Timing
Adjustment of VCR’S Against Camcorder Timing
Access Playback Menu
Power Switch Playback Menu
Input Correction Data
64 EN
Audio Dubbing
Begin Dubbing
Pause During Dubbing
Insert Editing
Find Edit OUT Point
Find Edit in Point
Pause During Editing
66 EN
Corrective Action
Symptom Possible Causes
Corrective Action
Troubleshooting
68 EN
During recording, the date
EN Troubleshooting
After Use
Remove
72EN
# Date/Time Reset Button Reset
Tally Lamp Power Lamp
Red-Eye Reduction Button
Control VOL
74 EN
Index
Indications
LCD Monitor/Viewfinder Indications During Recording
LCD Monitor/Viewfinder Indications During Playback
Indications Function
76 EN
To prolong service life
For safety, do not
Avoid using the unit
To avoid hazard
Do not leave the unit
To protect the unit, do not
About moisture condensation
Serious malfunctioning
AC Power Adapter/Charger AA-V68EA
Connectors
Camcorder
General
GR-DVL9600


 EN
EN


 Advanced
 Features
 (cont.)