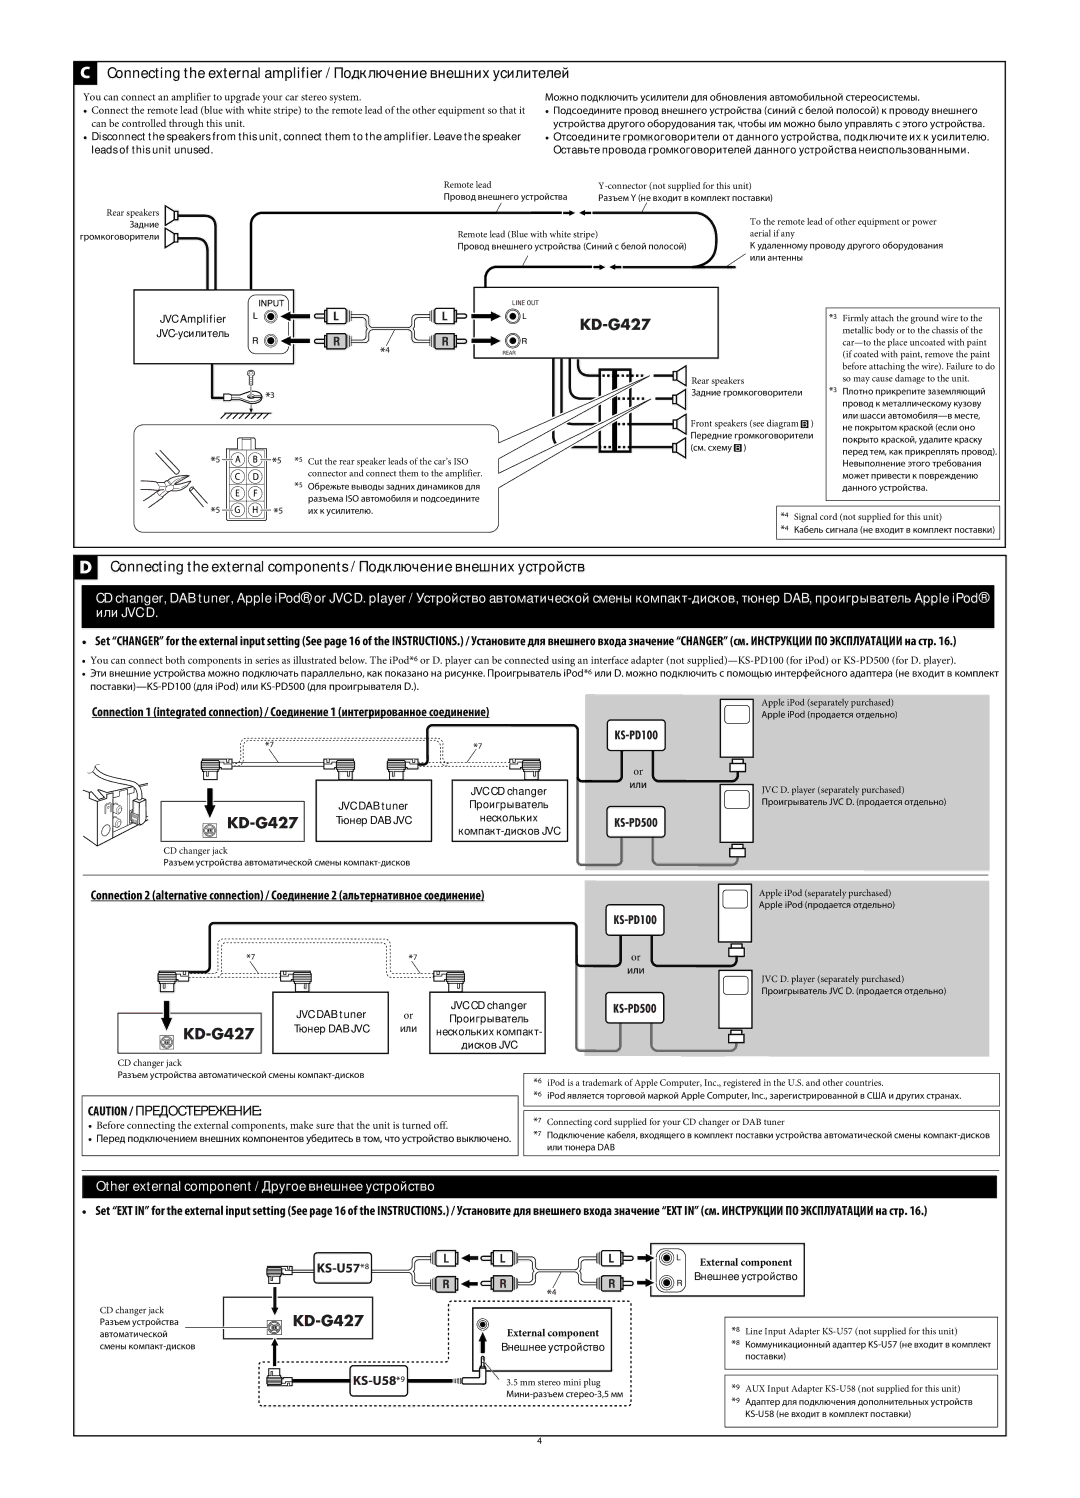
CConnecting the external amplifier / Подключение внешних усилителей

You can connect an amplifier to upgrade your car stereo system.

Connect the remote lead (blue with white stripe) to the remote lead of the other equipment so that it can be controlled through this unit.

Disconnect the speakers from this unit, connect them to the amplifier. Leave the speaker leads of this unit unused.

Можно подключить усилители для обновления автомобильной стереосистемы.

Подсоедините провод внешнего устройства (синий с белой полосой) к проводу внешнего устройства другого оборудования так, чтобы им можно было управлять с этого устройства.

Отсоедините громкоговорители от данного устройства, подключите их к усилителю. Оставьте провода громкоговорителей данного устройства неиспользованными.

Rear speakers

Задние

громкоговорители

Remote lead

Y-connector (not supplied for this unit)

Провод внешнего устройства

Разъем Y (не входит в комплект поставки)


To the remote lead of other equipment or power

Remote lead (Blue with white stripe)


aerial if any

Провод внешнего устройства (Синий с белой полосой)

К удаленному проводу другого оборудования

JVC Amplifier JVC-усилитель

*5 Cut the rear speaker leads of the car’s ISO connector and connect them to the amplifier.

*5 Обрежьте выводы задних динамиков для разъема ISO автомобиля и подсоедините

или антенны

Rear speakers

Задние громкоговорители

Front speakers (see diagram )

Передние громкоговорители (см. схему )

*3 Firmly attach the ground wire to the metallic body or to the chassis of the car—to the place uncoated with paint (if coated with paint, remove the paint before attaching the wire). Failure to do so may cause damage to the unit.

*3 Плотно прикрепите заземляющий провод к металлическому кузову или шасси автомобиля—в месте, не покрытом краской (если оно покрыто краской, удалите краску перед тем, как прикреплять провод). Невыполнение этого требования может привести к повреждению данного устройства.

их к усилителю.

*4 Signal cord (not supplied for this unit)

*4 Кабель сигнала (не входит в комплект поставки)

DConnecting the external components / Подключение внешних устройств

CD changer, DAB tuner, Apple iPod®, or JVC D. player / Устройство автоматической смены компакт-дисков, тюнер DAB, проигрыватель Apple iPod® или JVC D.

Set “CHANGER” for the external input setting (See page 16 of the INSTRUCTIONS.) / Установите для внешнего входа значение “CHANGER” (см. ИНСТРУКЦИИ ПО ЭКСПЛУАТАЦИИ на стр. 16.)

You can connect both components in series as illustrated below. The iPod*6 or D. player can be connected using an interface adapter (not supplied)—KS-PD100 (for iPod) or KS-PD500 (for D. player).

Эти внешние устройства можно подключать параллельно, как показано на рисунке. Проигрыватель iPod*6 или D. можно подключить с помощью интерфейсного адаптера (не входит в комплект

поставки)—KS-PD100 (для iPod) или KS-PD500 (для проигрывателя D.).

Connection 1 (integrated connection) / Соединение 1 (интегрированное соединение)

Apple iPod (separately purchased)

Apple iPod (продается отдельно)

JVC DAB tuner Тюнер DAB JVC

CD changer jack

Разъем устройства автоматической смены компакт-дисков

JVC CD changer Проигрыватель нескольких компакт-дисков JVC

or

или

JVC D. player (separately purchased)

Проигрыватель JVC D. (продается отдельно)

Connection 2 (alternative connection) / Соединение 2 (альтернативное соединение)

or

или

JVC DAB tuner

or

JVC CD changer

Проигрыватель

Тюнер DAB JVC

или

нескольких компакт-


дисков JVC

CD changer jack

Apple iPod (separately purchased)

Apple iPod (продается отдельно)

JVC D. player (separately purchased)

Проигрыватель JVC D. (продается отдельно)

Разъем устройства автоматической смены компакт-дисков

CAUTION / ПРЕДОСТЕРЕЖЕНИЕ:

Before connecting the external components, make sure that the unit is turned off.

Перед подключением внешних компонентов убедитесь в том, что устройство выключено.

*6 iPod is a trademark of Apple Computer, Inc., registered in the U.S. and other countries.

*6 iPod является торговой маркой Apple Computer, Inc., зарегистрированной в США и других странах.

*7 Connecting cord supplied for your CD changer or DAB tuner

*7 Подключение кабеля, входящего в комплект поставки устройства автоматической смены компакт-дисков или тюнера DAB

Other external component / Другое внешнее устройство

Set “EXT IN” for the external input setting (See page 16 of the INSTRUCTIONS.) / Установите для внешнего входа значение “EXT IN” (см. ИНСТРУКЦИИ ПО ЭКСПЛУАТАЦИИ на стр. 16.)

CD changer jack

Разъем устройства автоматической смены компакт-дисков

External component

Внешнее устройство

3.5mm stereo mini plug

Мини-разъем стерео-3,5 мм

External component

Внешнее устройство

*8 Line Input Adapter KS-U57 (not supplied for this unit)

*8 Коммуникационный адаптер KS-U57 (не входит в комплект поставки)

*9 AUX Input Adapter KS-U58 (not supplied for this unit)

*9 Адаптер для подключения дополнительных устройств KS-U58 (не входит в комплект поставки)

4

Page 230
Image 230
JVC KD-AR370, KD-G320 manual JVC DAB tuner JVC CD changer, JVC Amplifier JVC-усилитель

KD-AR370, KD-G320 specifications

The JVC KD-G320 and KD-AR370 are two versatile car audio systems designed to enhance your listening experience on the road. Both models offer unique features that cater to different preferences, making them suitable for a wide range of users.

The JVC KD-G320 boasts a sleek design that fits seamlessly into any vehicle's dashboard. One of its standout features is its 3-line LCD display, which provides clear visibility of track information, making it easy for users to see song titles and artists while driving. The unit supports multiple audio formats, including MP3, WMA, and AAC, allowing users to enjoy their favorite digital music with great quality. Its CD player is compatible with CD-R and CD-RW, providing flexibility for different media types.

Additionally, the KD-G320 is equipped with a powerful built-in amplifier, delivering 50 watts of dynamic power per channel. This ensures rich, clear sound, enhancing the overall audio experience. The model also includes an equalizer with preset curves and a customizable 3-band EQ, allowing users to tailor the sound to their tastes and preferences.

Another highlight is its compatibility with various external devices. The KD-G320 features a USB port for direct connection to USB flash drives, enabling users to play their music directly from a portable storage device. Furthermore, it includes an auxiliary input for connecting smartphones or other external audio sources, making it easy to enjoy a wide range of music.

On the other hand, the JVC KD-AR370 shares many features with the KD-G320 but introduces additional capabilities. It comes with a detachable faceplate, making it a more secure choice for those concerned about theft. The KD-AR370 also supports Bluetooth technology, allowing for hands-free calling and seamless wireless music streaming from smartphones or Bluetooth-enabled devices, enhancing convenience and safety while driving.

Both models feature preamp outputs for easy connection to external amplifiers and subwoofers, providing users with the option to expand their audio system for even greater sound quality. Furthermore, the built-in presets for radio stations make tuning into favorite local stations quick and easy.

In summary, both the JVC KD-G320 and KD-AR370 offer impressive features designed to enhance your in-car audio experience. With their compatibility with various media formats, sound customization options, and auxiliary connectivity, these units cater to the audiophile's needs while providing modern technological conveniences for everyday users.