5o5-8oo-o2o
Sears, Roebuck and Co., Hoffman Estates, IL 60179 U.S.A
MMPORTANT Safety Instructions
Conserve Estas Jnstrucciones
Consignes IMPORTANTE$ DE SI CURIT¢
Sears, Roebuck and Co., Hoffman Estates, IL
Kenmore Sewing Machine Warranty
Disclaimer of implied warranties limitation of remedies
Sears Canada Inc., Toronto, Ontario, Canada M5B 2B8
Garantia de la mdquina de coser Kenmore
Servicio de garanta
Garantie pour machine coudre Kenmore
Caractristiques de la machine
Specification
Especificaciones de la mquina
Especificaci6n
About Sears Canada Maintenance Agreements Call
Maintenance Agreements
Expertservicebyour12,000professionalrepair
U.S.A Master Protection Agreements
Le contrat dentretien de Sears
En Estados Unidos Contratos de Protecci6n Experta
Contrats dentretien de Sears
Table of Contents
SECClON
Puntadas
Table DES MATI#RES
Cabinets and Sewing Machine Tote Bag Rsos #
Names of Parts
Nombre de las partes
Gabinete y bolsa de mano Rsos #97606
Des meubles et sac de transport Rsos #97606
Porte-bobine
Available Accessories Attachments
15 16 1718 32*3334
Accessoires et pibces disponibles
Accesorios y refacciones d sponibles
For Your Safety
Connecting Machine to Power Supply
Before Using Your Sewing Machine
Polarized plug
Prise polarise
Conexi6n de la mquina a la red elctrica
Para su seguridad
Control de la velocidad de costura
Thread cutter
Pressure Adjusting Lever Pressure adjusting lever
Thread Cutter
Extension Table
Palanca de elevacien del prensatelas
Ajuste de la presien del prensatelas
Levier de reglage de la pression
Relive-pied presseur
Changing Presser Foot
Changing Needle
To Remove and Attach the Foot Holder
Snap-on button red button Groove Pin
TorniHodel enmangue
Changer raiguille
C6mo quitar/poner el enmangue del prensatelas
C6mo quitadponer el prensatelas
Stitches Straight Stretch Rick-rack Overcast Stitching
Presser Foot Types Zigzag foot Foot a
Two-point box stitch Decorative Stitch Patterns Twin
Straight stitch foot Foot H
Diffdrents pieds presseurs Pied zig-zag Pied a
Tipos de prensatelas Prensatelas para zig-zag Prensatelas a
Utilice este prensatelas para puntada recta y puntada de
OSatin stitch foot Foot F
Presser Foot
Types
Monograming Applique Shell
Prensatelas para coser a punto por encima Prensatelas C
Tipos de prensatelas continuaci6n
Diffrents pieds presseurs suite = Pied point lanc Pied F
Matelasser
Universal
Selecting Needle and Fabric
Very Light Medium
Ball Point Orange Blue BallPoint Wedge Point Leather Red
Selecci6n de hilo y tela
Roja
1175 1490
Tissu
1175
1280 1175 1490
Type daiguille
Blankpage pginablanca pageblanche
Bobbin Winding OHorizontal spool pin
Portacarretes
Bobinado de la canilla Remplissage
Portacarretes horizontal
Tapa-carretes grande
\@@
Bobinado de la canilla
Nota
Removing the hook cover plate
Anura aanura @Esquemadeenhebrado
PortacanillasTiredelhilohacialaizquierdapasndoloentre
Threading the Machine Threading the machine
Enfilage de la machine = Enfilage de la machine
Enhebrado del hilo de la aguja
= Ensartador de agujas O Tirador
Enfile-aiguille intgr
Tension is too tight
Adjust the Needle Thread Tension for a Straight
Correct tension
Comment remonter le fil de la canette
Rdglage de la tension du fil de Iaiguille pour le
Point droit
El bile est demasiado tense
OTension is too loose
Adjust Needle Thread Tension for a Zigzag Stitch
Is too tight
Tension correcte Endroit du tissu
El hilo est demasiado flojo
Tensi6n correcta
To select stitches
Stitch Length Zones
Seleccionador de puntadas como seleccionar Puntadas
Points
Stitch Width Control How to adjust the stitch width
Stitch Length Control How to adjust the stitch length
Control de la anchure de puntada
C6mo ajustar la anchure de las puntadas
Comment rgler la largeur du point
Rglage de la largeur du point
Adjusting Stretch Stitch Balance
La mquina coser hacia atrs hasta que suelte el bot6n
Control de puntada invertida
Bouton de marche arrire
Equilibrio de los patrones distorsionados
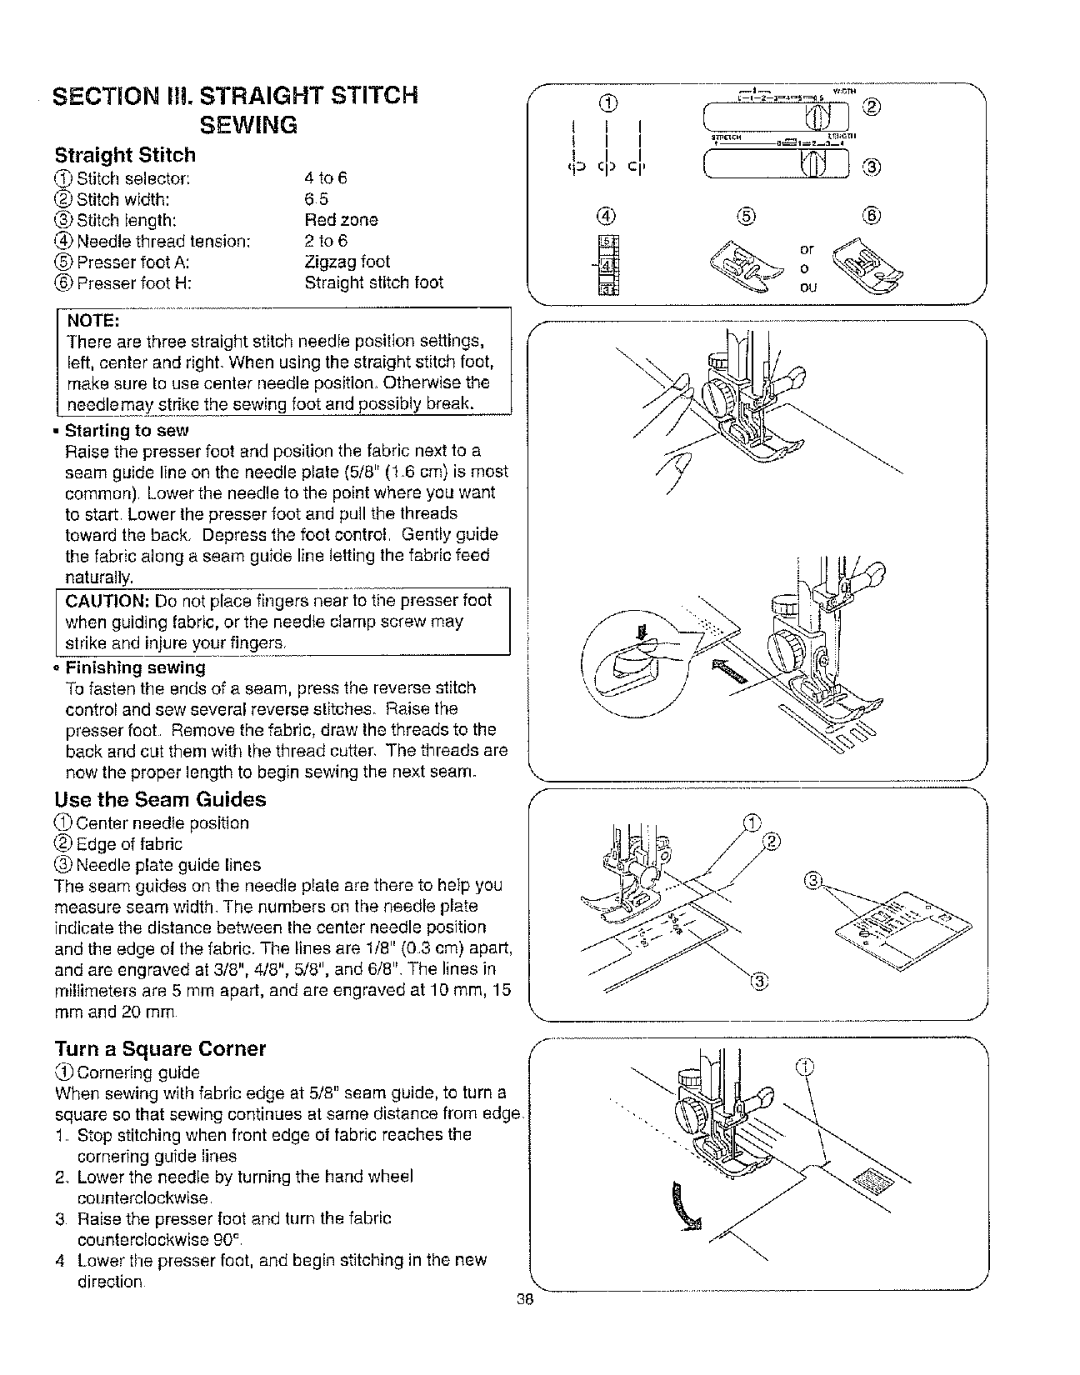
Section Ill. Straight Stitch Sewing
Straight
Uso de las gufas de costura
Puntada recta
Para empezar a coser
Ddbut dune couture
Topstitching
Quilting
SurpiqCire
Matelassage
22cm
= To snap on the zipper foot Groove
Cm\
Glissire
Zipper Sewing
Page
Stitch Selector Width Length Any Needle thread tension
Darning
To Drop or Raise the Feed Dogs
Piece of fabric under the hole to reinforce it
Comment monter et descendre les griffes
Dentrainement
C6mo subidbajar los dientes del transporte
Reprisage
Section IV. Zigzag Stitch Sewing
Basic Zigzag
Puntada
Puntada de zig-zag
Tensiondu fil de Iaiguille Pied presseur a
Point lanc6
Monogramming
Applique
Aplicaciones
Monogramas
Monogrammes
Appliques
Presser foot
Bar Tacking
Embroidery
De la puntada
Brides Renfort
Bordado
Button
Sewing
Overcasting
Surfilage
Puntada de sobrehilado
Remate
Costura De botones
Blind Hem Stitch
To sew
Ourlet invisible
SECCiON V. Puntadas Utiles Y
Dobladillo invisible
La couture
Multiple Zigzag Stitch
Lace Work
Point zig-zag multiple
Trabajos
Puntada de mlJltiple zig-zag
Shell Stitch
Point de crneau
Puntada En forma de concha Point coquille
Caja
Decorative Stitch Patterns
Fagoting
Two-point Box Stitch
Stitch
Ajoure
Caja de dos puntos
Twin Needle Stitches Option
Zigzag foot
Puntadas de doble aguja Opci6n Aiguilles jumeles Option
Straight Stretch
Iit
Zig-zag
Puntada recta triple
Extensi6n de Rick-rack
Croquet
Overcast
Stretch Stitching
Smocking
Puntada de pluma
Puntada eldstica de remate
Sobrehilado
3to6
Serging
Patching
Elastic Stretch Stitch
Puntada Eldstica de extensi6n
Puntada De dobladiilo
Surjet
Remiendos elsticos
11 to
Decorative Stretch Patterns
Stitch Selector
DiseSos decorativos elsticos
Motifs dcoratifs Extensibles
Automatic Buttonhole
Preparation
Automatique
Seccion VII.OJAt.ES
Ojal automdtico
L2J
Luegobajeelprensatelasparaojalesautom&ticos
Auto BH +
Page
Corded Buttonhole
Costura de ojales con cord6n
Boutonnieres passepoil6es
Option
Manual Buttonhole
Boutonni6re manuelle Option
Ojal manual
Opci6n
= Para coser
@ @
Automatic Buttonhole Option
Boutonni6re automatique Option
Styles et dimensions des boutonnieres
Ojal automtico Opci6n
Estilo y tama£o del
Automatic Buttonhole To sew
Continuaci6n
Ojal
Automdtico
Boutonni6re automatique
Automatic Buttonhole
Ojal automdtico continuaci6n
Automatic Buttonhole
Ojal autormdtico continuaci6n
Boutonniere automatique suite
Cleaning the Bobbin Holder
Replacing Light Bulb
Partie Viii. Entretien DE Votre Machine
Remplacement de Iampoule
Seccion Viii. Mantenimiento DEL LA
Limpiando el portacanillas
Foot Needte Open the face cover to
Cleaning Shuttle Race Feed Dogs
Unplug Machine Remove
Oiling the Machine
Nettoyage de la coursire et des griffes dentrainement
Limpieza del garfio y los dientes del transporte
Engrasando la mquina
Lubrification de la machine
Needle thread
Troubleshooting
Condition
Breaks
Se rompe el hilo de la aguja
Bruyanto
En cas de problme Problbme
Le fonctionnement est
Car anytime, day or night US.A. and Canada
Call anytime, day or night U.SA only