Manuals
/
Kyocera
/
Computer Equipment
/
Printer
Kyocera
FS-600
manual
Interior View
Models:
FS-600
1
32
144
144
Download
144 pages
27.62 Kb
29
30
31
32
33
34
35
36
Troubleshooting
Specifications
Install
Error codes
Interface Signals
Paper Empty PError Pin
Indicators
Maintenance
Print Quality Problems
Setup and Connections
Page 32
Image 32
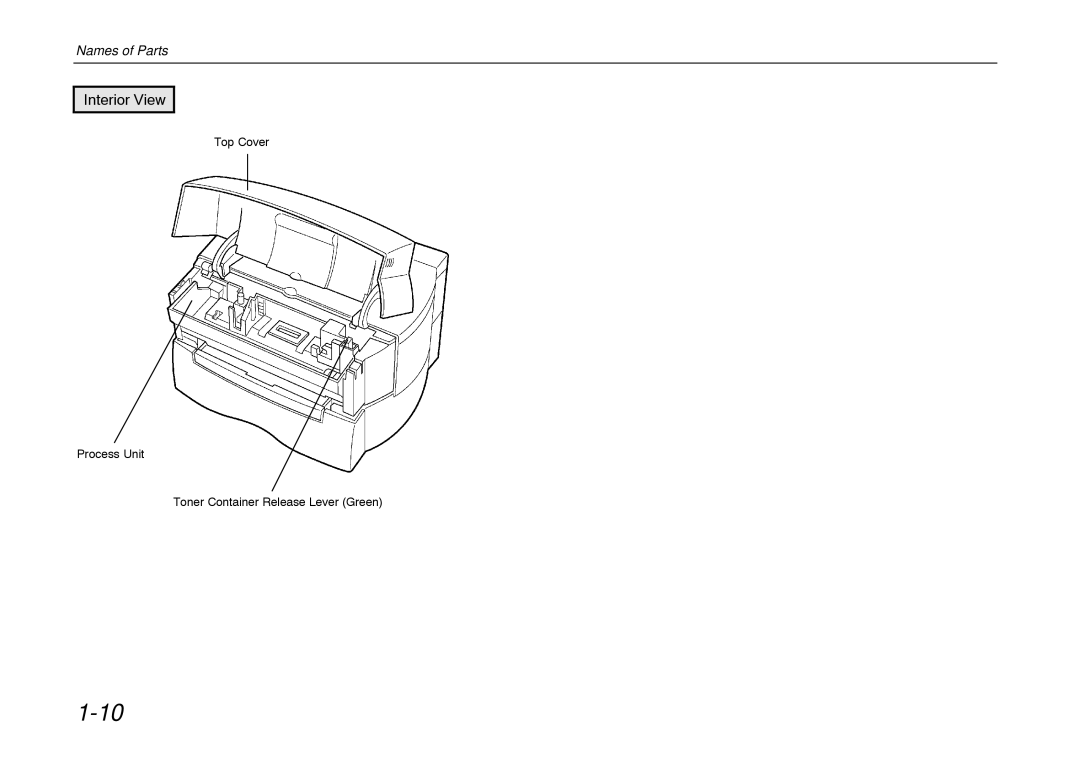
Names of Parts
Interior View
Top Cover
Process Unit
Toner Container Release Lever (Green)
1-10
Page 31
Page 33
Page 32
Image 32
Page 31
Page 33
Contents
Italiano
Regarding Tradenames
Introduction
Iii
Typeface Trademark Acknowledgement
FCC statement
Conforming to the Class B limits
Interface connectors
Safety information
Viii
Ozone concentration
Cdrh regulations
Important Safeguards
Canadian Department of Communications compliance statement
ISO
CE Marking Directive
According to Council Directive 89/336/EEC and 73/23/EEC
Xiii
Declaration of Conformity Australia
Xiv
Disclaimer
Prolonged Non-Use and Moving the Printer
Prolonged Non-use
Moving the Printer
Xvi
Introduction
Superb print quality
Long life modules
Environmentally benign waste parts
Wide variety of internal symbol sets
New printer control language, Prescribe IIe
Automatic rotation of fonts and graphics
Simple Network Management Protocol Snmp compliance
Options
Contents
Xxi
Chapter Installing Printer
Environmental Requirements of the Page Printer
Places to Avoid
Basic requirements
∙ Near the computer
∙ Level and well supported
Voltage
Frequency
Current capacity
Power Supply
Grounding
Surrounding space
Basic handling precautions
Unpacking and Inspection
List of packaged contents
Moving the Printer
Names of Parts
Interior View
Setup and Connections
Install the printer on the paper feeder. Option
Remove the process unit protective cover
Shake four or five times
Install the toner container
Close the top cover
Add paper
Load Limit
Close the cassette cover
Open the face-up output tray when the tray is being used
Open the paper stopper on the face-down tray
Connect the printer to the computer
Parallel Interface Connection
Be sure to connect the ground wire of the printer to ground
Attach the power cord
Be sure the printers power switch is turned off
Test the printer
Control Panel
Test the interface with the computer
Echo !R! Stat Exit PRN
Install the printer driver
Installing the Page Printer
Setup and Connections
Installing Under Windows3.1
Setup and Connections
Installing the Page Printer
Expanding Memory
Precautions on the Handling of Extended Simm
Description given below is intended for service personnel
Installing Simm
Screws
Pull the main circuit board all the way out of the printer
Catch Socket
Expanding Memory
Testing Extended Memory
Chapter Operating Printer
Control Panel
Indicators
Indicators on the Control Panel
Control Keys
Functions of the control keys are given in the table below
KIR 2 Level
KIR Level
Ecoprint mode
Manual Paper Feeding
Sub-Tray
Feeding Envelopes
Overhead Projection OHP Film
Auto Manual Feeding
Returning the Manual Feed Tray
Fonts
Fonts
List of Fonts
Bitmap Fonts
Scalable Fonts
Option Fonts
Resident Scalable Fonts
Resident Scalable Fonts
Kpdl Fonts
Kpdl Fonts
Chapter Maintenance
Toner Kit to be Used
Toner Container Replacement
Toner Container Replacement Interval
Maintenance
Replenishing Toner
Cap
Carefully remove the protective seal
Toner Container Grooves
Toner Container Replacement
Cleaning
Printer Interior
Cleaning
Maintenance
Chapter Troubleshooting
General Guide
Press the on LINE/STATUS key
See Appendix C
Print Quality Problems
On next
Chapter
Commands. If the problem occurs only with a specific file or
Indicators
Maintenance Indications
Open the printer and correct the paper jam. See
Indicators
Error Indications
Correcting a Paper Jam
Jam at the Face-down and Face-up Trays
Paper Cassette Paper Feeder Option Paper Feeder’s Cassette
Jam Inside the Printer
Troubleshooting
Appendix a Printer Specifications
Printer Specifications
Page
Appendix B Paper Selection
General Guidelines
Usable Paper
Paper Specifications
Paper Specifications
Composition
Selecting the Right Paper
Condition of the Paper
Paper Size
Smoothness
Thickness
Basis Weight
Moisture Content
Paper Grain
Other Paper Properties
Stiffness
Curl
Electrostatic properties
Quality control
Packaging
Specially treated paper
Special Paper
Preprinted Paper Overhead Projection OHP Film
OHP Film Specifications
Colored Paper
Labels
Postcards
Envelopes
Appendix C Host Computer Interface
Parallel Interface
Interface Signals
Table C . Parallel Connector Pin Assignments
Page
Paper Empty PError Pin
Error* nFault Pin
On-Line Select Pin
Auto-Feed nAutoFd Pin
Select In NSelectIn Pin
Power Ready Pin
Auxiliary output 1 Pin
Interface Signals
Table C . RS-232C Signal Pin Assignments
Serial RS-232C/RS-422A Interface Option
RS-232C interface
SG Signal Ground Pin
TXD Transmit Data Pin
RXD Receive Data Pin
RTS Request To Send Pin
Table C.3. RS-422A Signal Pin Assignments
RS-422A interface
Overview of Signals RS-422A
Serial Connector
RDB Receive Data Pin RDA Receive Data Inverted Pin
SDB Send Data Pin SDA Send Data Inverted Pin
RS-232C/RS-422A Protocol
H1 Baud rate
H2 Data bits
H3 Stop bits
H4 Parity
H5 Protocol logic
H6 Buffer nearly-full threshold
H7 Buffer nearly-empty threshold
Prescribe Frpo D0 command
H8 Received-data buffer size
RS-232C Cable Connection
Preparing an RS-232C Cable
Connecting the Printer to the Computer
Cmode LPT1=COM1
Appendix D Indicators
Waiting
Off line
Ready On line
Receiving data
Processing data
Adding paper
Selecting paper size
Sleeping
Paper jam
Memory overflow
Top cover open
Toner status
Call-service person errors
˜˜˜˜˜˜˜˜˜ Lit ˜˜˜˜˜˜˜˜˜ ˜ Off
Controller system error F3 error
Index
MRU
Top
Page
Image
Contents