MODEL 1100 SERIES OVENS |
|
|
|
|
|
|
|
|
|
|
|
| |||||||
|
|
|
|
|
|
| 1 | 2 | 3 | 4 | 5 | 6 | 7 | 8 | 9 | 10 |
|
|
|
|
|
|
|
|
| Type 1 | Off | *Off | On | On | ** Off | Off |
|
|
|
|
|
|
|
|
|
|
|
|
| Type II | Off | * | ** | On | Off | On |
|
|
|
|
|
|
|
|
|
|
|
|
| Type III (Baldor) | Off | * | ** | Off | On | On | On | Off | On | On |
| ||
|
|
|
|
|
| Type III (Stepper) | Off | * | ** | On | On | Off | Off | On | Off | On |
| ||
|
|
|
|
|
| Type IV (Baldor) | Off | Off | ** | Off | On | On | On | Off | On | On |
|
| |
|
|
|
|
|
| Type IV (Stepper) | Off | Off | ** | On | On | Off | Off | On | Off | On |
| ||
Stepper Motor - Conveyor Speed 23 Seconds to 30 Minutes |
|
|
|
|
|
|
|
| |||||||||||
|
|
|
|
|
|
|
|
|
|
|
|
|
|
|
|
|
| ||
|
|
|
|
|
| Type III | Off | * Off | ** Off | On | On | Off | On | Off | On | On |
| ||
|
|
|
|
|
| Type IV | Off | Off | ** Off | On | On | Off | On | Off | On | On | |||
|
|
|
|
|
|
|
|
|
|
|
|
|
|
|
|
|
|
|
|
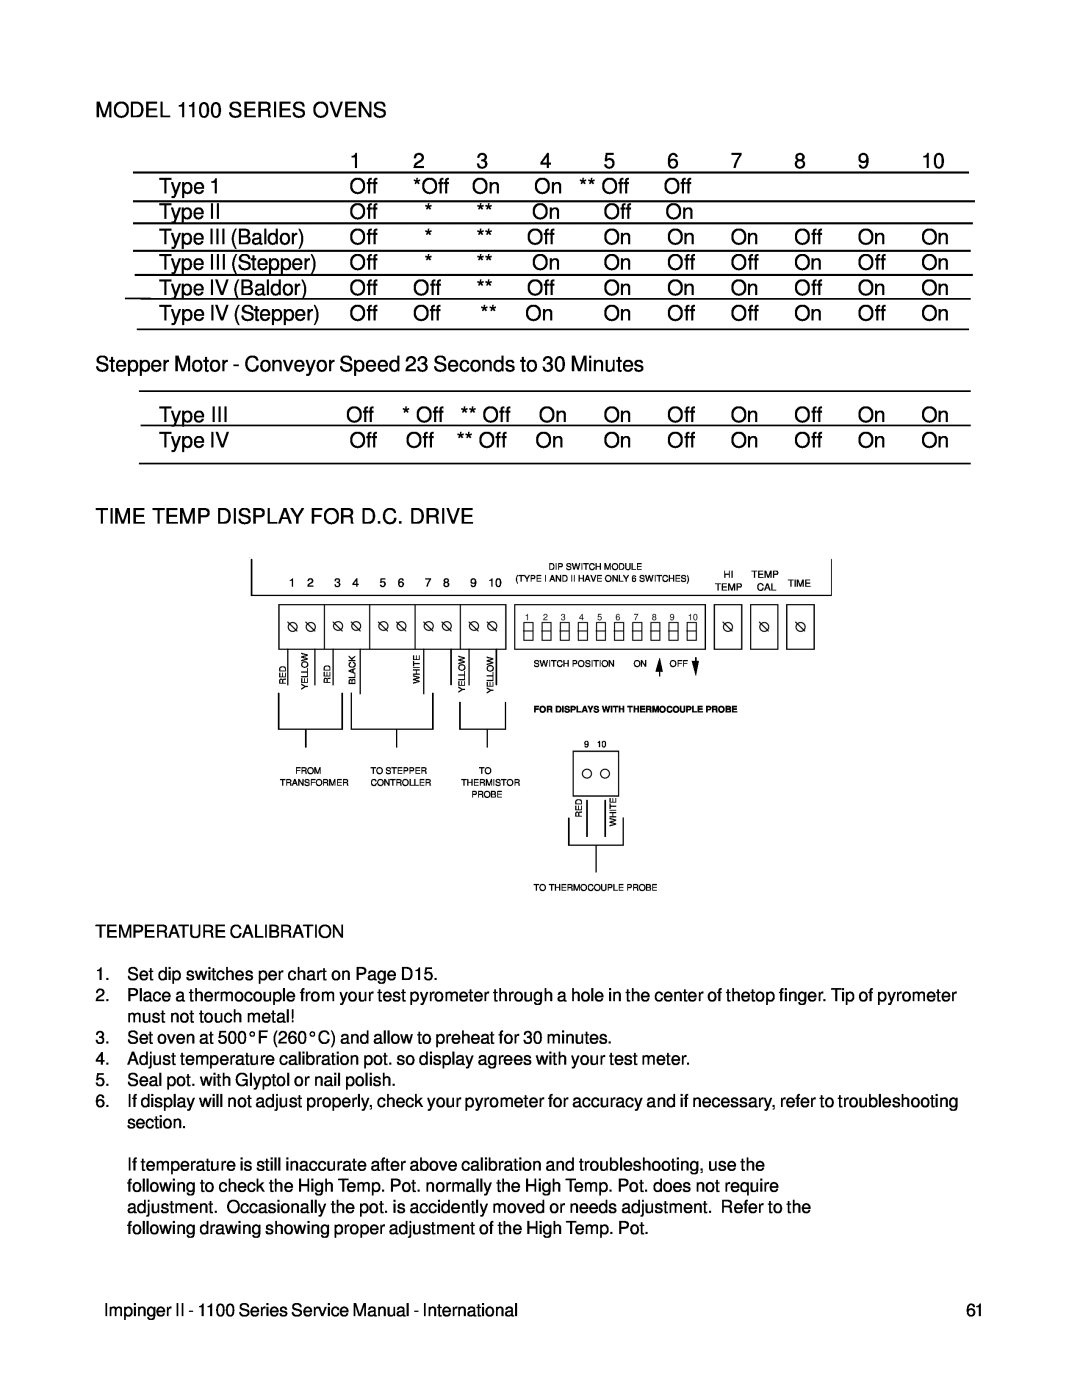
TIME TEMP DISPLAY FOR D.C. DRIVE
|
|
|
|
|
|
|
|
|
|
|
|
|
|
|
| DIP SWITCH MODULE |
|
|
|
|
|
|
|
| HI | TEMP |
|
| ||||||||||||
| 1 | 2 | 3 | 4 | 5 | 6 | 7 | 8 | 9 | 10 |
| (TYPE I AND II HAVE ONLY 6 SWITCHES) |
| TIME |
| |||||||||||||||||||||||||
|
|
| TEMP | CAL |
| |||||||||||||||||||||||||||||||||||
|
|
|
|
|
|
|
|
|
|
|
|
|
|
|
|
|
|
|
|
|
|
|
|
|
| |||||||||||||||
|
|
|
|
|
|
|
|
|
|
|
|
|
|
|
|
|
|
|
|
|
|
|
|
|
|
|
|
|
|
|
|
|
|
|
|
| ||||
|
|
|
|
|
|
|
|
|
|
|
|
|
|
|
|
|
|
|
|
|
|
|
|
|
|
|
|
|
|
|
|
|
|
|
|
|
|
|
|
|
|
|
|
|
|
|
|
|
|
|
|
| 1 | 2 | 3 | 4 | 5 | 6 | 7 | 8 | 9 | 10 |
|
|
|
|
|
|
| ||||||||||||
|
|
|
|
|
|
|
|
|
|
|
|
|
|
|
|
|
|
|
|
|
|
|
|
|
|
|
|
|
|
|
|
|
|
|
|
|
|
|
|
|
|
|
|
|
|
|
|
|
|
|
|
|
|
|
|
|
|
|
|
|
|
|
|
|
|
|
|
|
|
|
|
|
|
|
|
|
|
|
|
|
|
|
|
|
|
|
|
|
|
|
|
|
|
|
|
|
|
|
|
|
|
|
|
|
|
|
|
|
|
|
|
|
|
|
|
|
|
|
|
|
|
|
RED | YELLOW | RED | BLACK | WHITE |
FROM | TO STEPPER |
TRANSFORMER | CONTROLLER |
TEMPERATURE CALIBRATION
YELLOW | YELLOW | ||
|
|
|
|
|
|
|
|
|
|
|
|
TO THERMISTOR
PROBE
SWITCH POSITION ON | OFF |
FOR DISPLAYS WITH THERMOCOUPLE PROBE
9 | 10 |
RED | WHITE |
TO THERMOCOUPLE PROBE
1.Set dip switches per chart on Page D15.
2.Place a thermocouple from your test pyrometer through a hole in the center of thetop finger. Tip of pyrometer must not touch metal!
3.Set oven at 500°F (260°C) and allow to preheat for 30 minutes.
4.Adjust temperature calibration pot. so display agrees with your test meter.
5.Seal pot. with Glyptol or nail polish.
6.If display will not adjust properly, check your pyrometer for accuracy and if necessary, refer to troubleshooting section.
If temperature is still inaccurate after above calibration and troubleshooting, use the following to check the High Temp. Pot. normally the High Temp. Pot. does not require adjustment. Occasionally the pot. is accidently moved or needs adjustment. Refer to the following drawing showing proper adjustment of the High Temp. Pot.
Impinger II - 1100 Series Service Manual - International | 61 |