3 Troubleshooting

￿ WARNING

Label all wires prior to disconnection


when servicing

controls. Wiring


errors can cause improper and


dangerous operation.

Always


disconnect power to the boiler


before servicing. Failure to comply


could result in severe personal


injury, death,

or

substantial

property damage.

￿WARNING Never jumper (bypass) any device except for momentary testing as

outlined in the Troubleshooting chart. Severe personal injury, death, or substantial property damage can result.

Before troubleshooting:

1.Have the following items:

a.Voltmeter that can check 120 vac, 24 vac, and 12 vdc.

b.Continuity checker.

c.Contact thermometer.

2.Check for 120 vac (minimum 102 vac to maximum 132 vac) to boiler.

3.Make sure thermostat is calling for heat and contacts are closed. Check for 24 vac between thermostat wire nuts and ground.

4.Make sure all external limit controls are installed and operating.

Check the following:

1.Wire connectors to control module are securely plugged in at the module and originating control.

2.Gas pressures:

Maximum: 14 inches w.c. (3.5 kPa) (natural and LP) with no flow (lockup) or with boiler on

Minimum: 4 inches w.c. (1.0 kPa) (natural and LP), with gas flowing (verify during boiler startup)

Service Manual

Check control module fuses

NOTICE

ALWAYS check control module fuses before

replacing control module or any major


components (blower, etc.). If one of these fuses


is blown, it can prevent the control module or


other components from operating.

1.Turn OFF the power to the boiler at the external line switch.

2.Remove the upper and lower doors.

3.Remove the four (4) screws securing the control panel cover to the unit to gain access to the control module.

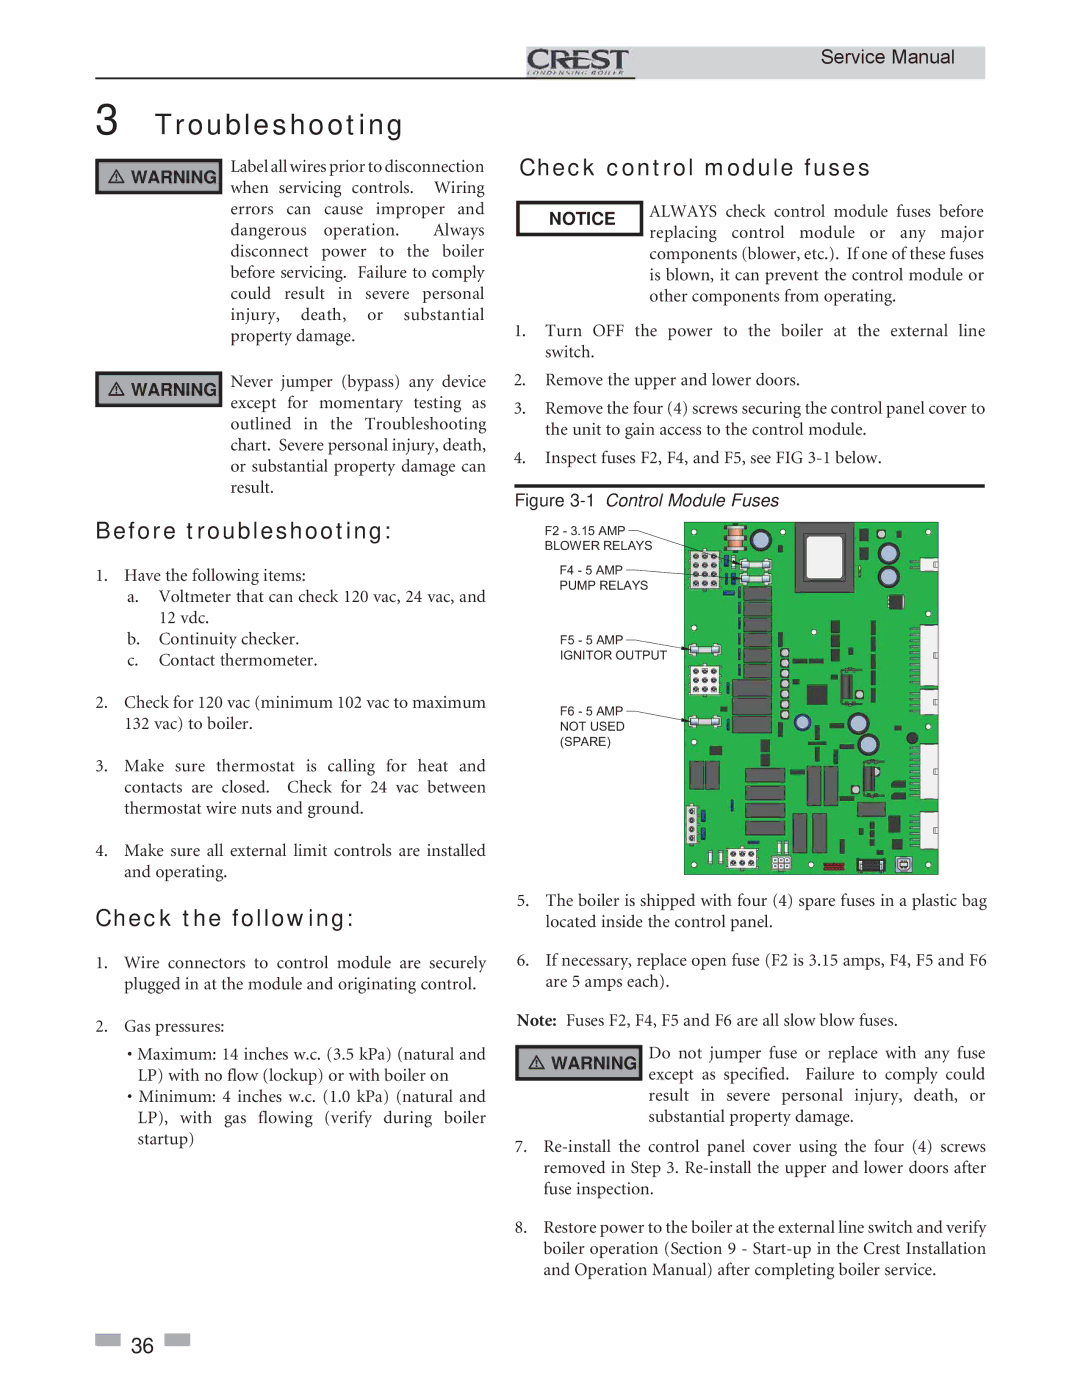
4.Inspect fuses F2, F4, and F5, see FIG 3-1 below.

Figure 3-1Control Module Fuses

F2 - 3.15 AMP

BLOWER RELAYS

F4 - 5 AMP

PUMP RELAYS

F5 - 5 AMP

IGNITOR OUTPUT

F6 - 5 AMP

NOT USED

(SPARE)

5.The boiler is shipped with four (4) spare fuses in a plastic bag located inside the control panel.

6.If necessary, replace open fuse (F2 is 3.15 amps, F4, F5 and F6 are 5 amps each).

Note: Fuses F2, F4, F5 and F6 are all slow blow fuses.

￿WARNING Do not jumper fuse or replace with any fuse except as specified. Failure to comply could

result in severe personal injury, death, or substantial property damage.

7.Re-install the control panel cover using the four (4) screws removed in Step 3. Re-install the upper and lower doors after fuse inspection.

8.Restore power to the boiler at the external line switch and verify boiler operation (Section 9 - Start-up in the Crest Installation and Operation Manual) after completing boiler service.

36

Page 36
Image 36
Lochinvar 3.5, 1.5, 2.5 Troubleshooting, Before troubleshooting, Check the following, Check control module fuses

3, 2, 3.5, 2.5, 1.5 specifications

Lochinvar is a leader in manufacturing high-efficiency water heating solutions, and their Lochinvar 1.5, 1.3, and 1.0 models exemplify the company's commitment to innovation and performance. These advanced heating systems are designed to meet the diverse needs of commercial and residential applications, providing reliable hot water while ensuring energy efficiency and environmental sustainability.

The Lochinvar 1.5, 1.3, and 1.0 models incorporate cutting-edge technologies that set them apart from traditional water heaters. One of the most notable features is their use of high-efficiency condensing technology, which extracts maximum heat from the combustion process. This process allows the units to achieve high thermal efficiencies, often exceeding 95%, which not only reduces energy costs but also lowers greenhouse gas emissions.

In terms of design, Lochinvar's models are constructed with durable materials, ensuring longevity and reliability in demanding environments. The stainless steel heat exchanger is a key element that contributes to the durability and performance of the units. This material is resistant to corrosion and scale build-up, enhancing the lifespan of the heater and reducing maintenance requirements.

The Lochinvar 1.5, 1.3, and 1.0 models feature advanced control systems that provide precise temperature management and easy operation. The intuitive digital display allows users to monitor performance metrics, temperature settings, and energy consumption with ease. Additionally, these units are equipped with intelligent modulating gas valves that optimize fuel usage based on demand, ensuring efficient operation across various load conditions.

Safety is a priority in the design of Lochinvar's water heaters. The models come with built-in safety features, including flame failure detection, overheat protection, and venting safeguards. These systems work together to ensure the safe operation of the units, giving users peace of mind.

Another characteristic that makes the Lochinvar 1.5, 1.3, and 1.0 models popular among users is their compact design. These units are engineered to fit in tight spaces, making them ideal for installations where space is at a premium. Despite their small footprint, they deliver powerful performance, ensuring that users have access to the hot water they need.

In summary, Lochinvar's 1.5, 1.3, and 1.0 water heating models represent the pinnacle of efficiency, safety, and reliability. With their advanced technologies, durable construction, and user-friendly features, these units are an excellent choice for anyone seeking a high-performance water heating solution.